<?xml version="1.0" encoding="utf-8"?>
<feed xmlns="http://www.w3.org/2005/Atom">
  <title>惶心博客</title>
  
  <subtitle>&quot;像是说出再见前 犹豫了一瞬 忽然哽咽停顿&quot;</subtitle>
  <link href="https://huangxin.dev/atom.xml" rel="self"/>
  
  <link href="https://huangxin.dev/"/>
  <updated>2026-01-03T23:26:02.000Z</updated>
  <id>https://huangxin.dev/</id>
  
  <author>
    <name>惶心</name>
    
  </author>
  
  <generator uri="https://hexo.io/">Hexo</generator>
  
  <entry>
    <title>2025 年终总结 —— 最后一个「第一次」</title>
    <link href="https://huangxin.dev/past-stories/2025-end-of-year-commemorative-essay.html"/>
    <id>https://huangxin.dev/past-stories/2025-end-of-year-commemorative-essay.html</id>
    <published>2026-01-01T05:00:01.000Z</published>
    <updated>2026-01-03T23:26:02.000Z</updated>
    
    <content type="html"><![CDATA[<blockquote><p>过去会被缅怀，但也许我们都不希望真正地回到过去。而未来，永远是新的历史，永远是生命在延续的证明，永远是新的希望的来源。</p></blockquote><span id="more"></span><blockquote><p>这是博主在 2026 新年发布于朋友圈的个人向 2025 年终总结。有删改。</p></blockquote><p><img src="https://edge.huangxin.org/images/2026/01/3028205681.jpg"></p><h2 id="一"><a href="#一" class="headerlink" title="一"></a>一</h2><p>2025 年，我年度歌单的第一首，是《无名的人》。</p><blockquote><p><em>“我不过 / 想亲手触摸 / 弯过腰的每一刻 / 留下的 湿透的脚印 / 是否还值得 ”</em></p></blockquote><p>在人间漫步二十余载，2025 会是自十四岁远赴异国求学以来，变化最大的一年。在一年的光阴里，我在圣诞假期里赶作业，拿到了第一篇满分论文。在三月最后一个学期结束后，扔掉了睡了几年的床铺，拖着沉重的行李横跨漫长的航线回到了家。在四月通宵了半个月交完了最后一份作业；在七月以专业第一名的成绩毕业，从记事以来第一次失去 “学生” 的身份。八月九月在南方的盛夏， 150 份秋招投递最终石沉大海。但又好像功夫不负有心人，在十月成功通过社招入职了梦中情司，成为了产业链底层的一颗螺丝钉。</p><p>在人间踱步二十余载，2025 年的年末，是我第一次没有闲暇在零点前写完年终总结，挑完一年里重要的照片的年份。在找到工作后，日常似乎就从焦虑变成了疲惫。我疲于应付不知边界、不懂项目管理的领导，疲于必须在方法论上妥协。疲于每天的通勤，也疲于项目高峰期被迫的加班。我不再想学习新的东西，却一次又一次在危机来临的时刻，用优化过的流程和方法论挽救项目。</p><p>两年前生日那天，我特地参观了一趟隔壁城市的地标，却永远不会想到两年后会每天都会看着它上班。距离确实会产生美；在这个距离，当初那几张特地调的天青色照片早已被压力和困惑所覆没。我甚至开始预视自己被解雇的那一刻，会是解脱，还会是失落？下一份工作又应该怎么办？人生是否会就此开始走下坡路？</p><p>我明白一切的根源，源于我不愿意妥协，源于我希望保持标准，源于我想对人保持应有的尊重、宽容和理解标准，源于我想追求真正的卓越，无论我在做什么事情。</p><p>即便在拥挤的早晚高峰被推搡着随波逐流，即便在公司施舍的网约车上晕车的同时昏昏欲睡，即便每天要转两次地铁只为了能多睡十分钟，我仍希望能保持清醒，保持眼睛炯炯有光。</p><p>我知道，完美主义、焦虑、孤独和更多隐匿在迷雾里的枷锁仍将如影随形。而我也知道，我有无数应对的武器、策略和实践。它们来自于多年的历练间筑起的绵延长城，来自于决心，来自于过去连自己都觉得不可能的成就。</p><p>像我在上一次长大一岁时说的，“我知道所有的答案，但我又一无所知。”</p><h2 id="二"><a href="#二" class="headerlink" title="二"></a>二</h2><p>也许是巧合，抑或许不是，在过去一年，我第一次能给 “长大” 这件事情下一个定义。</p><p>在无数的夜里，我终于明白，当你不再想长大的时候，你就真正成为了大人。</p><p>当我在 23 点后终于回到家，退出工作微信，坐在属于自己的电脑前，看着特地配置的任务栏上时间一秒一秒地过去。</p><p><code>2025/12/31 23:59:59</code></p><p>而后，我的心脏重重地跳动一拍，就像突然失去了什么珍贵的东西。我看着代表日期和时间的那一串数字，在意识生效之前，几乎完全改头换面。</p><p><code>2026/01/01 00:00:00</code></p><p>我知道，过去的一年被彻底留在了过去，留在了历史，留在了前四分之一个世纪，留在了我的前二十三年，留在了异国，留在了超级 CBD，留在了每一个人的世界里。</p><p>消息开始炸响，不同的人们说着同样的话。</p><p><em>“新年快乐。”</em></p><p>我知道今年，不，是去年的年终总结还没有写。</p><p>我曾会用 “第一次” 的数量，来衡量一年的成长。但这是 2025 年我数不清的第一次之后，最后一个 “第一次”，达成于跨年的那一刻。</p><h2 id="三"><a href="#三" class="headerlink" title="三"></a>三</h2><p>成为大人，如同掠过你我眼前耳边却从不停歇的时间，就像中午或温暖或寒冷的风，类似街角不经意的相遇，永远回不到过去。</p><p><strong>过去会被缅怀，但也许我们都不希望真正地回到过去。而未来，永远是新的历史，永远是生命在延续的证明，永远是新的希望的来源。</strong></p><p>电视上的大人物发表了新的讲话，世界似乎仍然在运转，仍在重复。一如往昔，一如从前。</p><p>2025 年，我年度歌单的第二首，是《致明天》。</p><blockquote><p>“但说好了不能再后悔 / 要继续向更远处飞 / 如同最初天真无畏 / 去往你想的明天”</p><p>“会有轻风作伴 / 依旧坚定坦然”</p><p><em>“My precious only one.”</em></p></blockquote>]]></content>
    
    
    <summary type="html">&lt;blockquote&gt;
&lt;p&gt;过去会被缅怀，但也许我们都不希望真正地回到过去。而未来，永远是新的历史，永远是生命在延续的证明，永远是新的希望的来源。&lt;/p&gt;
&lt;/blockquote&gt;</summary>


    <category term="曾经里" scheme="https://huangxin.dev/categories/past-stories/"/>
    
    
  </entry>
  
  <entry>
    <title>绕过限制迁移企业版 Outlook 邮件</title>
    <link href="https://huangxin.dev/partly-technical/migrate-outlook-enterprise.html"/>
    <id>https://huangxin.dev/partly-technical/migrate-outlook-enterprise.html</id>
    <published>2025-09-25T01:00:00.000Z</published>
    <updated>2025-09-25T13:54:54.000Z</updated>
    
    <content type="html"><![CDATA[<blockquote><p>Disclaimer: 本文仅提供步骤。在这么做之前，<strong>请充分考虑法律后果。</strong>如果你的企业邮箱来自工作/包含商业信息，或者签订了保密条款或协议，私自导出的行为<strong>几乎一定</strong>构成侵权，<strong>触犯法律。</strong></p></blockquote><span id="more"></span><p>快毕业了，想着把学校邮箱里的邮件导出一份，主要是留个纪念和方便日后引用。学校的官方政策不鼓励全量导出邮件，仅仅建议转发重要的通信，故此我认为导出一份作为个人使用也无可厚非。学校用的是 Microsoft 365 的商业版本（即从 <code>outlook.office.com</code> 登录的企业版 Outlook）；但是如下图所示，导入/导出功能被禁用了。</p><p><img src="https://edge.huangxin.org/images/2025/09/1242554788.png" alt="image"></p><p>通过一个在 Reddit 上的 <a href="https://www.reddit.com/r/Outlook/comments/suco72/comment/hxd8tun/">workaround</a>，我找到了将所有文件导出成 <code>.pst</code> 的格式方法，这样可以把整个邮箱的邮件（包含对话记录和附件等）归档，方便日后导入其他的服务或客户端。</p><h2 id="导出-pst-文件"><a href="#导出-pst-文件" class="headerlink" title="导出 .pst 文件"></a>导出 .pst 文件</h2><ol><li><p>首先，你需要安装 <a href="https://support.microsoft.com/en-us/office/install-or-reinstall-classic-outlook-on-a-windows-pc-5c94902b-31a5-4274-abb0-b07f4661edf5">Outlook (classic) 客户端</a>（就是 Microsoft Office 全家桶里的 Outlook 选项），并在上面登录你的组织/企业邮箱账号。</p><blockquote><p>以下操作在 Windows 平台上完成，不确定 macOS 的软件版本是否有相关的功能性。软件界面为英文，中文翻译仅供参考。</p></blockquote></li><li><p>点击左上角的 <em>Files</em>（文件），在 <em>Info</em>（信息）界面确保你的企业邮箱被选中，然后点击下方的 <em>Account Setting</em>（账户设置）下拉菜单，选择 <em>Account Name and Sync Settings</em>（账户名和同步设置）<br> <img src="https://edge.huangxin.org/images/2025/09/1632966472.png" alt="image"></p></li><li><p>在弹出的窗口内将邮件下载范围拉到最大（全部）。<br> <img src="https://edge.huangxin.org/images/2025/09/3540216095.png" alt="image"></p></li><li><p>这时候 Outlook 会自动从服务器下载邮件；你也可以手动点击左上角的 “同步” 按钮，或者重启客户端，来达到强制同步的效果。</p></li><li><p>取决于邮箱大小、网络质量和下载速度，同步时间会有浮动。在确保所有邮件都被下载到本地后（可以在邮件列表下拉，看看是否能看到刚加入时的第一封邮件），推进到下一步。</p></li><li><p>在首页点击 <em>New Items</em>（新建项目）下拉菜单，再选择 <em>More Items</em>（更多项目）- <em>Outlook Data File</em>（Outlook 数据文件），在电脑上选择一个你想要的位置，给文件命名，保存。<br> <img src="https://edge.huangxin.org/images/2025/09/1049468558.png" alt="image"></p></li><li><p>在首页搜索框搜索 <em>Rules</em>（规则），然后在搜索结果里的 <em>Action</em>（动作）分类下，选择 <em>Rules</em>（规则）- <em>Manage Rules and Alerts</em>（管理规则和提示）。<br> <img src="https://edge.huangxin.org/images/2025/09/4194476688.png" alt="image"></p></li><li><p>在弹出的窗口里选择 <em>New Rules</em>（新建规则），然后选择下方的 <em>Apply rule on messages I receive</em>（应用于我接受的所有消息），点击下一步。第二页会要求设置条件，不要设置，直接继续下一步。会弹出窗口提醒所有的消息都会被引用规则，忽略，选择 “是”。</p><p> <img src="https://edge.huangxin.org/images/2025/09/1110425038.png" alt="image"></p></li><li><p>在第三页，会提示选择需要应用的 <em>Action</em>（动作），选择第五项 <em>move a copy to the specified folder</em>（将一个副本移动到指定的文件夹）。在下方的对话框内，点击 <em>Specified</em> （指定的）字样，选择你先前创建的 Outlook 数据文件，确认。</p><blockquote><p>注意这里<strong>不要</strong>选择第一项（移动到指定的文件夹），不然会把你目前在用的邮箱<strong>清空</strong>。<br> <img src="https://edge.huangxin.org/images/2025/09/3157858456.png" alt="image"></p></blockquote></li><li><p>下一个页面将会提示设置例外，直接忽略。在最后一个页面，勾选 *Run this rule now on messages already in {收件箱的名字}*（在收件箱内的消息上运行这条规则），点击最下方的完成。此时邮件会被一条一条复制到新建的数据文件。<br> <img src="https://edge.huangxin.org/images/2025/09/614853687.png" alt="image"></p></li><li><p>如果想备份已发送的邮件，可以回到第 7 步，把规则应用的对象改成 <em>Apply rule on messages I <strong>sent</strong></em>（应用于我<strong>发送</strong>的所有消息），然后重复 8 - 9 步。</p></li><li><p>操作完成之后，你可以用你想要的方式存储和迁移数据文件，可以在其他的客户端上用 Outlook 打开，实现预览和归档。</p></li></ol><h2 id="导入其他邮箱"><a href="#导入其他邮箱" class="headerlink" title="导入其他邮箱"></a>导入其他邮箱</h2><p>不同邮箱服务商对 <code>.pst</code> 格式的归档文件支持程度不一；这个时候，我们可以依旧利用 Outlook (classic) 来把归档文件迁移到任何邮箱服务商上。参考以下步骤。</p><ol><li><p>在 Outlook (classic) 内登录你想要迁移到的邮箱（通过鉴权或者 SMTP）。</p></li><li><p>在目标邮箱上右键，选择 <em>New Folder</em>（新建文件夹）。给文件夹命名。</p><blockquote><p>这里要注意，除非你想在收件箱内直接预览别的邮箱内的邮件，否则应该注意邮箱内文件夹的名称，比如不要同时是 <em>Inbox</em> 或者 <em>收件箱</em>。</p></blockquote><p> <img src="https://edge.huangxin.org/images/2025/09/395176872.png" alt="image"></p></li><li><p>把 Outlook 数据文件内的文件夹拖到目标邮箱里对应的文件夹内。</p></li><li><p>点击同步按钮。这个时候 Outlook 就会把旧邮箱的邮件上传到目标邮箱。取决于邮箱服务商和你的网络质量以及旧邮箱大小，有时候这个过程可能需要几小时。</p></li><li><p>现在你可以在新的邮箱上跨客户端地预览你的旧邮件了。</p></li></ol>]]></content>
    
    
    <summary type="html">&lt;blockquote&gt;
&lt;p&gt;Disclaimer: 本文仅提供步骤。在这么做之前，&lt;strong&gt;请充分考虑法律后果。&lt;/strong&gt;如果你的企业邮箱来自工作/包含商业信息，或者签订了保密条款或协议，私自导出的行为&lt;strong&gt;几乎一定&lt;/strong&gt;构成侵权，&lt;strong&gt;触犯法律。&lt;/strong&gt;&lt;/p&gt;
&lt;/blockquote&gt;</summary>


    <category term="技术向" scheme="https://huangxin.dev/categories/partly-technical/"/>
    
    
  </entry>
  
  <entry>
    <title>我的第一台桌面个人电脑</title>
    <link href="https://huangxin.dev/partly-technical/my-first-desktop-pc.html"/>
    <id>https://huangxin.dev/partly-technical/my-first-desktop-pc.html</id>
    <published>2023-10-29T16:39:02.000Z</published>
    <updated>2024-06-29T22:58:38.000Z</updated>
    
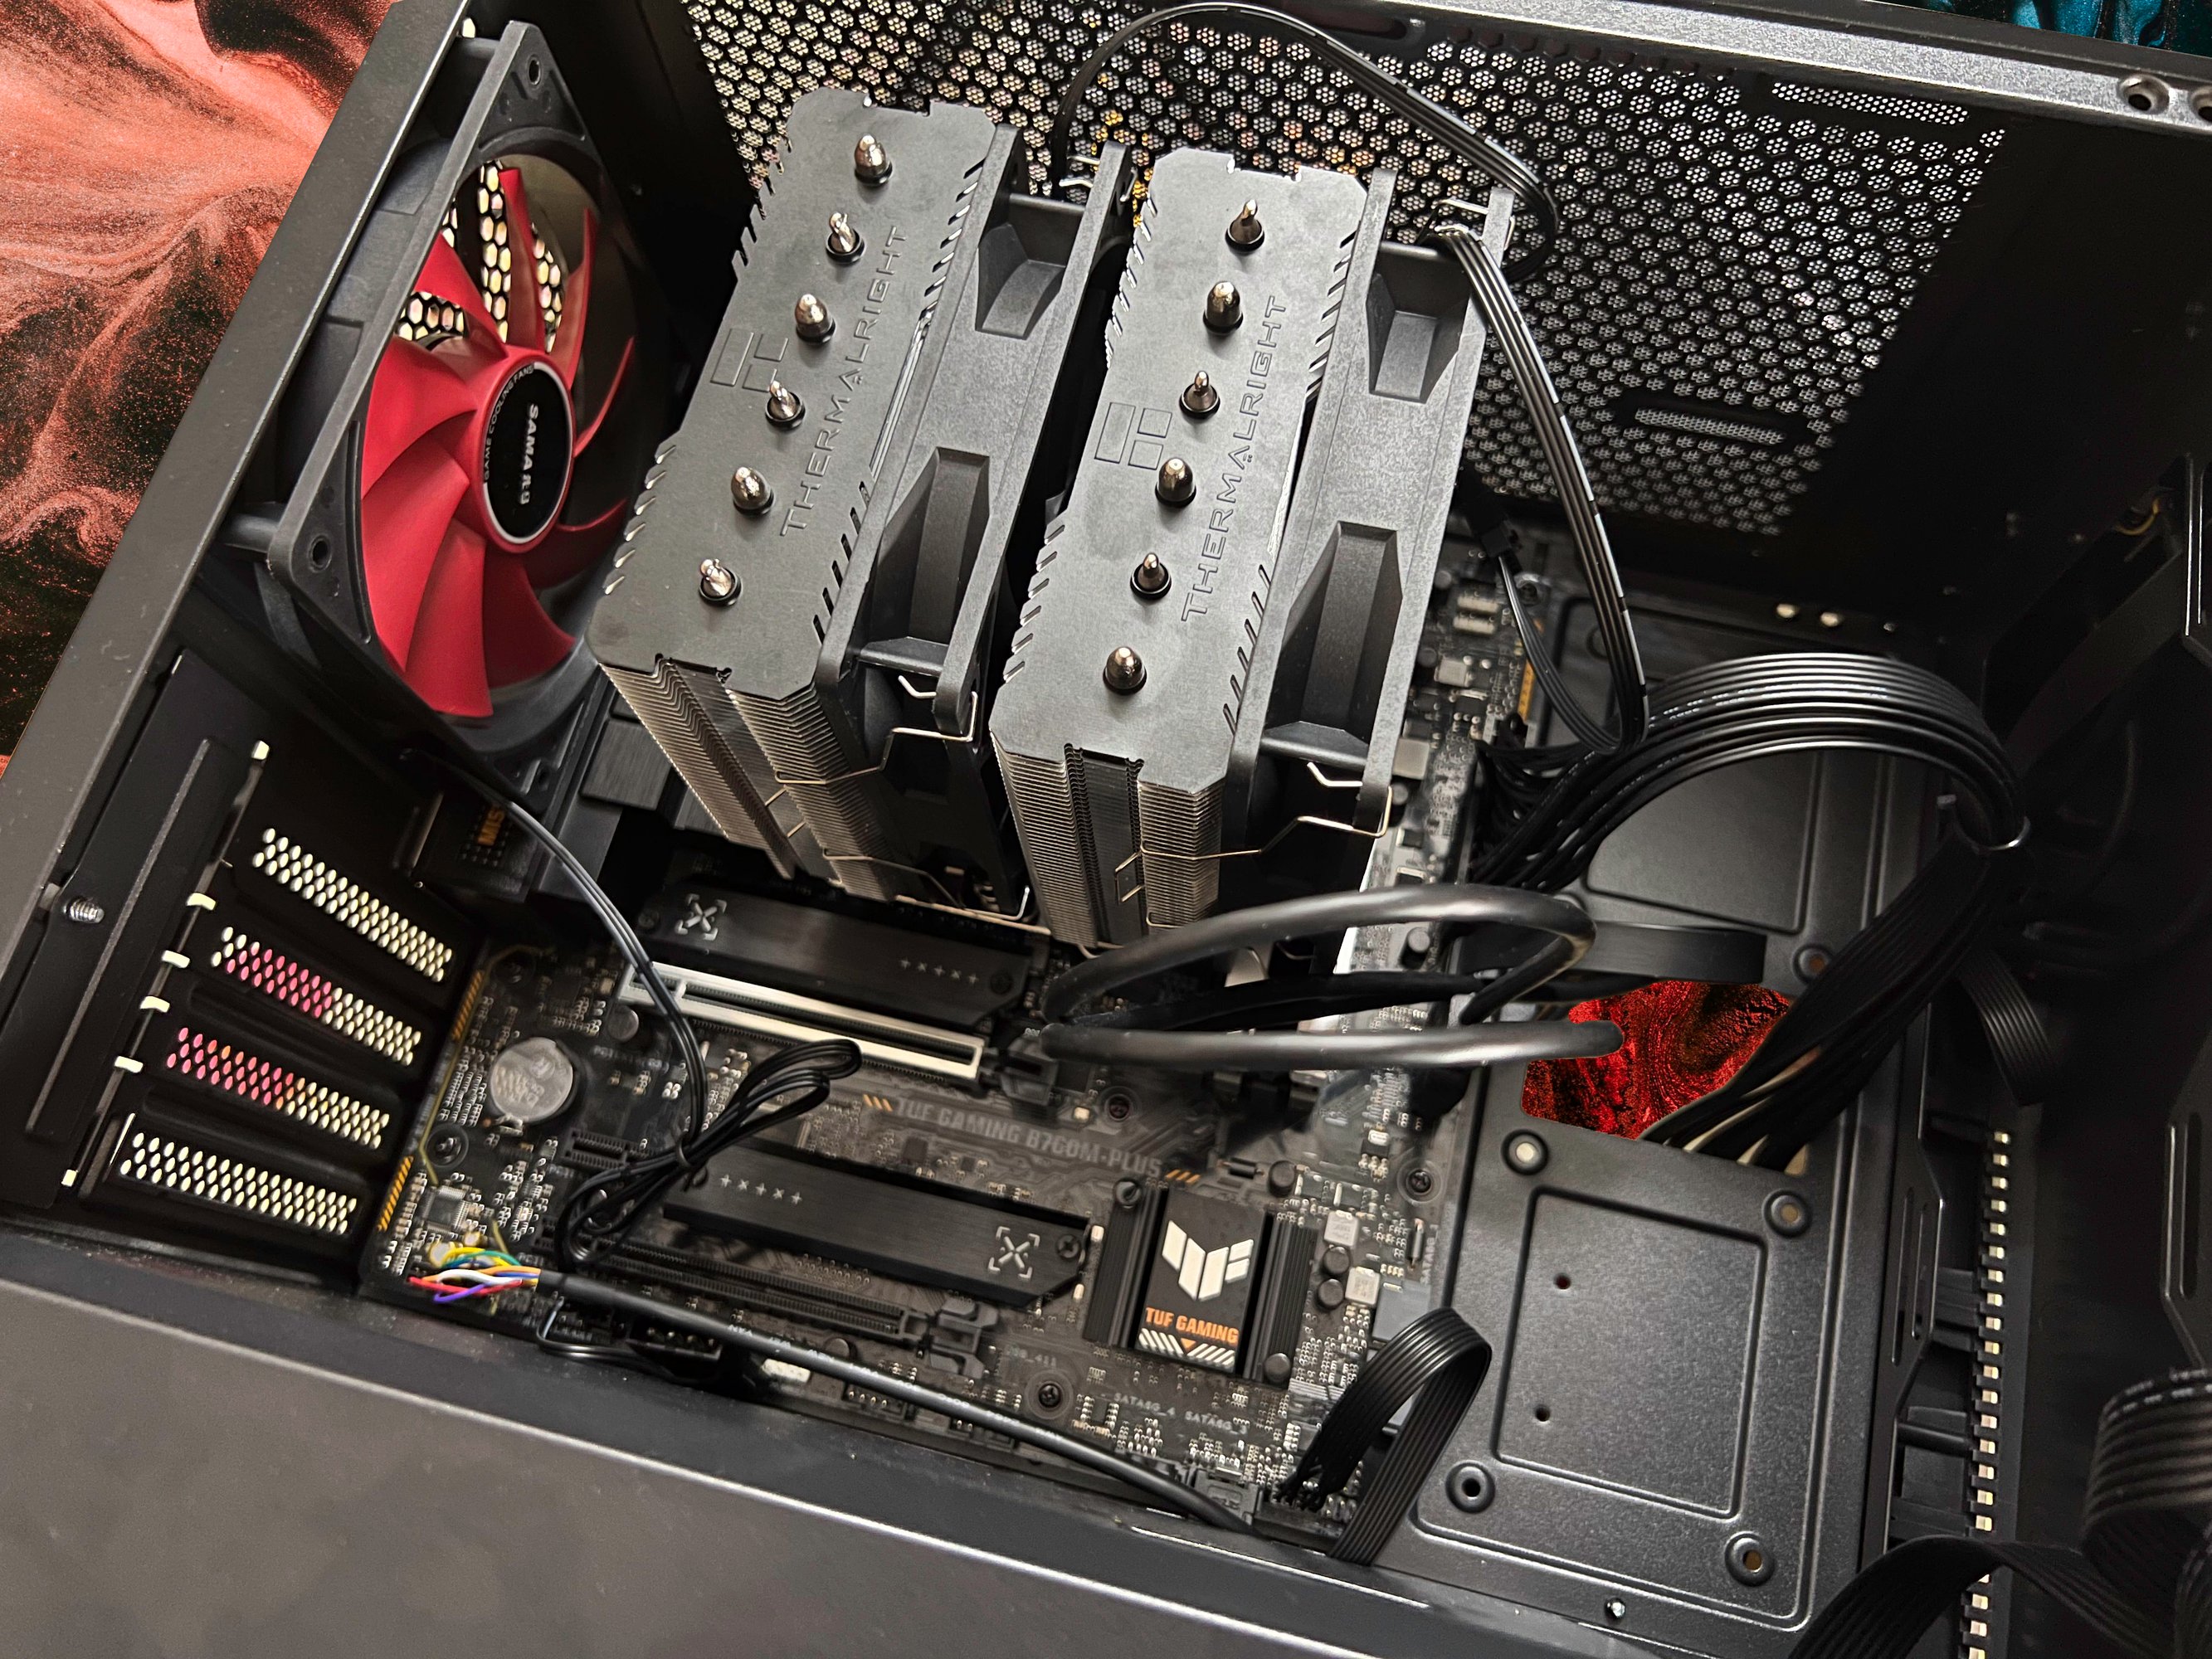
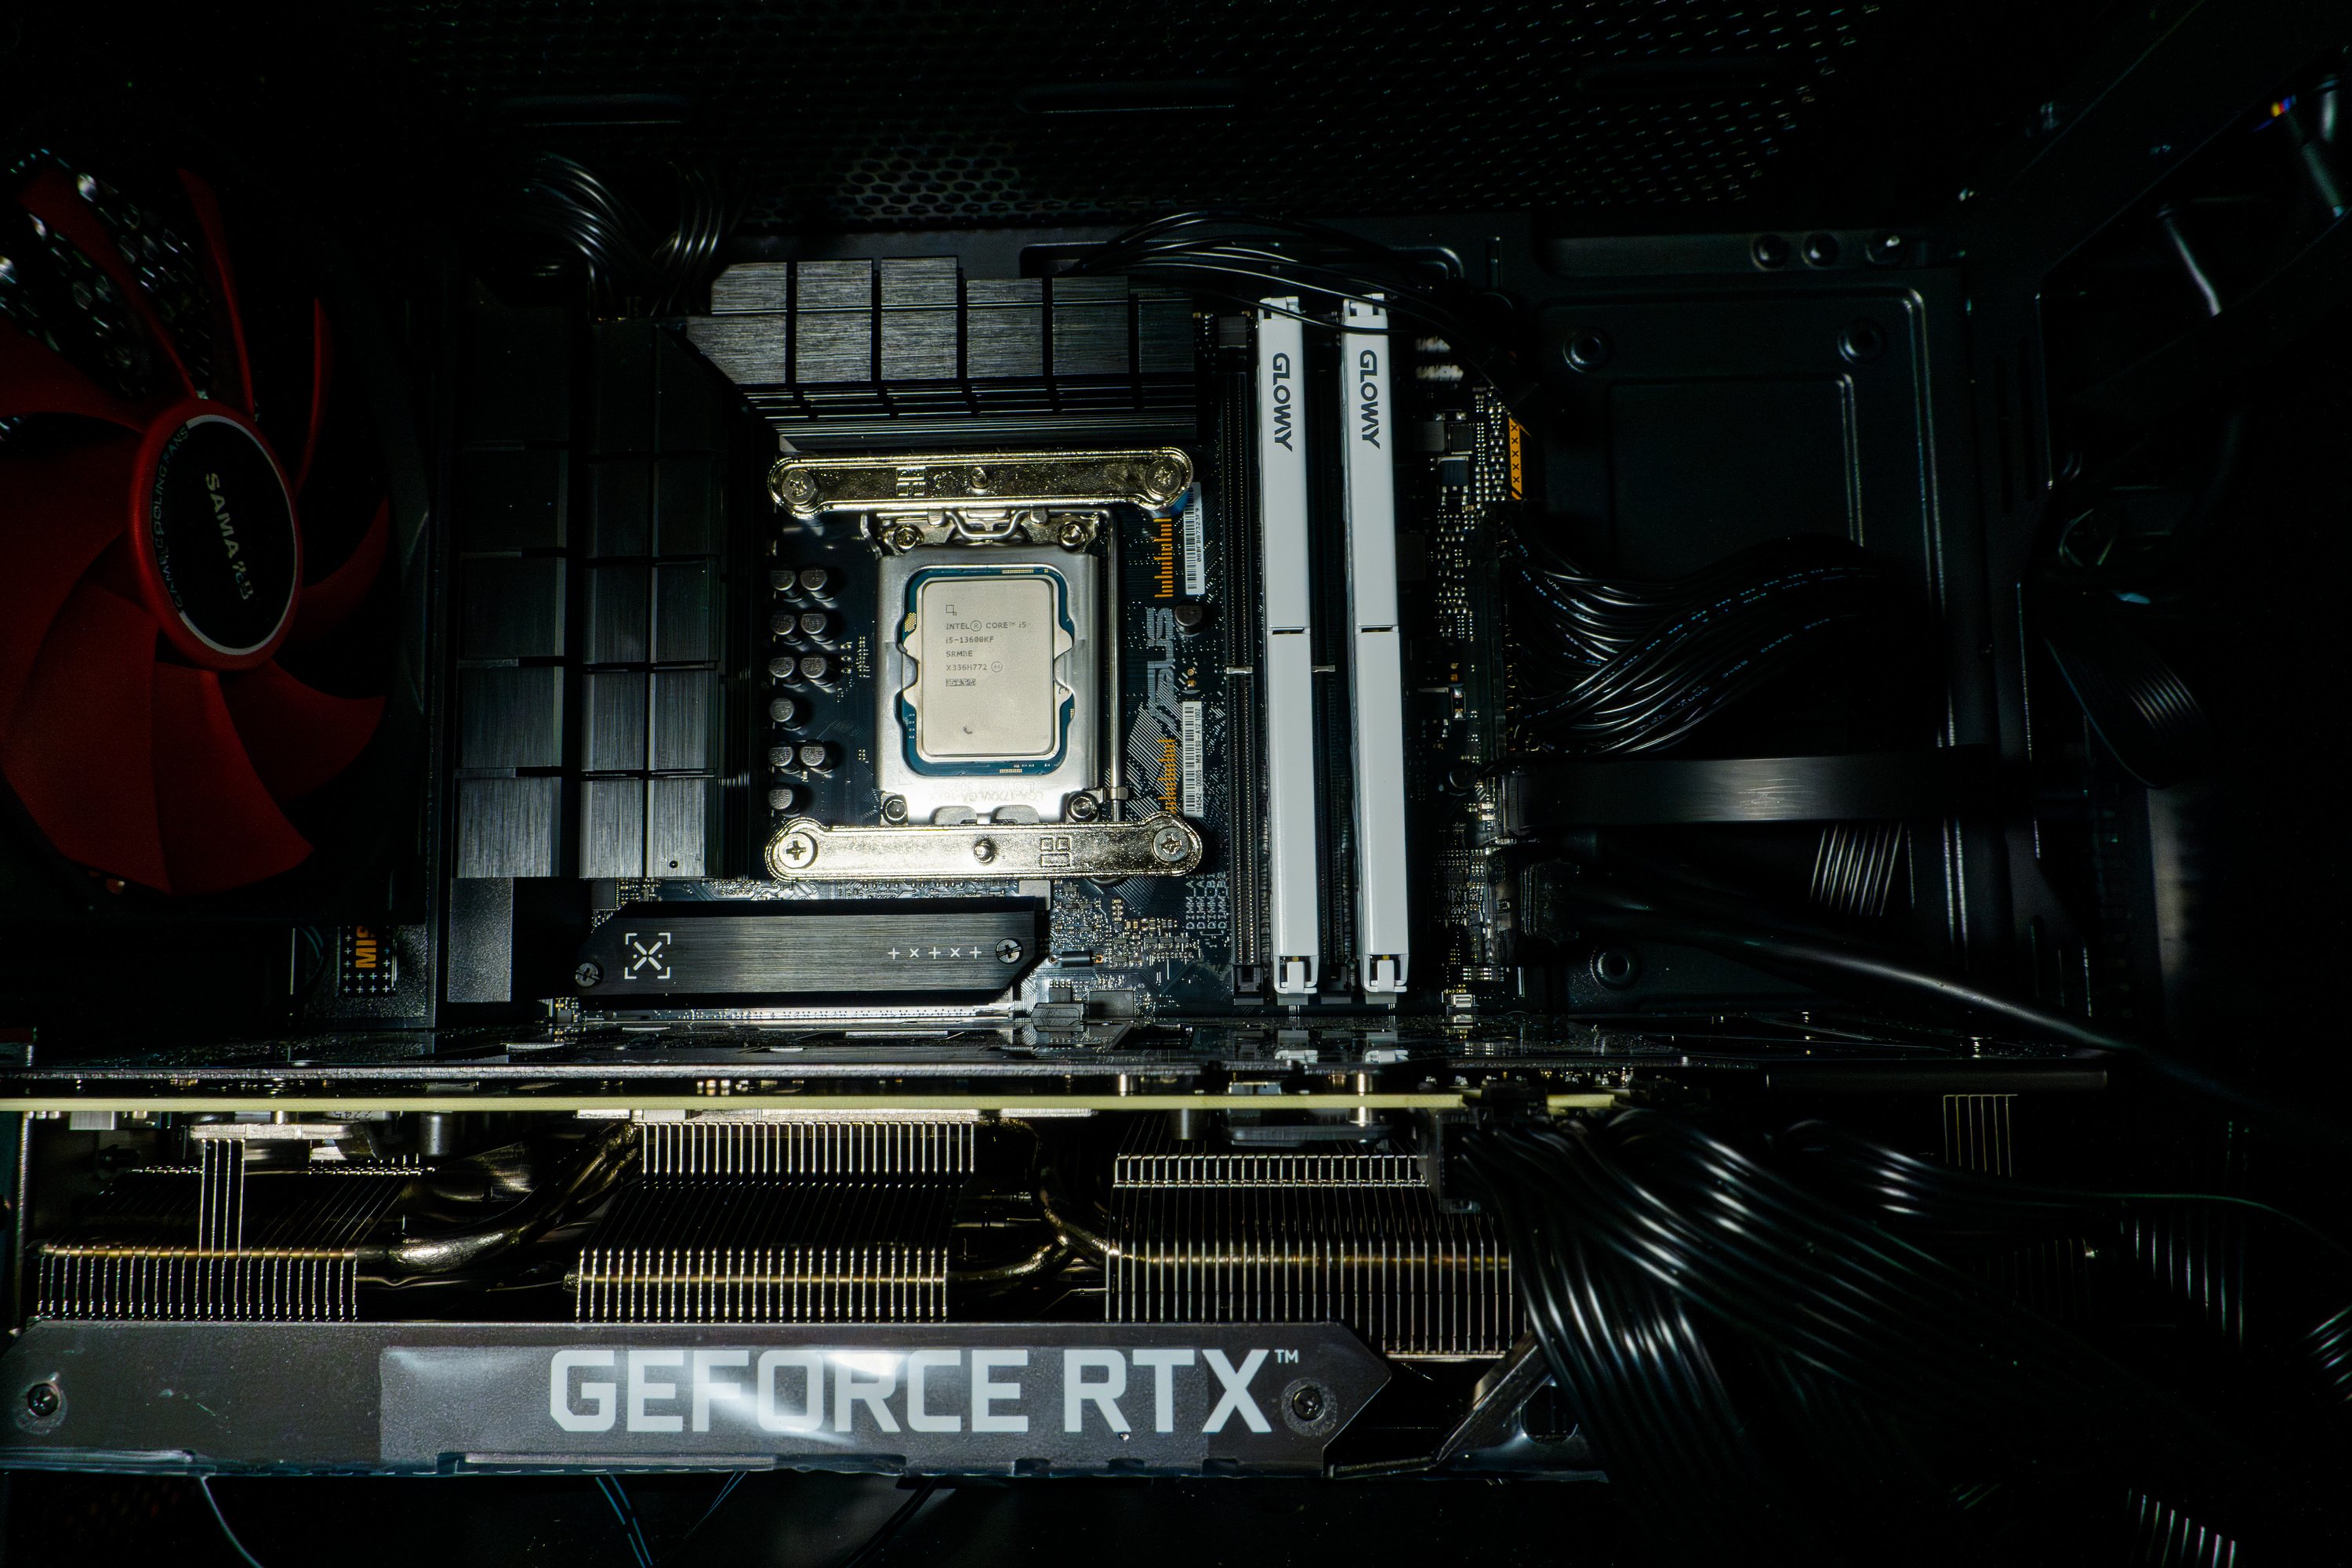
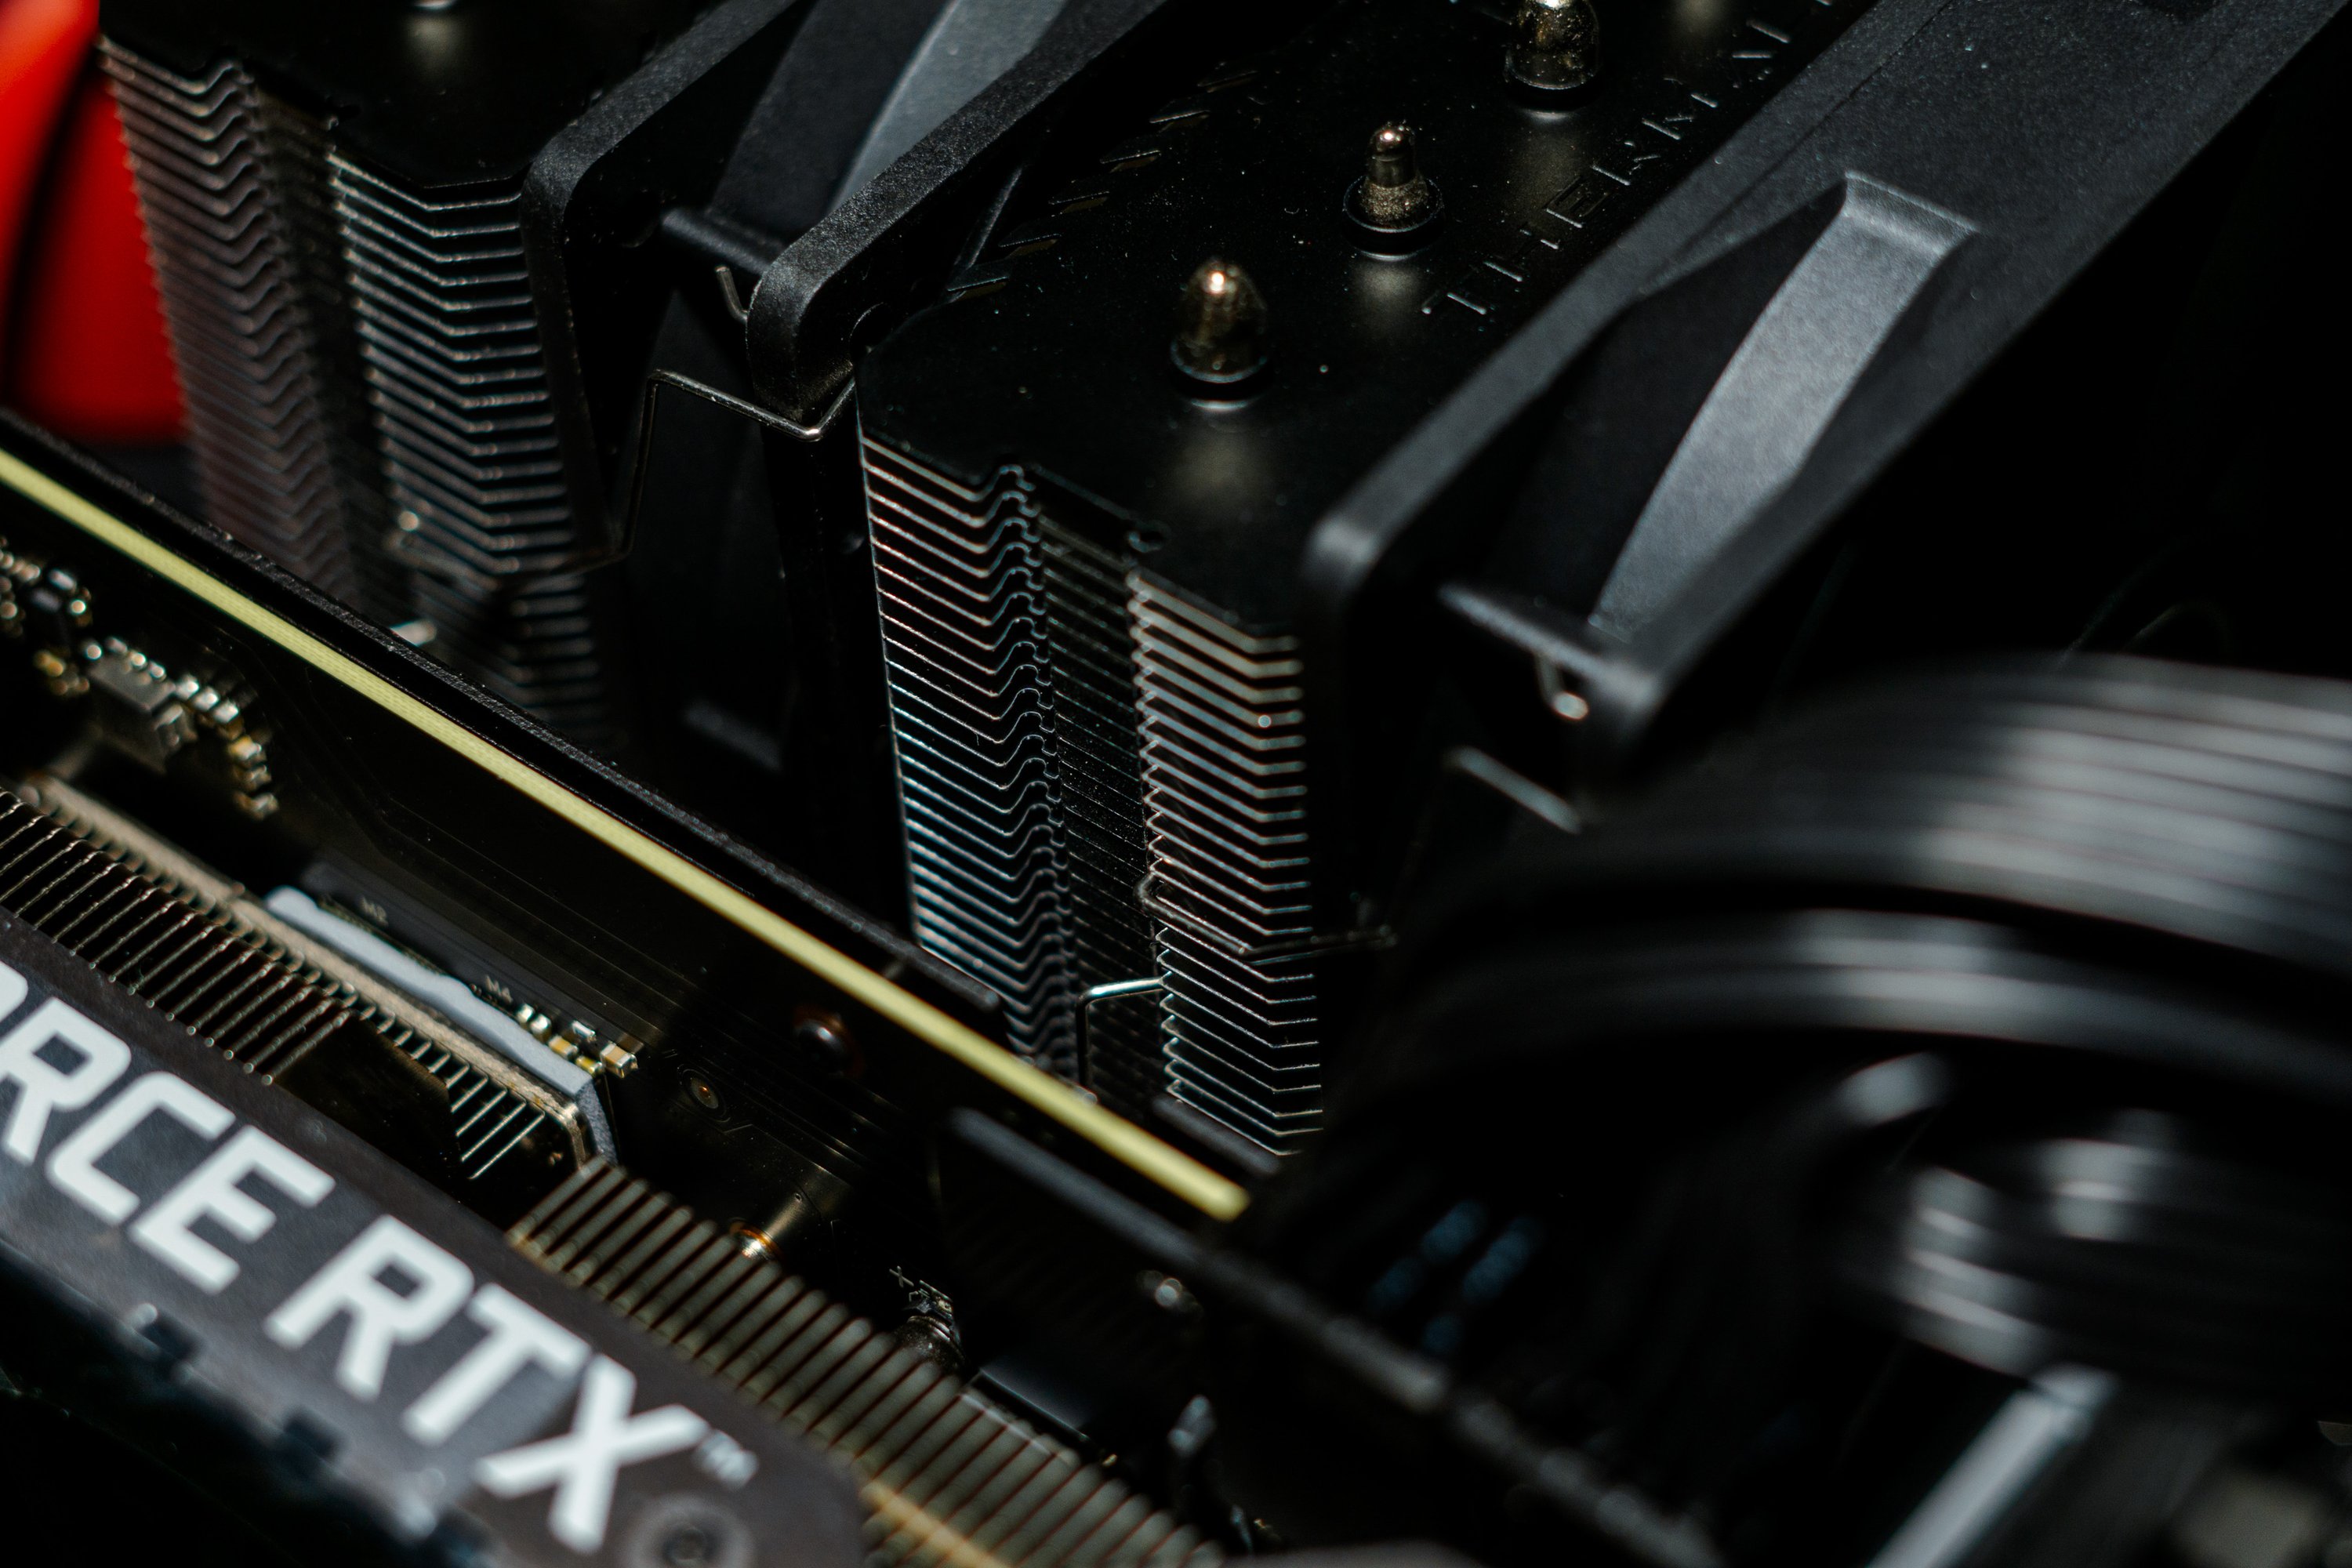
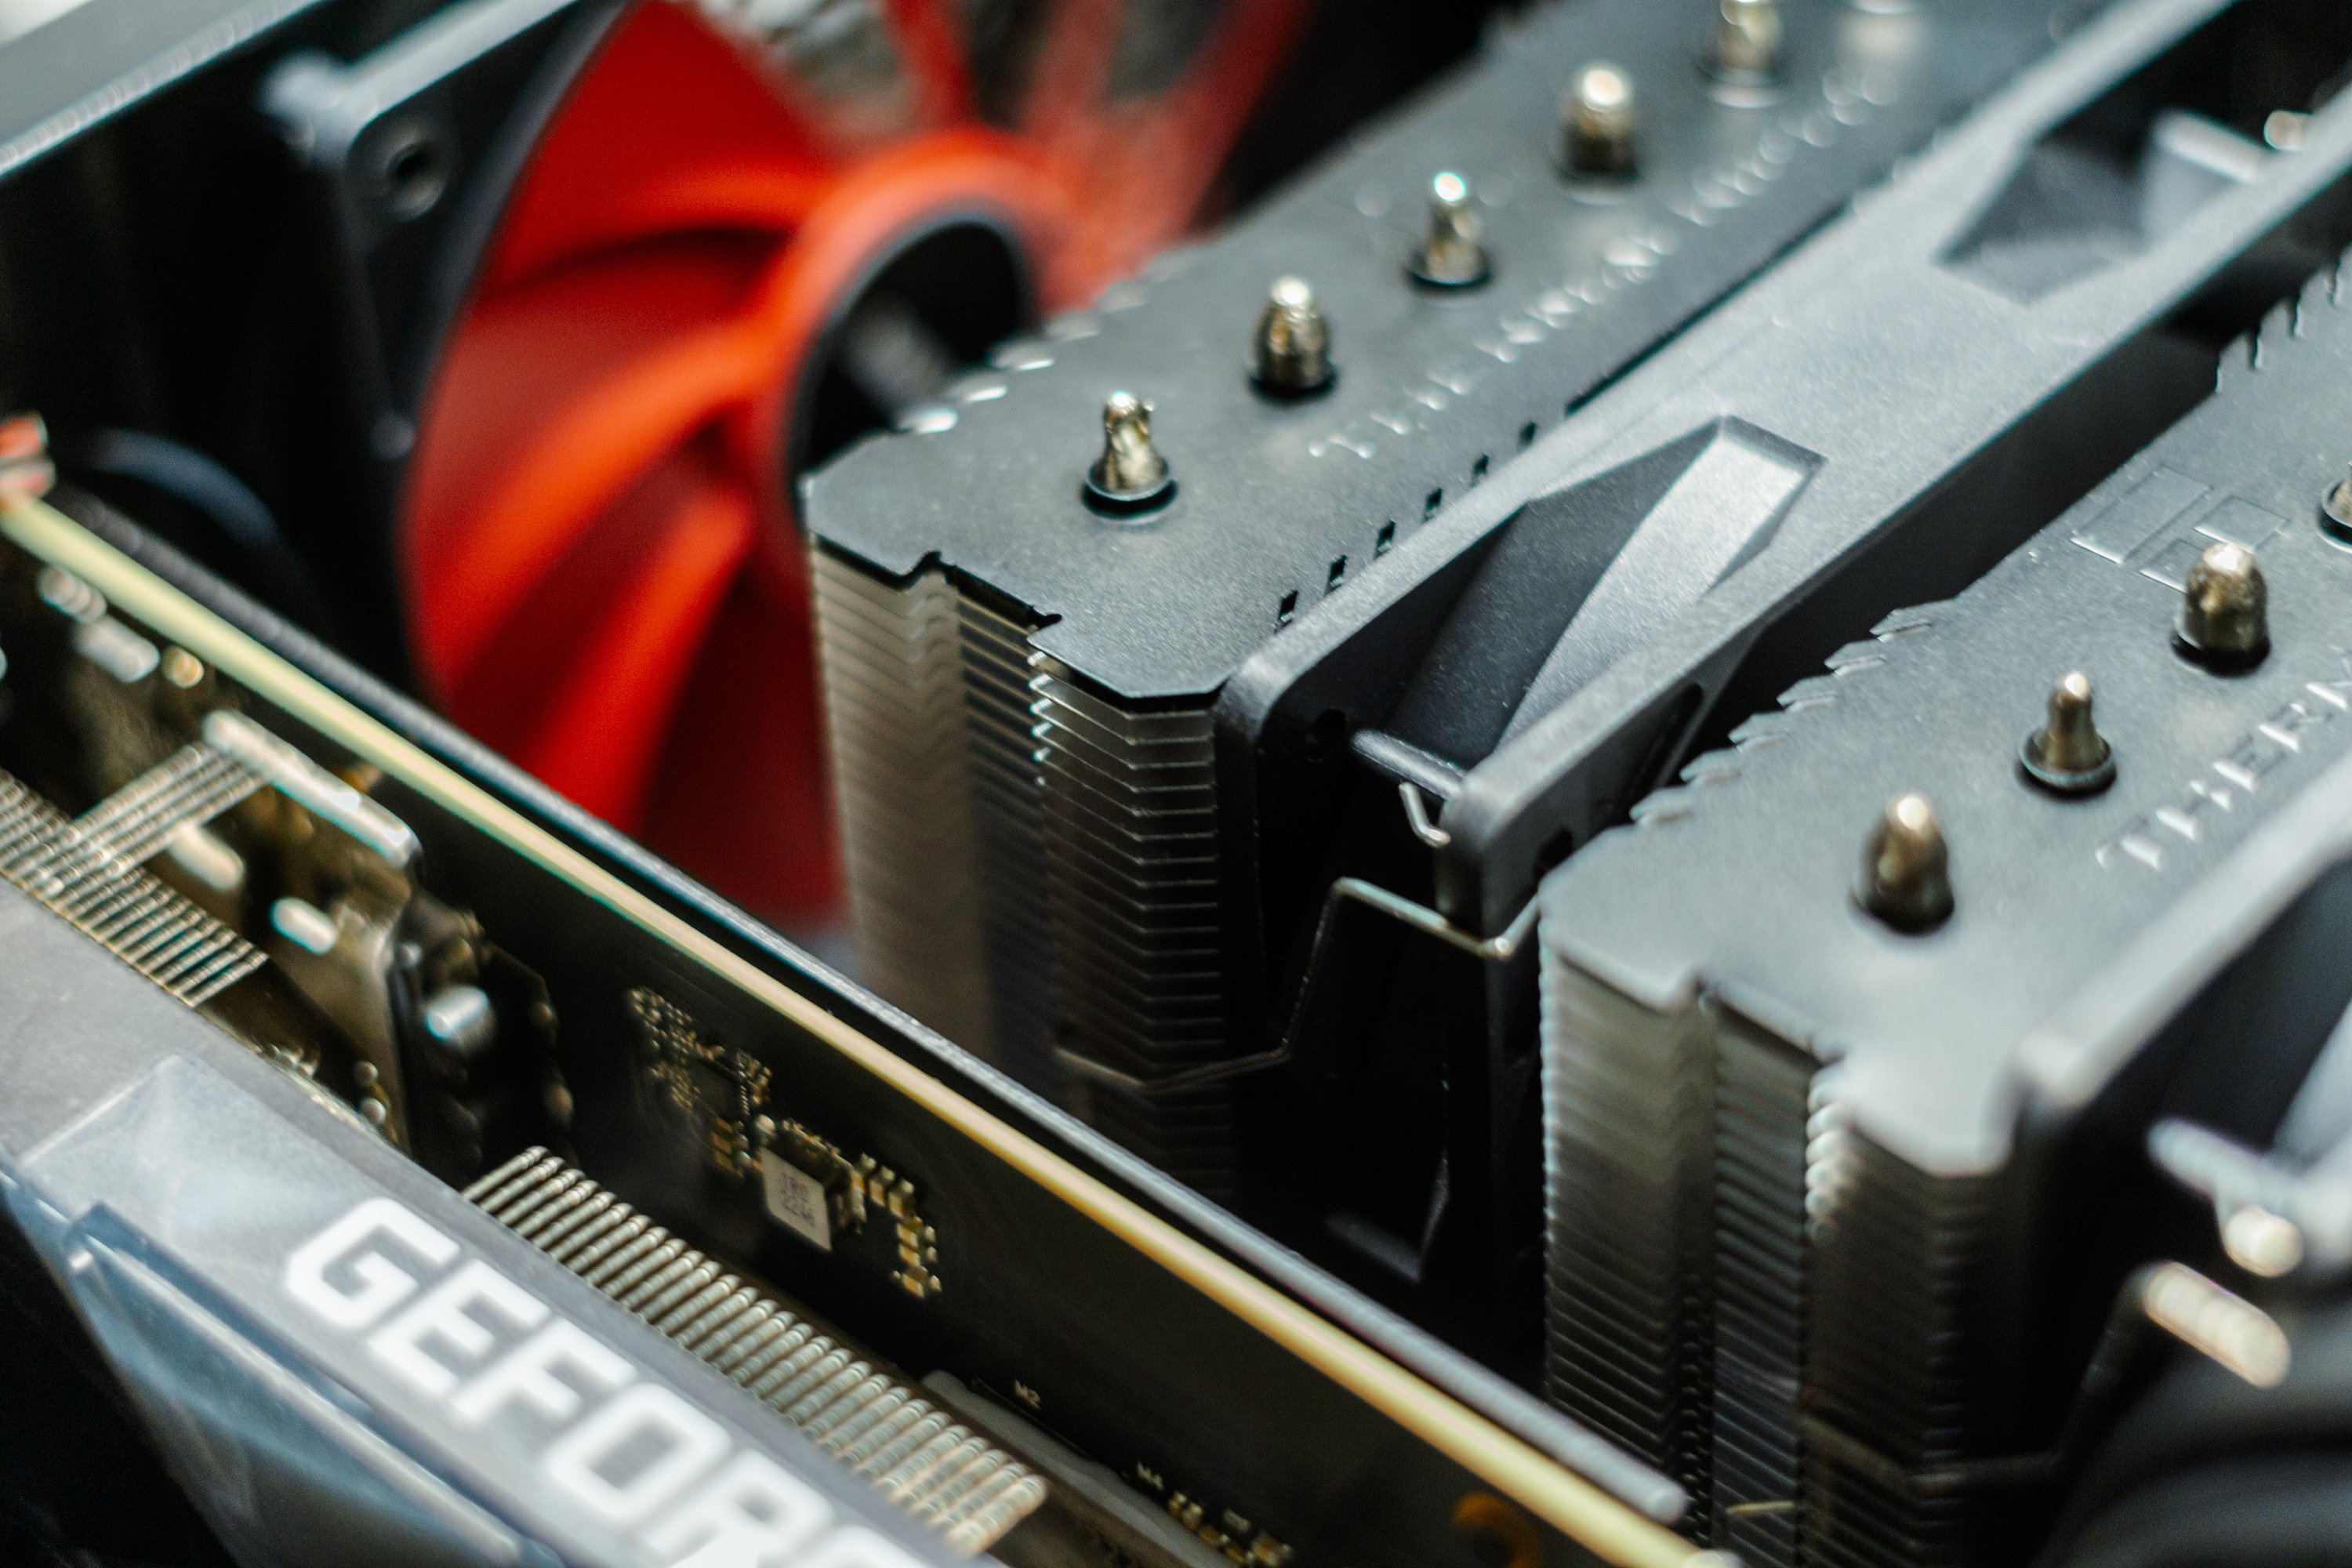
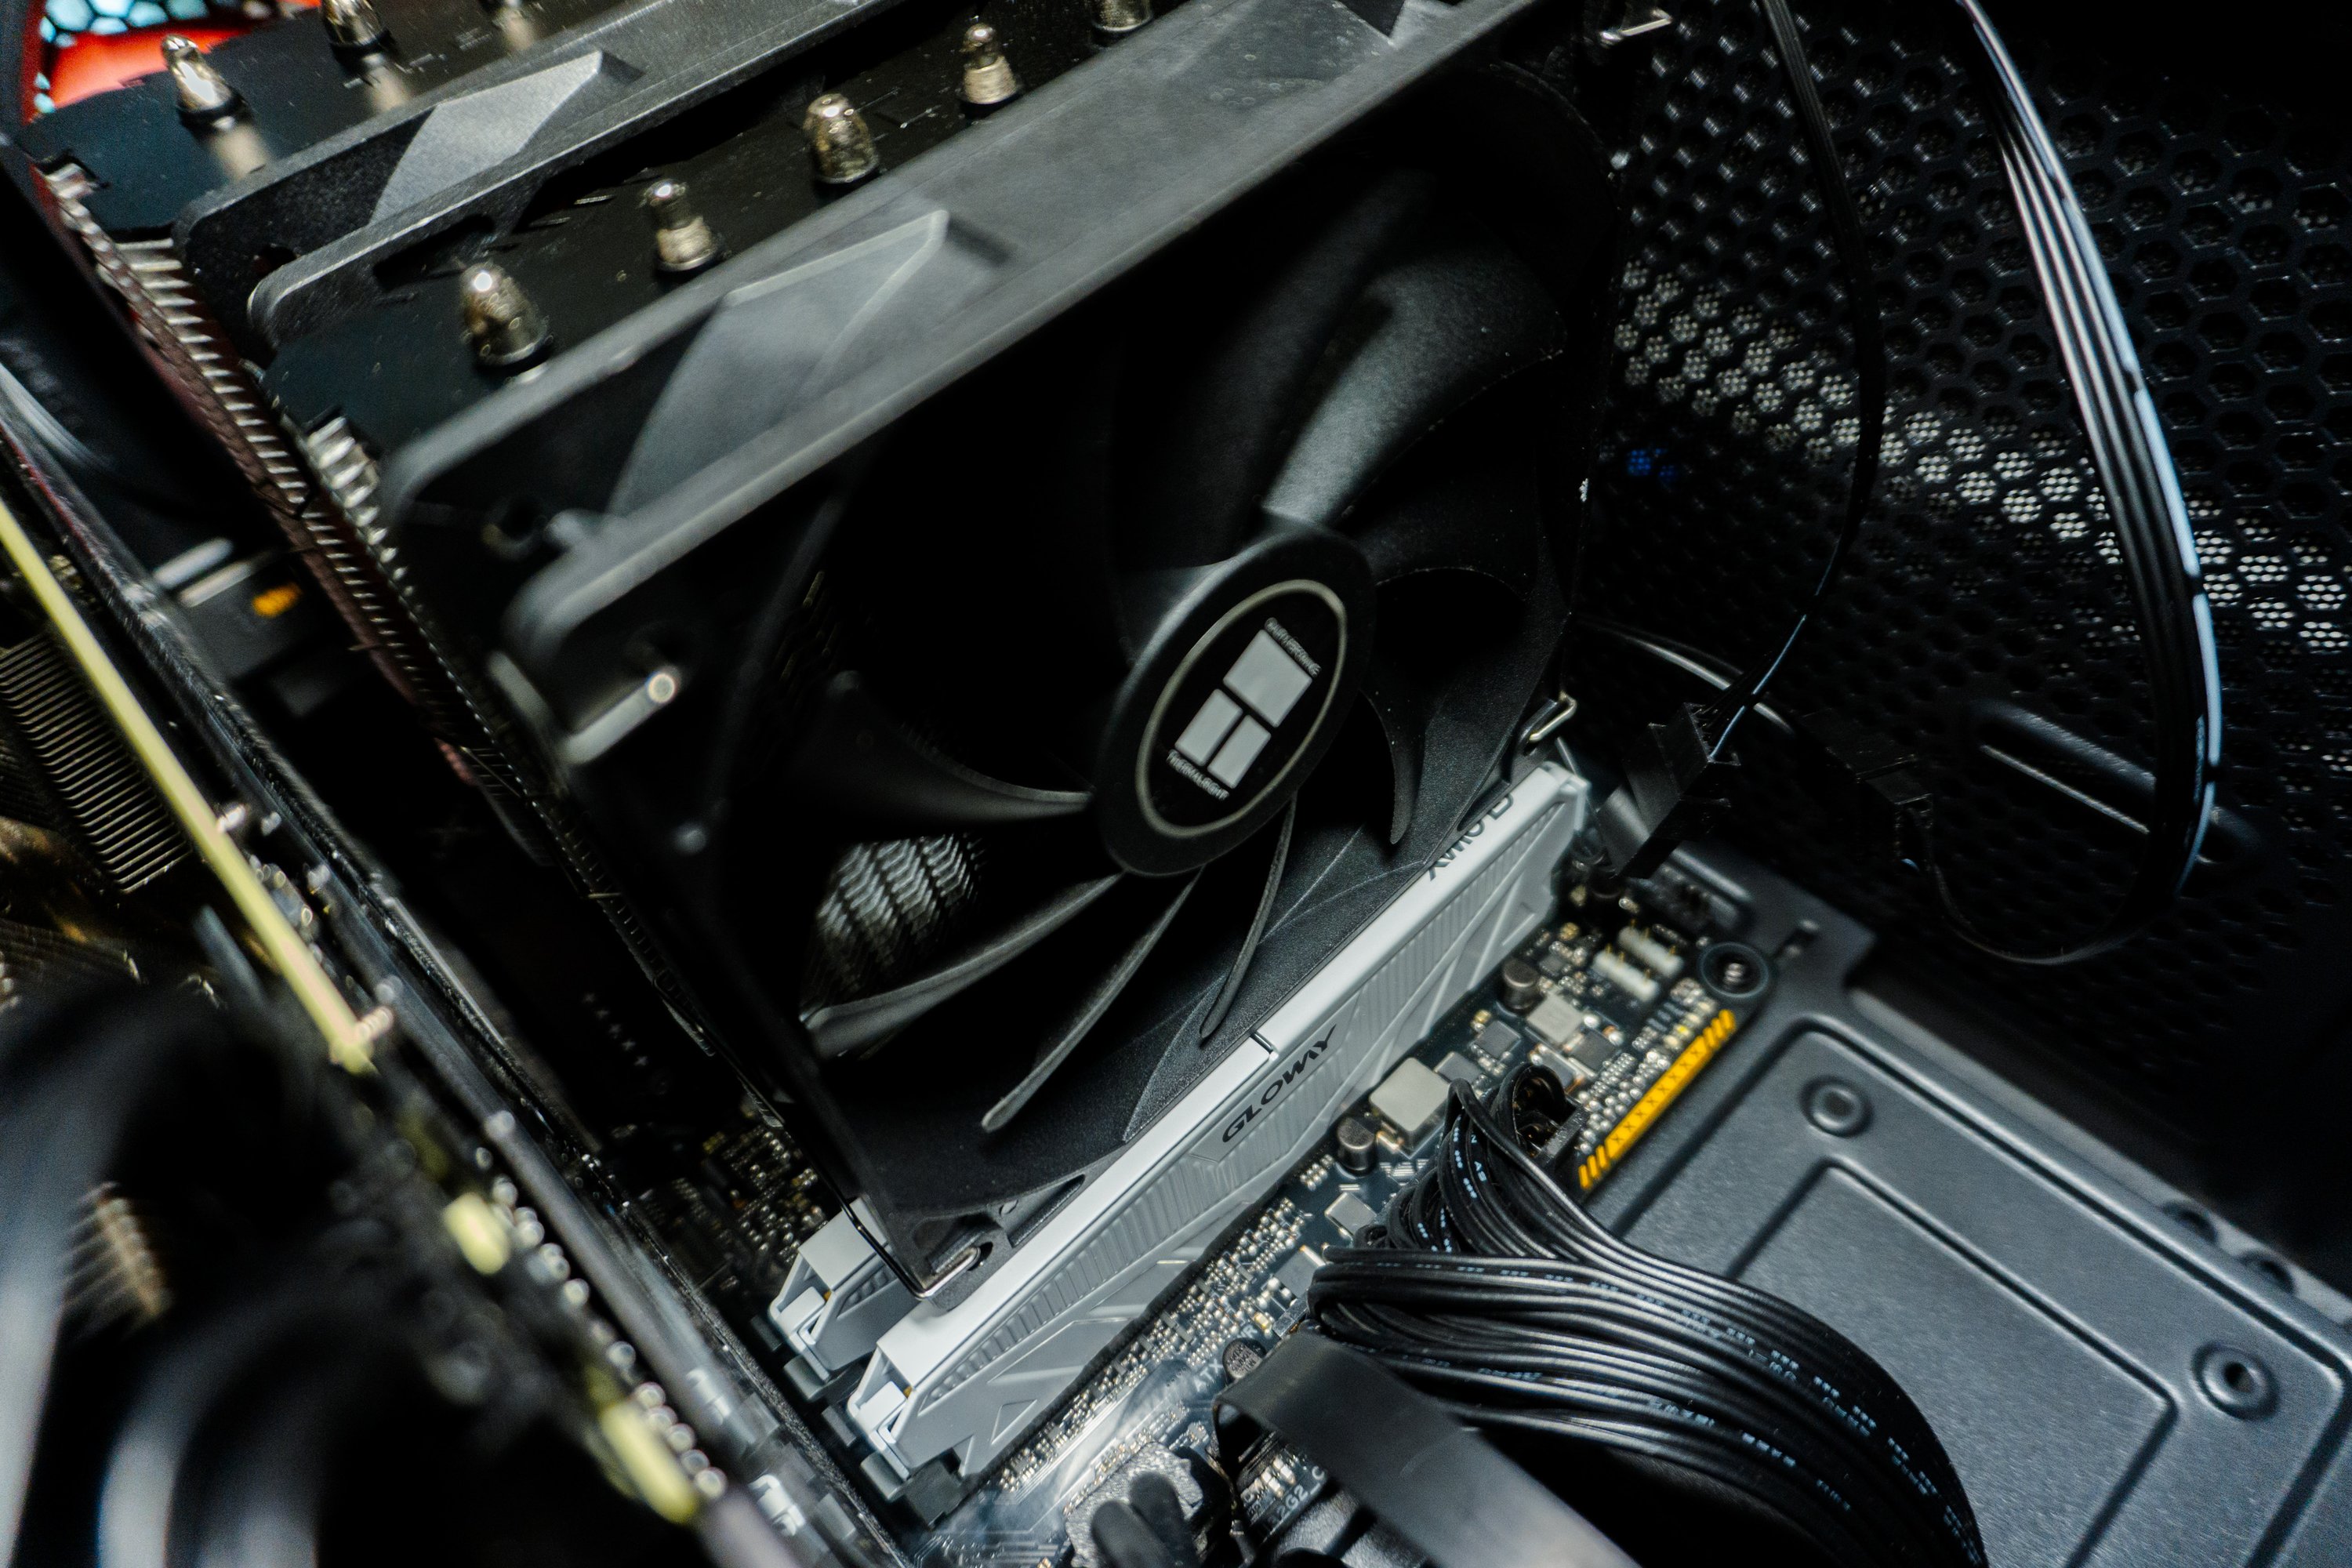
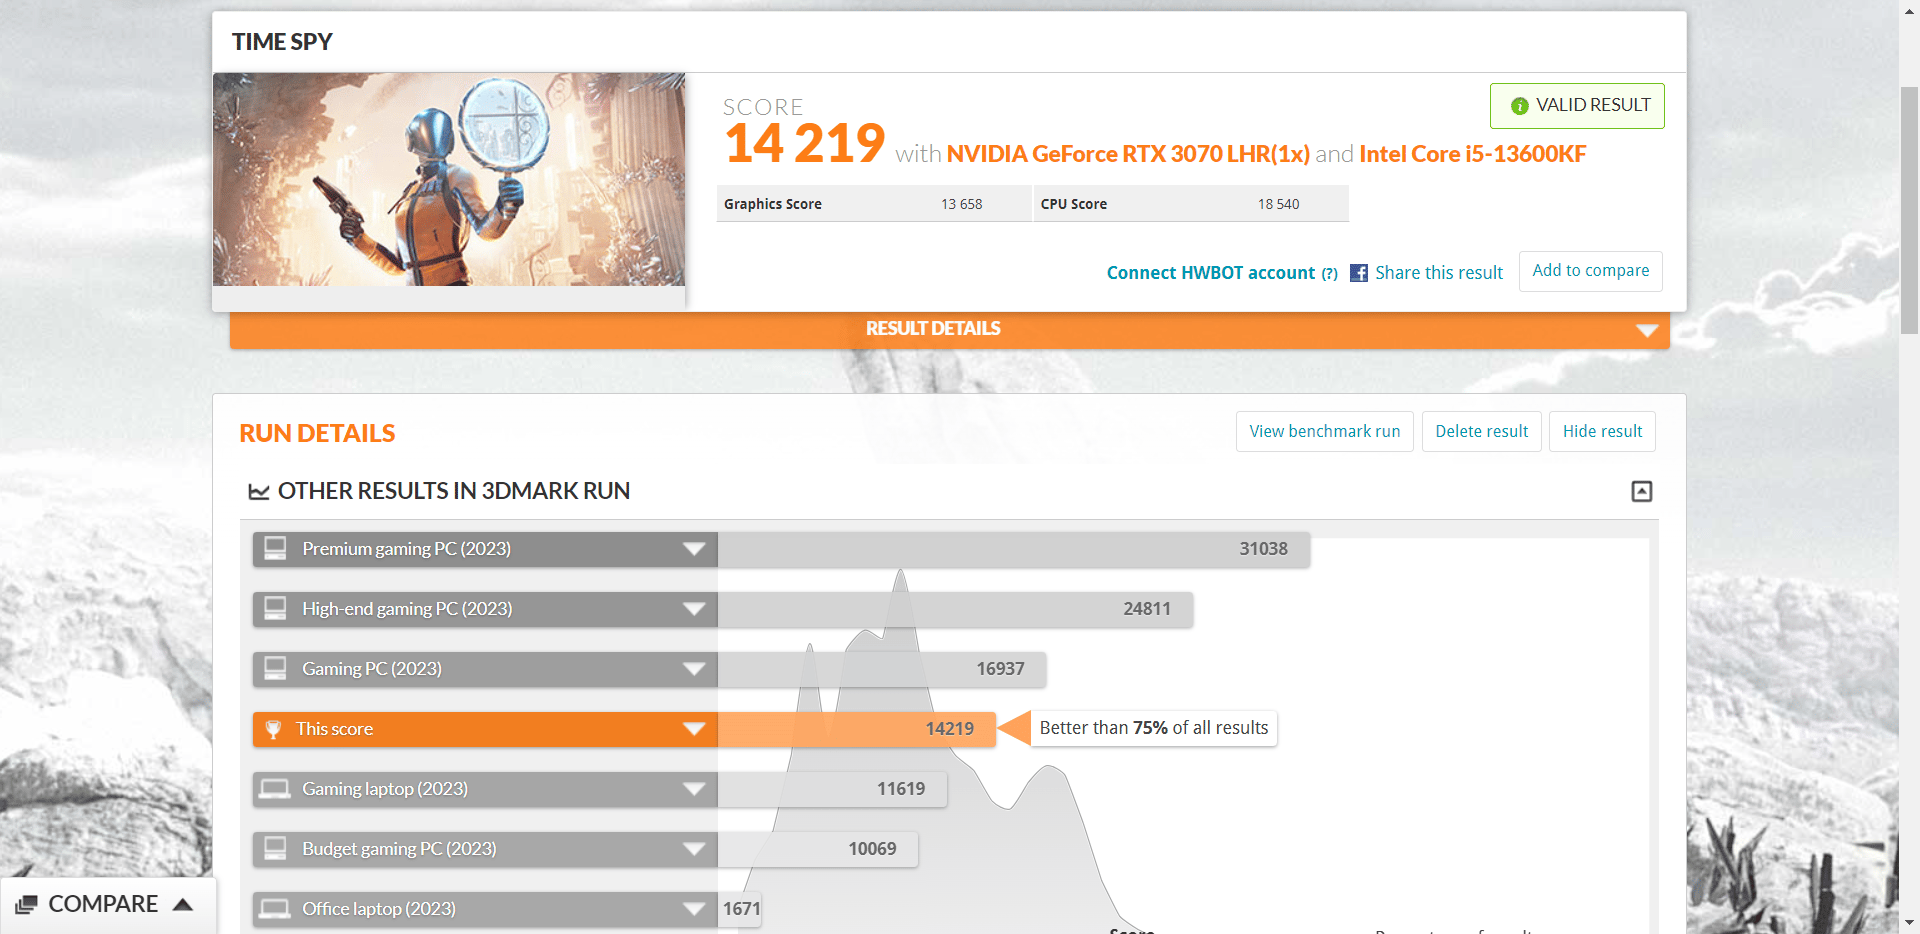
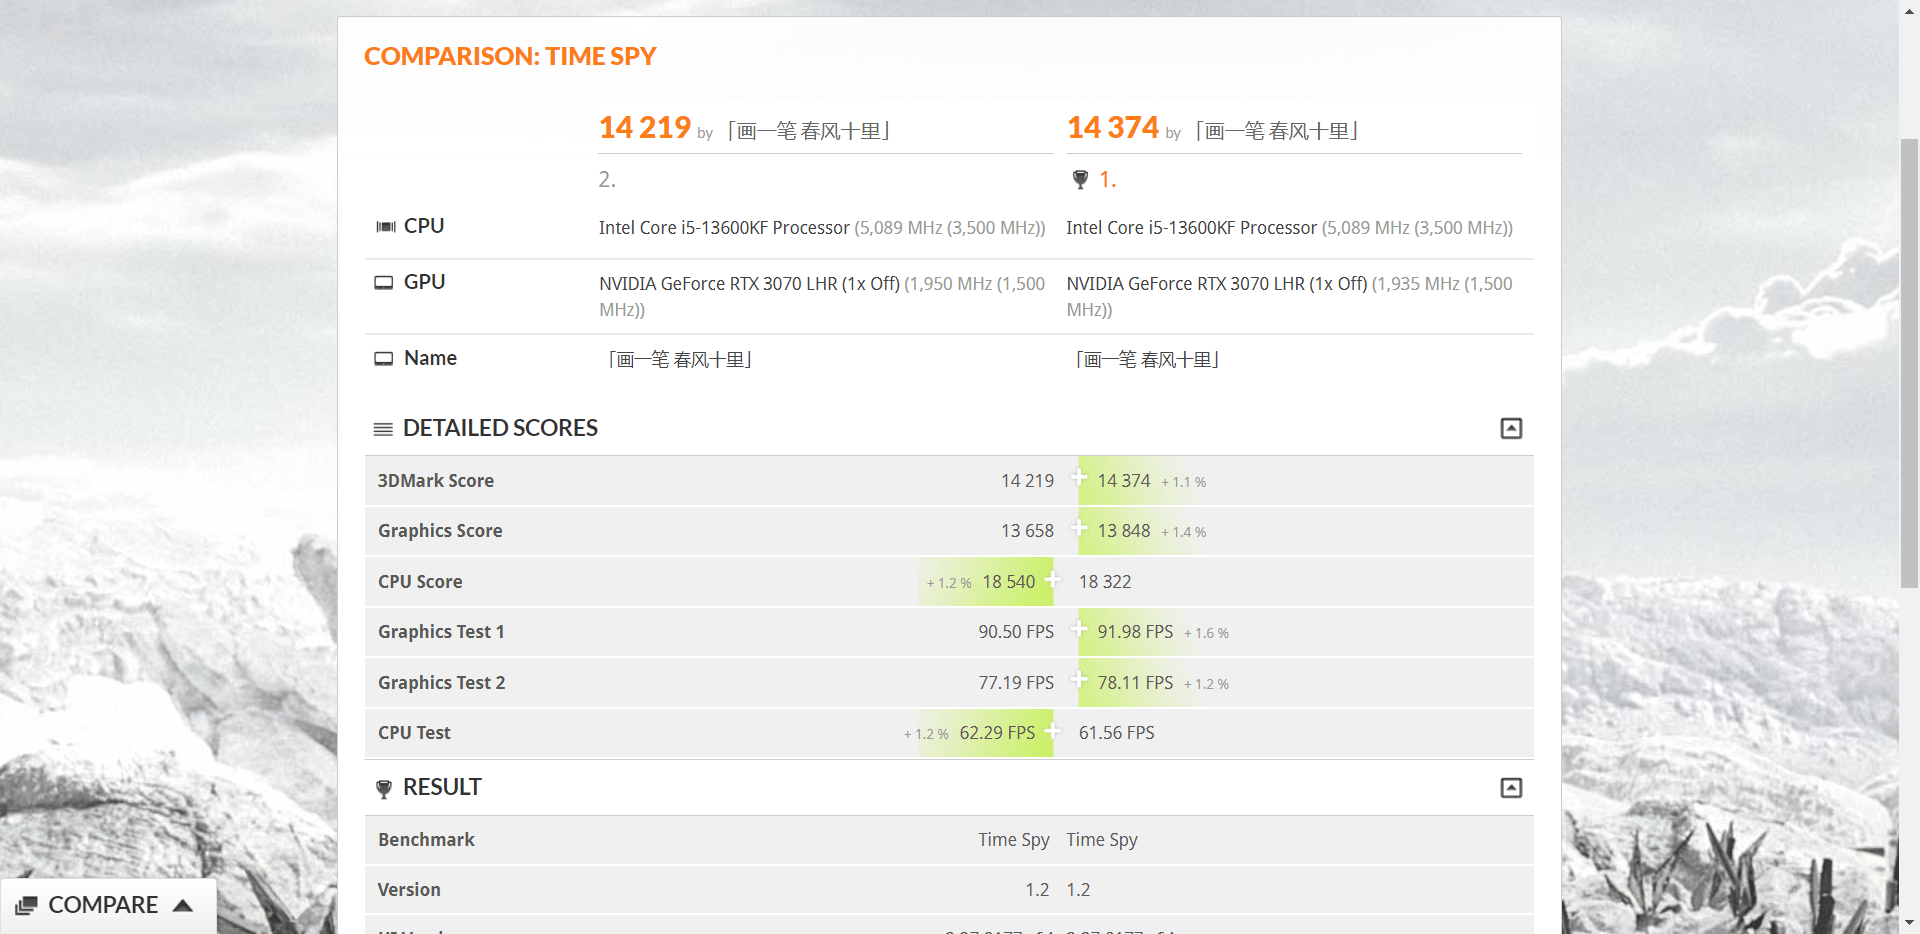
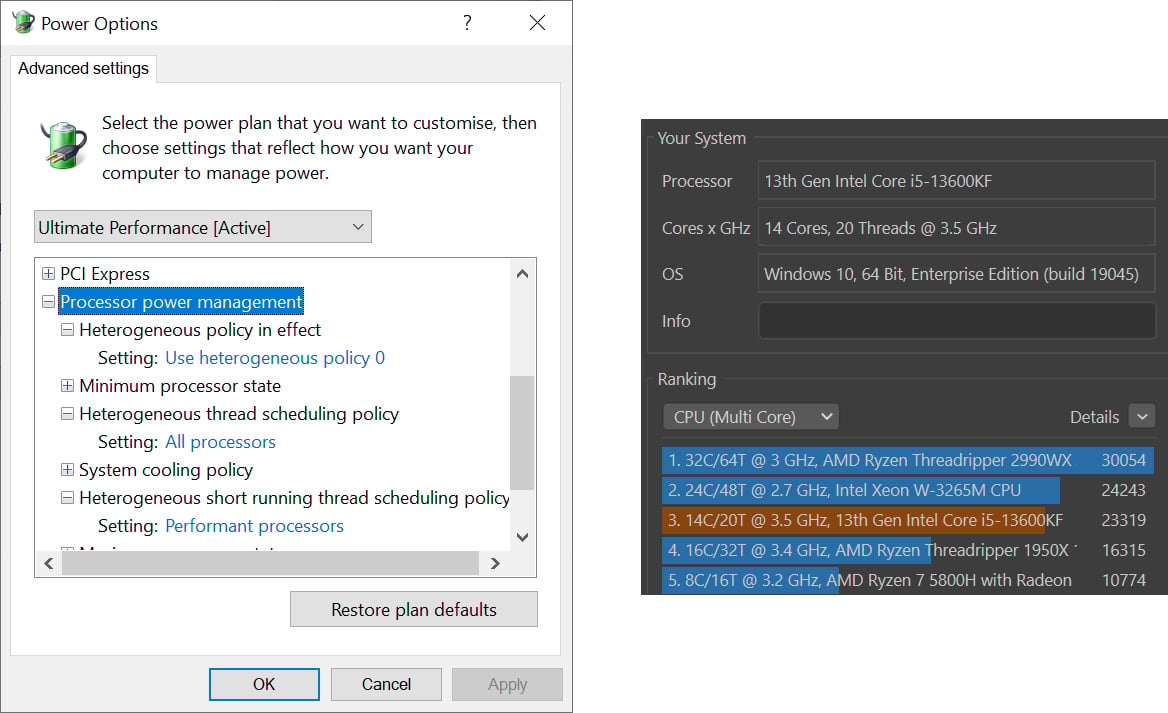
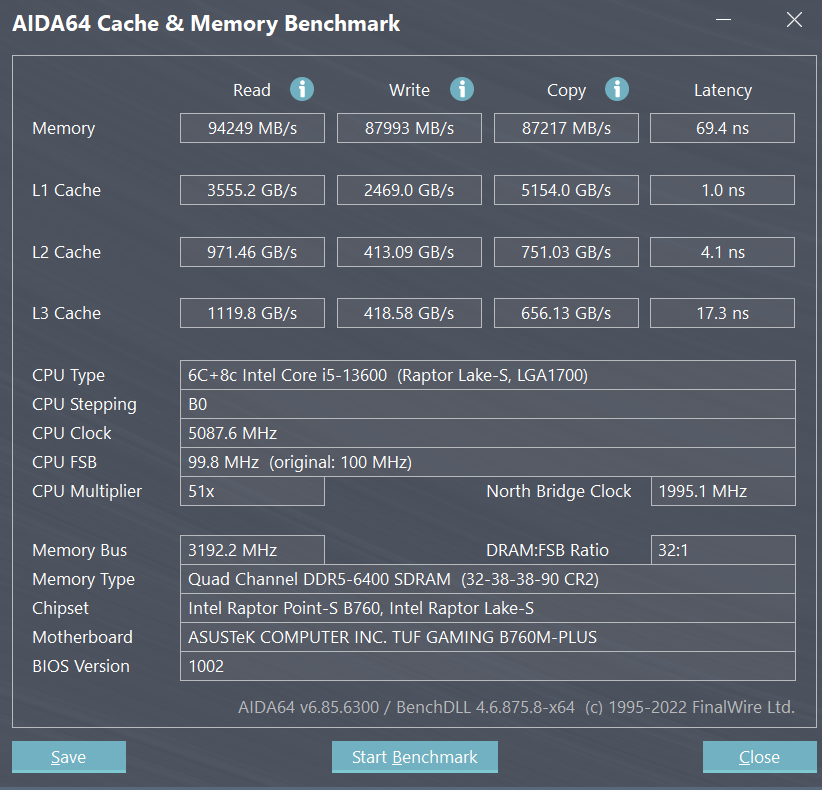
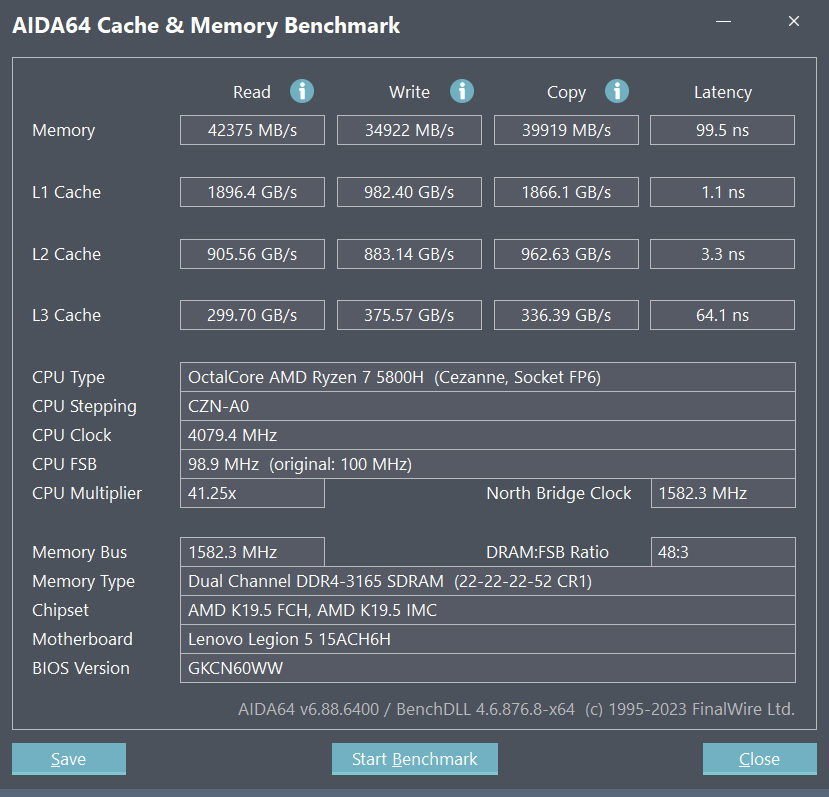
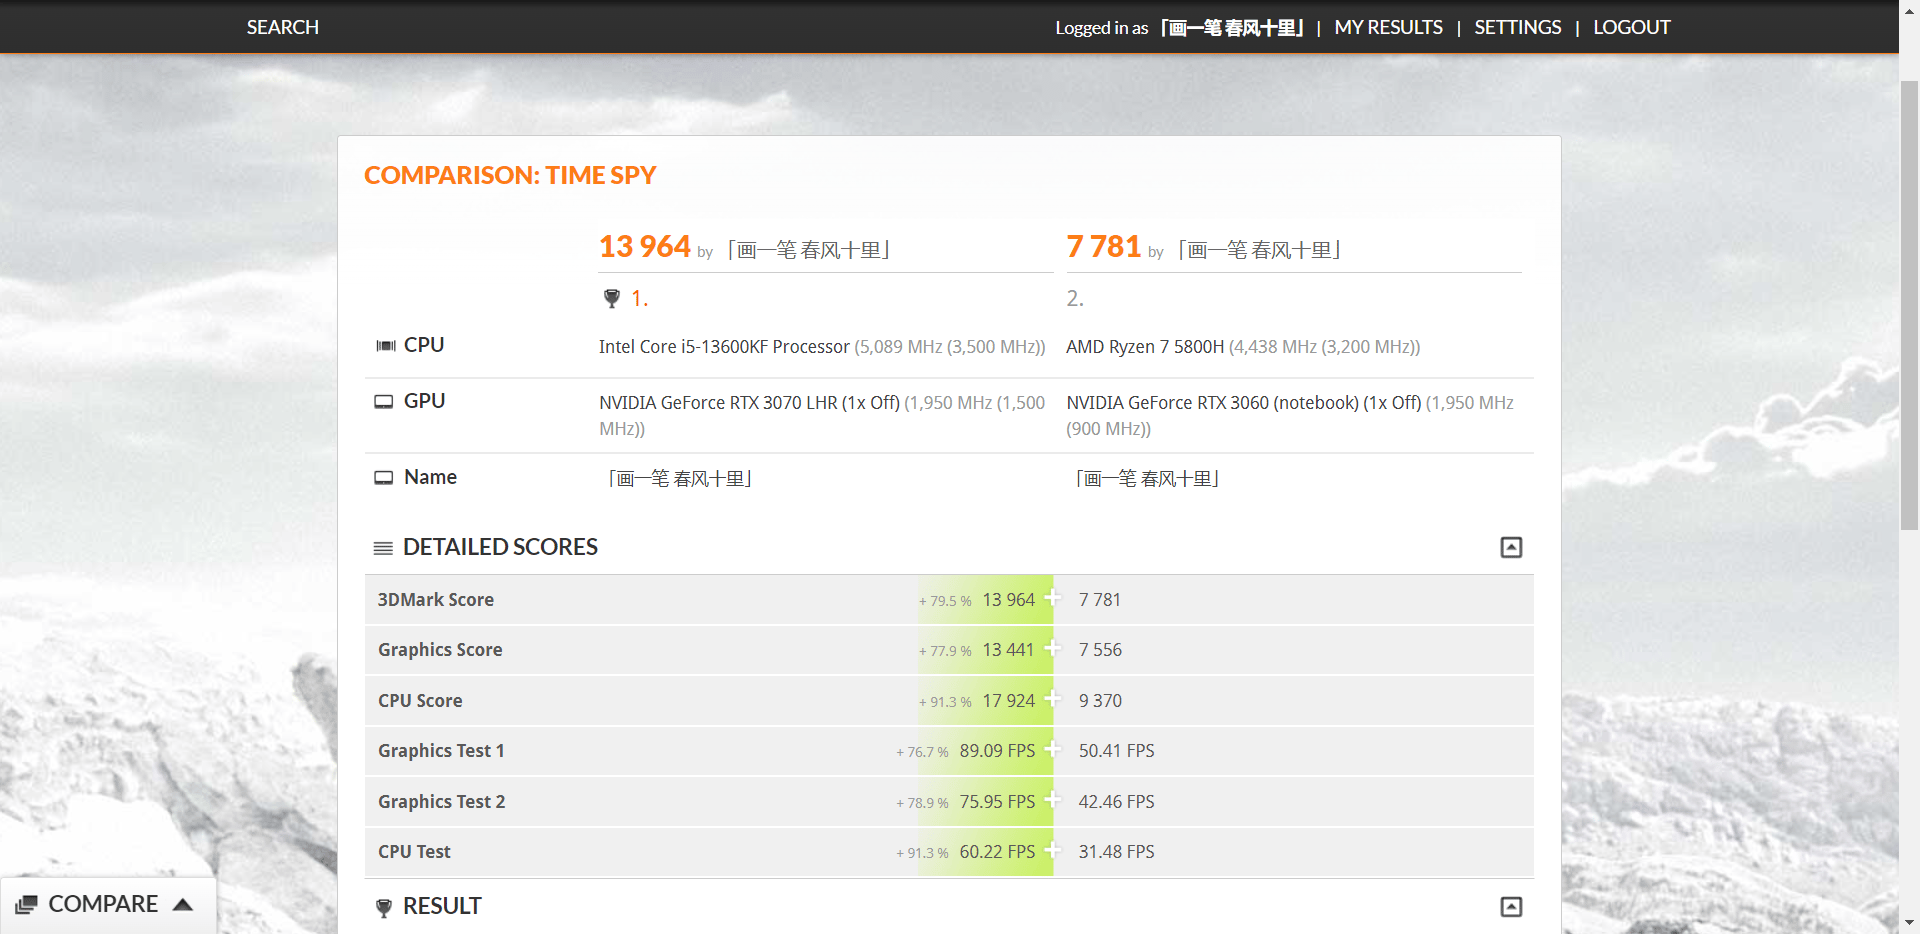
    <content type="html"><![CDATA[<h1 id="前言"><a href="#前言" class="headerlink" title="前言"></a>前言</h1><p>电脑无疑是今日的我最为重要的生产力工具（手机则大部分是娱乐工具 233）。在 16 年我第一台属于自己的电脑是一台搭载 <a href="https://www.intel.com/content/www/us/en/products/sku/84985/intel-core-i55257u-processor-3m-cache-up-to-3-10-ghz/specifications.html">i5-5257U</a> 的 <a href="https://support.apple.com/en-gb/111959">MacBook Pro (Retina, 13-inch, Early 2015)</a>。那台电脑支持着我探索网络的第一步，我在它上面初步体验了 <a href="https://www.apple.com/final-cut-pro/">Final Cut Pro</a> 等专业软件。</p><span id="more"></span><p>应该是两年后的 18 年，因为家人想要一台 MacBook 而我想要搭配独立显卡的电脑，我拥有了一台<a href="https://www.mi.com/mibookpro/specs">小米笔记本 Pro</a>，搭配 <a href="https://www.intel.com/content/www/us/en/products/sku/122589/intel-core-i78550u-processor-8m-cache-up-to-4-00-ghz/specifications.html">i7-8550U</a> 和 <a href="https://www.nvidia.com/en-gb/geforce/gaming-laptops/geforce-mx150/">Nvidia MX150</a> 独立显卡。这台电脑能比较卡顿地运行 <a href="https://www.adobe.com/products/premiere.html">Premiere Pro</a> 剪视频，以及低特效玩一些例如绝地求生和彩虹六号之类的游戏。当时不懂低压U、TDP 一类的概念，觉得 i7 理所当然地代表高性能。直到有一次回到家，在家里用电脑城随便配的 <a href="https://www.intel.com/content/www/us/en/products/sku/126687/intel-core-i58400-processor-9m-cache-up-to-4-00-ghz/specifications.html">i5-8400</a> 的台式机上和笔记本同时运行 <a href="https://www.adobe.com/products/media-encoder.html">Media Encoder</a> 转码，才发现原来桌面 CPU 原来如此强大。</p><p>因为生活所需，其实没有办法只配一台台式机。在 2020 年疫情期间 MiBook Pro 主板出问题以后，我临时入手了一台<a href="https://detail.zol.com.cn/notebook/index1322041.shtml">联想拯救者 R7000 2020</a>；它搭载 <a href="https://www.amd.com/en/products/apu/amd-ryzen-5-4600h">Ryzen 5 4600H</a> 和 4GB 显存的 <a href="https://www.nvidia.com/en-me/geforce/gaming-laptops/gtx-1650/">GTX 1650 (Mobile)</a>，能够流畅地玩很多单机游戏和剪辑视频。在 2022 年，出于对 GTX 1650 图形性能的不满意，在囹圄于当时的处境的情况下，购入了一台 <a href="https://item.lenovo.com.cn/product/1013207.html">R7000P 2021</a>，搭配 <a href="https://www.amd.com/en/products/apu/amd-ryzen-7-5800h">Ryzen 7 5800H</a> 和 <a href="https://www.nvidia.com/en-us/geforce/laptops/30-series/">RTX 3060 (Laptop GPU)</a>；本想着两张显卡之间 118% 的性能差距，能够在之后很长一段时间里都无需性能焦虑。没想到的是，这台 R7000P 的散热很成问题，风扇极吵的同时 GPU 会在满载达到 83° 然后撞温度墙降频（大概能从 1700Mhz 降到 1200Mhz）；虽然图形性能确实有提升，但是降频带来的帧率不稳定极大地影响了游戏的体验。我日益明白移动端平台除非加大钱，否则很难和拥有更好散热和更高 TDP 的桌面端平台抗衡。加上我越来越多地在电脑上运行更多的多任务，纠结了大半年，也因为对以后的生活有了更明朗的规划，决定趁着双十一，以 7000 元的预算组装一台台式机。</p><h1 id="配置"><a href="#配置" class="headerlink" title="配置"></a>配置</h1><blockquote><p>CPU: <a href="https://www.intel.com/content/www/us/en/products/sku/230494/intel-core-i513600kf-processor-24m-cache-up-to-5-10-ghz/specifications.html">Intel i5-13600KF</a> 盒装</p><p>显卡: <del><a href="https://www.asus.com.cn/motherboards-components/graphics-cards/tuf-gaming/tuf-rtx3070-o8g-v2-gaming/">华硕 TUF-RTX3070-O8G-V2-GAMING</a></del> <a href="https://www.pny.com/pny-geforce-rtx-4070-12gb-xlr8-gaming-verto-epic-x-rgb">PNY RTX™ 4070 12GB XLR8 Gaming VERTO™</a></p><p>主板：<a href="https://www.asus.com.cn/motherboards-components/motherboards/tuf-gaming/tuf-gaming-b760m-plus/">华硕 TUF GAMING B760M-PLUS</a></p><p>内存：<a href="https://item.jd.com/100050612963.html">光威 天策 DDR5 6400 海力士 A-Die CL32 16GB ×2</a></p><p>SSD：<a href="https://ssd.skhynix.com/platinum_p41/">SK Hynix Platinum P41</a></p><p>副盘：<a href="https://item.jd.com/100042016272.html">爱国者 P7000Z</a> 2TB + <a href="https://documents.westerndigital.com/content/dam/doc-library/en_us/assets/public/western-digital/product/internal-drives/wd-blue-nvme-ssd/data-sheet-wd-blue-sn550-nvme-ssd-idk.pdf">西数 SN550</a> 1TB + <a href="https://semiconductor.samsung.com/ssd/pc-ssd/pm981a/">三星 PM981a</a> 500GB + <a href="https://www.seagate.com/products/surveillance-drives/skyhawk-hard-drive/">希捷 SkyHawk</a> ST4000VX15 4TB（均复用已有部件）</p><p>电源：<a href="https://www.thermalright.com/product/tg-650/">利民 TR-TG650 金牌全模组 650W</a></p><p>机箱：<a href="https://item.jd.com/100039516529.html">先马 平头哥 M2 Air</a>（前置 Type-C）</p><p>CPU 散热器：<a href="https://www.thermalright.com/product/peerless-assassin-120-se/">利民 PA120 SE</a> 双塔</p><p>机箱风扇：<a href="https://item.jd.com/1026103.html">先马 游戏风暴 12cm</a></p></blockquote><p>总价格：2839（板U） + 3885（显卡） + 549（内存） + 469（SSD）+ 301（电源）+ 109（机箱） + 137（散热器）+ 9（机箱风扇） = ￥8298</p><p>其他外设包括：</p><blockquote><p>鼠标：<a href="https://www.logitechg.com/en-eu/products/gaming-mice/g203-prodigy-gaming-mouse.910-004845.html">Logitech G203 Prodigy</a></p><p>键盘：<a href="https://support.logi.com/hc/en-gb/articles/360035270353-MX-Keys-Wireless-Illuminated-Keyboard">Logitech MX Keys</a></p><p>显示器：<a href="https://www.samsung.com/uk/business/monitors/high-resolution/monitor-s60a-ls24a600nwuxxu/">Samsung LS24A600N</a> 2K 75Hz + Samsung 某低端 1080p</p><p>音响：<a href="https://www.philips.com.cn/c-p/SPA520S_93/multimedia-speakers-2.1">Philips SPA520S</a></p><p>麦克风：<a href="https://www.amazon.co.uk/AmazonBasics-USB-Gaming-Microphone-Red/dp/B07HM1862D">AmazonBasics USB Gaming MIC</a></p><p>耳机：<a href="https://buy.realme.com/cn/goods/284">Realme 真我 Buds 有线</a> 3.5mm + <a href="https://www.sony.com/ug/electronics/headband-headphones/wh-ch700n">Sony WH-CH700N</a></p></blockquote><p>目前使用的笔记本：</p><blockquote><p><a href="https://support.apple.com/kb/SP825">MacBook Air (M1, 2020)</a> - 8GB</p></blockquote><h2 id="显卡"><a href="#显卡" class="headerlink" title="显卡"></a>显卡</h2><p>出于显卡的高昂价格，它反而是我的组装过程首先考虑的部件。</p><p>双十一前夕，广为好评的 <a href="https://www.techpowerup.com/gpu-specs/geforce-rtx-3060-ti-gddr6x.c3935">RTX 3060Ti G6X</a> 显卡已经下架有一段时间了，只剩下小品牌和第三方小店有售卖。但是又由于 40 系低端卡在用料上过分缩水，个人感觉吃相比较难看，不太想支持；<a href="https://www.nvidia.com/en-us/geforce/graphics-cards/40-series/rtx-4060-4060ti/">4060Ti</a> 的性能和 3060Ti G6X 打的不相上下，4070 的售价目前大概在 4500-4700，也不符合预算分配。最后发现<em>华硕京东自营旗舰店</em>还有 <a href="https://www.nvidia.com/en-us/geforce/graphics-cards/30-series/rtx-3070-3070ti/">RTX 3070</a> 在售，2999 的价格能打过双十一 3199 的 4060Ti，加上相比于其他较低端的产品线和品牌，TUF 系列自带做工和用料加成，最后决定入手。</p><p>值得一提的是这张卡在 10.17 应该已经是尾货了，我蹲了几天发现第一次没货，赶紧在补货/其他用户取消订单之后下单了。在我下单后两小时内，商品就进入了持续至今的无货状态。</p><p>好运的是在双十一活动到来以后用 Plus 券和双十一券保价了 70 块钱，最后到手 2929。</p><p>也有考虑过 AMD 显卡，但是第一在这个预算 AMD 的竞品的性价比（每块钱的性能）没有拉开差距，第二 AMD 的驱动和生产力方面看国内外的评测和用户感受总觉得还不行，所以就 Pass 掉了。</p><h3 id="11-20-后续更新"><a href="#11-20-后续更新" class="headerlink" title="11.20 后续更新"></a>11.20 后续更新</h3><p>虽然这张 TUF 3070 做工用料都非常好，但是它的<strong>啸叫</strong>不仅<strong>频率上高</strong>而且<strong>大声</strong>。和京东来回扯皮近两周后在已拆封已上机的情况下退货了，且拿到了额外补偿 ￥200，上车了 PNY 的三风扇丐版 4070；双风扇和三风扇之间差了六七十块钱，入了三风扇（实际上也是短 PCB 加上长散热器）。实际入手成本 4085（双11凑单价）- 200 = ￥3885.</p><p>这张 4070 除非把耳朵贴上去不然是很难听到啸叫的；trade off 就是完全没办法超频，BIOS 锁死功耗，并且就算频率 +100 电压拉满显存频率不变的情况下还是会偶尔出现游戏卡退的情况，应该是天雷滚滚体质，所以说毫无超频空间。</p><p>好的地方就是它真的很小巧，可以很轻松连盒子塞进背包那种。就是不知道评测最好的七彩虹 AD OC 会不会有啸叫；4399 的双11价格应该还算值，但是现在这样也挺好。</p><p>默认大概在 150-170W 之间，散热基本上没啥大问题，很少能上 60°C，降压方面过两天再折腾。</p><p>两张显卡之间纸面性能提升 ~30%，价格贵了 42%（3885/2729），没了啸叫，总的来说就是挺开心。</p><p>看贴吧评论感觉华硕卡特别容易啸叫，感觉以后买的时候还是要尽量避免。</p><h2 id="CPU"><a href="#CPU" class="headerlink" title="CPU"></a>CPU</h2><p>CPU 的选项基本上有：<a href="https://www.intel.com/content/www/us/en/products/sku/232140/intel-core-i513490f-processor-24m-cache-up-to-4-80-ghz/specifications.html">i5-13490F</a>, <a href="https://www.intel.com/content/www/us/en/products/sku/230494/intel-core-i513600kf-processor-24m-cache-up-to-5-10-ghz/specifications.html">i5-13600KF</a>, <a href="https://www.intel.com/content/www/us/en/products/sku/134595/intel-core-i712700kf-processor-25m-cache-up-to-5-00-ghz/specifications.html">i5-12700KF</a> 和 AMD 方面的 <a href="https://www.amd.com/en/products/cpu/amd-ryzen-5-7500f">Ryzen 5 7500f</a>/<a href="https://www.amd.com/en/products/apu/amd-ryzen-5-7600">7600</a> 和 <a href="https://www.amd.com/en/products/cpu/amd-ryzen-7-5800x3d">Ryzen 7 5800X3D</a>. 由于对生产力的强需求，i.e. 装机并不是纯粹为了打游戏，所以 CPU 的实际性能很重要。上面的 AMD 的 CPU 选择主要都是游戏首选 U，实际上多核性能比起 Intel 还是差了一点，而 DDR5 的优化似乎也不怎么好，最后的选择还是落在 Intel 阵营。</p><p>12 代以后的 Intel CPU 基本上都是大小核结构，在早些时候因为 Windows 10 甚至是 Windows 11 平台糟糕的大小核分配引起过大范围的讨论。个人不是很认可 Windows 11 臃肿的桌面 UI 设计，所以 Windows 10 仍然是首选。根据 <a href="https://www.reddit.com/r/intel/comments/v0uf90/windows_10_intel_12th_gen_alder_lake_ecores_as_of/">Reddit 上的讨论</a>，Windows 10 21H2 似乎已经在某种程度上解决了大小核调解的问题，<a href="https://www.youtube.com/watch?v=6MY-HHNMOFI">PCWorld 的测评</a>也确认了两个平台性能差异不大。而 13 代 Intel CPU 带来了<a href="https://www.tomshardware.com/news/intel-13th-gen-raptor-lake-release-date-specifications-pricing-benchmarks-all-we-know-specs">改进了的硬件调解器</a>（Thread Director），于是 13 代 Intel 就成了首选。</p><p>最后的选择基于预算落在了 <a href="https://www.intel.com/content/www/us/en/products/sku/232140/intel-core-i513490f-processor-24m-cache-up-to-4-80-ghz/specifications.html">i5-13490F</a> 和 <a href="https://www.intel.com/content/www/us/en/products/sku/230494/intel-core-i513600kf-processor-24m-cache-up-to-5-10-ghz/specifications.html">13600KF</a> 上。前者是中国特供传说是网吧用的游戏甜品 U，后者则是有真正 13 代的核心改进和性能几乎等同于上一代 i7 的大管牙膏。在预算都能允许两个 U 的情况下，13600KF 默认支持<a href="https://www.intel.com/content/www/us/en/products/sku/230494/intel-core-i513600kf-processor-24m-cache-up-to-5-10-ghz/specifications.html">更高的 DDR5 内存频率</a>（5600MT 相比于 4800MT），它的内存控制器（IMC）体质应该会比 13490F 好一些。因为打算上 6000-6400 频率的 DDR5，所以最后选择了后者。</p><p>13600KF 在现阶段对我来说几乎是过剩的性能应该能让我未来更新配置的时候有机会不更换 CPU（毕竟过了这么多代挤了这么多次牙膏它也就比 i5-8400 快 50% 而已）。<del>（其实无论怎么说这 U 都买贵了的）</del></p><h2 id="主板"><a href="#主板" class="headerlink" title="主板"></a>主板</h2><p>下一个决定的部件就是主板。主流的厂商有华硕、微星、技嘉，次一线的的有七彩虹和铭瑄等。出于耐用性的考虑，还是考虑一线主流品牌。技嘉之前的 “Insist on Ultra Durable” 的 slogan 还挺喜欢的，微星主板之前家里的台式机也用过，这次想试试华硕主板（然而其实并没有什么不同，可以说毫无存在感）。</p><p>芯片组方面因为高频 DDR5 的关系最后只考虑了 B760（同时超频需求为 0）。各家品牌都有较低端的 B760 主板，缺点在于 IO 面板的丰富程度和 PCIE/M.2 的扩展度。也是出于战未来（这个词好讽刺hhh）的考虑，最后考虑更高端，后置 IO 带有 10G Type-C 和四个以上的 USB 3.0 的 B760.</p><p>最后的选择是买板 U 套装的时候选的 <a href="https://www.asus.com.cn/motherboards-components/motherboards/tuf-gaming/tuf-gaming-b760m-plus/">B760M-Plus 华硕重炮手 D5</a>（其实有点后悔没上有 3 个 M.2 的技嘉）。</p><h2 id="内存"><a href="#内存" class="headerlink" title="内存"></a>内存</h2><p>一开始想的是 DDR4 的，因为 DDR5 对游戏可谓毫无加成。但是又想到日常极重的多任务需求，加上预算允许，最后还是上了 DDR5.</p><p>发现现在都不讲金士顿之类的品牌了（有是有但是很贵），直接考虑国产品牌。最后随便选了个海力士 A-Die 颗粒的光威（因为感觉金百达 Kingbank 那个 logo 太丑了），频率和时序是 6400 CL32，应该算可以了。</p><h1 id="上图！"><a href="#上图！" class="headerlink" title="上图！"></a>上图！</h1><blockquote><p>所有部件的合影，最下方左侧是 aigo P7000Z 2TB 和 WD SN550（外缓没砍半版）</p></blockquote><p><img src="https://edge.huangxin.org/images/2023/10/30/1505121907.jpg" alt="所有部件的合影"></p><blockquote><p>机箱内装好散热器的样子，还没装显卡</p></blockquote><p><img src="https://edge.huangxin.org/images/2023/10/30/1528431533.jpg" alt="IMG_7758-Edit"></p><blockquote><p>机箱内拆下散热器的样子，可以看到 CPU 型号、内存品牌和显卡</p></blockquote><p><img src="https://edge.huangxin.org/images/2023/10/30/2976301324.jpg" alt="DSC00004-Enhanced-NR"></p><blockquote><p>散热器 + 显卡特写（1）</p></blockquote><p><img src="https://edge.huangxin.org/images/2023/10/30/2677422055.jpg" alt="DSC00004"></p><blockquote><p>散热器 + 显卡特写（2）</p></blockquote><p><img src="https://edge.huangxin.org/images/2023/10/30/2301926188.jpg" alt="DSC00001"></p><blockquote><p>散热器风扇和下方的内存条特写</p></blockquote><p><img src="https://edge.huangxin.org/images/2023/10/30/563931056.jpg" alt="DSC00012"></p><h1 id="实际体验"><a href="#实际体验" class="headerlink" title="实际体验"></a>实际体验</h1><h2 id="大小核"><a href="#大小核" class="headerlink" title="大小核"></a>大小核</h2><p>亲测下来就是 Windows 10 / 11 真的没有大小核影响了。</p><p>一开始装的 Windows 11，强忍着它的逆天 UI（例如右键菜单默认隐藏，改个 Volume Mixer 要进设置）跑了下免费的 <a href="steam://install/231350">3DMark Demo</a> 的 Time Spy，结果在全出厂设置下是 14219 分。</p><p><img src="https://edge.huangxin.org/images/2023/10/30/3929045288.png"></p><p>重新装了个 Windows 10，一跑分，坏了，只有 13045. <a href="https://www.3dmark.com/compare/spy/42566926/spy/42569542">对比之下</a> Windows 10 各项下都有 ~10% 的性能损失。</p><p>好在没死心，从 NVIDIA 官网重新下了驱动，这下有 14219 分了，对比<a href="https://www.3dmark.com/compare/spy/42566926/spy/42571993">在这里</a>。</p><p><img src="https://edge.huangxin.org/images/2023/10/30/1023096942.png"></p><p>电源计划切换到终极性能（Ultimate Performance），注册表解锁异构处理器分配（具体设置如下图），<a href="https://www.maxon.net/en/cinebench">Cinebench</a> R23 跑分 23319，算正常水平，不继续折腾。</p><p><img src="https://edge.huangxin.org/images/2023/10/31/313033193.jpg"></p><h2 id="散热"><a href="#散热" class="headerlink" title="散热"></a>散热</h2><p>在上方的 3DMark Time Spy 测试中，CPU 温度均为 82-83°C；而短时间双烤下，CPU 封装温度更是能达到 95°C 且偶尔触发 Thermal Throttling；这当然不理想。一开始还觉得是一百多的双塔不行，在网上搜索一番之后（发现有人用70块的单塔压这个 U），进 BIOS 解锁了 104 微码和降低了 0.095V 的电压（尝试过 -0.125V，但是烤机过后会出现死机的情况）。调整以后 CPU 单烤 &lt; 77°C，双烤 3 小时在 90° 左右；考虑到真实工作流里双烤跑满的概率近乎于 0，就不管它了。也不用增加预算买更好的双塔了。</p><p>调整后跑 Time Spy 温度报告也只有 75°C，<a href="https://www.3dmark.com/spy/42652567">结果 13964 分</a>。</p><blockquote><p>11.02 更新 - 显卡小超了一波频 分数忘了 大概在 14500 左右 提升大概在 3.8% 功率不变</p><p>最高超上了 15001，但是稳定不了</p></blockquote><p>显卡的散热倒是很强，无论怎么烤怎么用温度都超不过 63°C（超频后 65-66°C - 七八十度？不存在的）；而且这张卡是默认超了一点点频的（1725MHz 到 1935Mhz, boosted）在这个价格对它很满意。</p><h2 id="主板-1"><a href="#主板-1" class="headerlink" title="主板"></a>主板</h2><p>其实华硕主板的 BIOS 和其他两家区别应该不大，也不算特别好用（不过可能 Basic I/O System 就只能做到这样的水平吧）（笑）当然自定义选项确实超级多，只不过大部分我都不会用。</p><p>主板默认是各种功耗墙、频率全部拉满的，不用操心也很好。只不过第一次烤机 95°C 把我惊呆了。</p><p>用内置的 XMP 配置文件成功在 6400 频率运行内存。</p><p>看网上超频的收益除了数字上好看好像也没什么特别大的提升，并且要配置 Z 系列主板和更强的散热，不超频感觉是对的。</p><p>PCIE 扩展槽给了一个 5.0 ×16，一个 4.0 ×16，希望以后能用得着第二个槽吧。</p><p>前置接口接上了机箱的一个 Type-C 10Gbps，两个 USB 3.0 (3.2 Gen 1)，后置接口有一个 20Gbps Type-C，两个 10Gbps 3.2 Gen 2 Type-A，两个  USB 3.0 (3.2 Gen 1) 和两个 USB 2.0，目前是一整个用不完的大状态，移动固态硬盘也就 10Gbps 的。那么多接口现在就成了放着好看的存在。</p><p>反正这张主板用料应该是够的，应该也不太会坏，就这样吧。</p><p>值得一提的是用同一个音响，支持 7.1 环绕声主板推出来的音频 Fidelity 感觉比起笔记本电脑还是很不一样，无论是听音乐还是玩游戏都能注意到以前没注意到的细节，也不知道是不是错觉。</p><h2 id="显卡-1"><a href="#显卡-1" class="headerlink" title="显卡"></a>显卡</h2><p>3070 玩游戏比移动端的 3060 自然是天壤之别（纸面性能有 ~65% 的提升），很多游戏都能开全高特效，或者是开全高特效和垂直同步（显示器2K 刷新率 75Hz）的情况下根本跑不满。有一个缺点就是跑起来的时候带有点能注意到的啸叫；在网上看了看好像基本上是玄学的问题。显卡跑起来的时候 CPU 风扇基本上也会有一定转速，所以就装作听不见了。</p><p>这张显卡还默认带了两个 HDMI 接口，而不是其他显卡的一个，感觉挺友好。虽然我的主显示器是支持 DP 的，所以在这上面对我没区别。</p><p>希望能 够用最少三年吧。</p><h2 id="内存-amp-生产力"><a href="#内存-amp-生产力" class="headerlink" title="内存 &amp; 生产力"></a>内存 &amp; 生产力</h2><p>DDR5 内存感觉是正确的选择，加上 PCIE4.0 的 SSD（虽然我这块没缓存，<a href="https://www.solidigm.com/products/client/d6/p44.html">Solidigm P44 Pro</a> 这个 1111 又升价了暂时没买）的结果就是系统相比之前的笔记本响应度提升了一整个级别（虽然开任务管理器还是会慢一小会儿）。开机从按下按键到出现 Windows 10 的锁屏只用了 20 秒，从第一次 BIOS 界面出现到开机完毕只用了 7 秒。</p><p>这块爱国者的 P7000Z 2TB 在这块主板上跑到了超过 80MB/s 的 4K 读，相当满意。<del>现在感觉有缓盘在这方面的提升也不大了</del>（11.1 更新 - 还是用 489 的价格入手了一块 SK Hynix Platinum P41 - 半年前 469 退货的 Solidigm P44 Pro 现在只能说亏爆）。</p><p>多开应用（比如现在我开了 N 个浏览器标签页，数个常用软件例如网易云、微信、Office套件、代码编辑器加上安卓模拟器），CPU 也就跑在 11%，非常令人吃惊。</p><p>生产力方面目前只用了 Lightroom 和 PS 修了下上面的几张图，导入和导出都相比以前快非常之多。LR 在 Windows 上也算真的能用了，以前的 AMD + 高延迟 D4 后果就是几乎不能用。</p><p>AIDA64 跑分如下，算正常的水平就没管了。</p><p><img src="https://edge.huangxin.org/images/2023/10/30/3616804045.png"></p><p>附带一下原来电脑的内存跑分：</p><p><img src="https://edge.huangxin.org/images/2023/10/30/1669608976.png"></p><h2 id="电源"><a href="#电源" class="headerlink" title="电源"></a>电源</h2><p>电源就买了个便宜的利民金牌，看评测虽然不是一线代工 &amp; 做工但却也没什么雷，能用。全模组设计能往机箱里少塞点线也不错。唯一的槽点是电源线只有 1 米，有点太短了。</p><p>实际上这台电脑用起来最多也就双烤到 510W（CPU 未降压；降压以后大概在 490W；计入电源转化效率，下同），玩游戏大概在 380W，平时日用就 100-150W，待机 ~85W，所以说这个电源也算有点超标准了；很多人的电源焦虑根本没必要。</p><h1 id="其他"><a href="#其他" class="headerlink" title="其他"></a>其他</h1><p>装机的过程在看了 N 个小时网上教程的情况下还是挺顺利的。不过一开始散热器装反了（包括底座），以及后来发现前置 Type-C 连接线没接好导致设备连上去有任何的读写操作就马上卡退。散热器也没有出现把 CPU 压弯的情况。</p><p>第一次亮机的时候没画面，看了 BIOS Debug 灯发现是内存的问题， 把其中一条按下去一点之后就可以了。</p><p>风扇曲线也没怎么调，感觉默认的挺不错的。</p><p>机箱风扇就跟风随便买了个 8.9 块的，聊胜于无 &amp; 装装样子吧。反正我是不觉得机箱应该装六七个风扇的，还不如打开侧板用风扇吹。</p><p>也不信仰 RGB，所以机箱和内部基本上是全黑的，显卡带的 RGB 也被我关掉了，也不用为了 RGB 去增加预算和上海景房（玻璃碎裂警告）。而且由于电脑就在卧室，睡觉的时候还 RGB 真的有点自虐的感觉；手动关掉又太麻烦了。</p><p>能继续用 Windows 10 还是很高兴。</p><h2 id="新旧电脑对比"><a href="#新旧电脑对比" class="headerlink" title="新旧电脑对比"></a>新旧电脑对比</h2><p>附上 3DMark 成绩<a href="https://www.3dmark.com/compare/spy/42652567/spy/42403769">对比之前的笔记本</a>。</p><p><img src="https://edge.huangxin.org/images/2023/10/30/1407298780.png"></p><h1 id="总结"><a href="#总结" class="headerlink" title="总结"></a>总结</h1><p>就是这样，这就是我花了 7000 块钱组装的第一台属于自己的台式机。</p><p>希望它能和我一起，accomplish all accomplishments.</p><p>May us thrive in the future.</p><p><img src="https://edge.huangxin.org/images/2023/10/30/2391845265.png"></p>]]></content>
    
    
    <summary type="html">&lt;h1 id=&quot;前言&quot;&gt;&lt;a href=&quot;#前言&quot; class=&quot;headerlink&quot; title=&quot;前言&quot;&gt;&lt;/a&gt;前言&lt;/h1&gt;&lt;p&gt;电脑无疑是今日的我最为重要的生产力工具（手机则大部分是娱乐工具 233）。在 16 年我第一台属于自己的电脑是一台搭载 &lt;a href=&quot;https://www.intel.com/content/www/us/en/products/sku/84985/intel-core-i55257u-processor-3m-cache-up-to-3-10-ghz/specifications.html&quot;&gt;i5-5257U&lt;/a&gt; 的 &lt;a href=&quot;https://support.apple.com/en-gb/111959&quot;&gt;MacBook Pro (Retina, 13-inch, Early 2015)&lt;/a&gt;。那台电脑支持着我探索网络的第一步，我在它上面初步体验了 &lt;a href=&quot;https://www.apple.com/final-cut-pro/&quot;&gt;Final Cut Pro&lt;/a&gt; 等专业软件。&lt;/p&gt;</summary>


    <category term="技术向" scheme="https://huangxin.dev/categories/partly-technical/"/>
    
    
  </entry>
  
  <entry>
    <title>我的海外 BitTorrent 下载方案</title>
    <link href="https://huangxin.dev/partly-technical/my-bittorrent-solution.html"/>
    <id>https://huangxin.dev/partly-technical/my-bittorrent-solution.html</id>
    <published>2023-10-06T06:27:40.000Z</published>
    <updated>2024-03-25T16:46:57.000Z</updated>
    
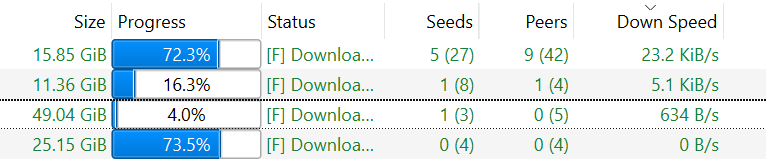
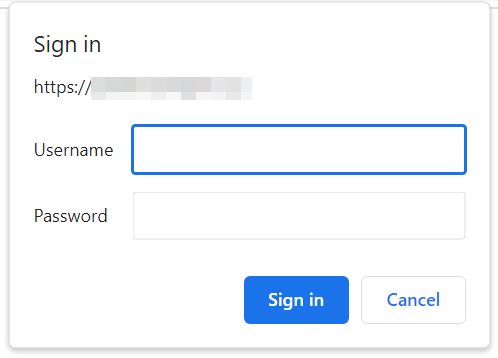
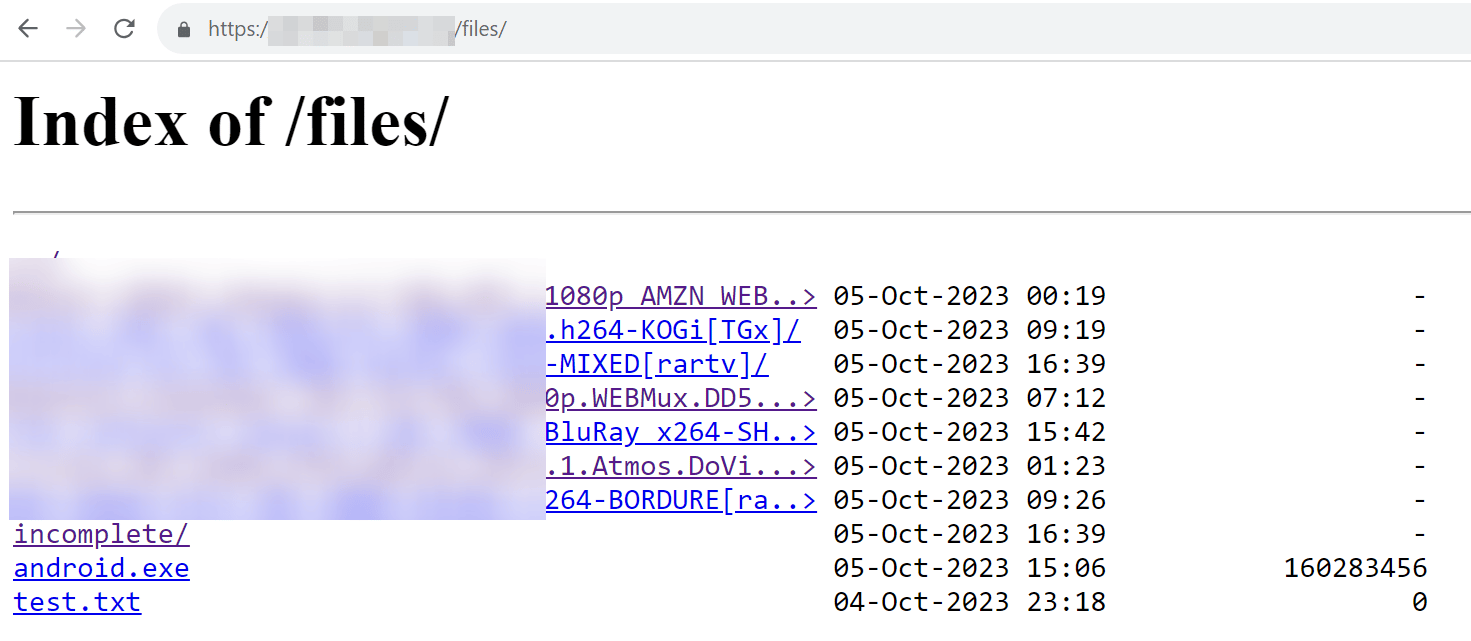
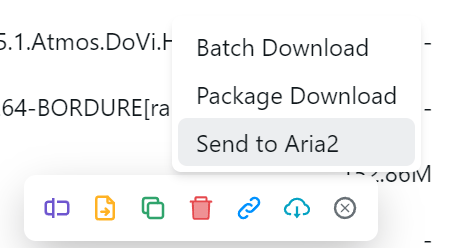
    <content type="html"><![CDATA[<h1 id="前言"><a href="#前言" class="headerlink" title="前言"></a>前言</h1><p>很多人都有看电影电视的经历抑或是习惯。囿于国内的言论环境，很多资源都无法正常引进，或者在引进的时候被删减。通过各类云盘流通的资源质量良莠不齐，而使用国外流媒体平台观看又会面对诸多限制和高昂成本的问题，对于我来说，直接食用国外通过 BitTorrent（BT）分享的生肉或者加上自行寻找配对的熟肉字幕更加具有实践性。<span id="more"></span>然而，又一次苦于国内的网络连通性和网络封锁，国内下载 BT 的时候免不了有的资源没有速度、无法下载完全。这个时候，一个国外的网络环境不可或缺。</p><p><img src="https://edge.huangxin.org/images/2023/10/06/2086358529.png"></p><p>然而，绝大部分的国外网络资源，无论是私有专用网还是服务器，都会受到 DMCA 或者其他类型的版权投诉的影响，使 BT 下载不可持续。也有一部分的服务器位于独特的司法管辖内，能给予资源获取较高的自由度。这篇文章分享了我低成本和低门槛的海外 BT 下载和取回的解决方案。</p><p>读懂本文，你需要：</p><ol><li>对 Linux 系统和其操作的基本了解</li><li>对 Nginx 的基本了解</li><li>对英文的掌握度</li><li>一个海外网络环境</li></ol><p><strong>本文方案的构成：</strong></p><ol><li>某主机商（见文末）位于比利时卢森堡的服务器，挂载缓存 HDD 硬盘（256GB @ 35MB/s），约 26￥/月</li><li>qBitTorrent-Nox 及其 Web UI 作为 BT 下载器</li><li>Nginx 作为反向代理前端、目录列举和用户鉴权的工具</li><li>AList 作为目录列举和文件管理工具</li></ol><p>本文的局限性：</p><ol><li>没有涉及 PT（Private Tracker）的使用</li><li>使用一键服务器环境，牺牲了安全性，存在可能的隐患</li><li>下载、取回速度显著受限于服务器挂载硬盘的读写速度以及（在直连的情况下）服务器和大陆的网络连通性</li></ol><p>本文约 4000 字。</p><h1 id="上手"><a href="#上手" class="headerlink" title="上手"></a>上手</h1><h2 id="准备服务器环境"><a href="#准备服务器环境" class="headerlink" title="准备服务器环境"></a>准备服务器环境</h2><p>系统为 Ubuntu 20.04。开机 <code>df -h</code> 看看磁盘状态：</p><figure class="highlight bash"><table><tr><td class="code"><pre><span class="line">root@localhost:~<span class="comment"># df -h</span></span><br><span class="line">Filesystem      Size  Used Avail Use% Mounted on</span><br><span class="line">udev            459M     0  459M   0% /dev</span><br><span class="line">tmpfs            98M  628K   98M   1% /run</span><br><span class="line">/dev/vda1        20G  974M   18G   6% /</span><br><span class="line">tmpfs           489M     0  489M   0% /dev/shm</span><br><span class="line">tmpfs           5.0M     0  5.0M   0% /run/lock</span><br><span class="line">tmpfs           489M     0  489M   0% /sys/fs/cgroup</span><br><span class="line">tmpfs            98M     0   98M   0% /run/user/0</span><br></pre></td></tr></table></figure><p>首先 <code>apt update &amp;&amp; apt install -y python3-pip</code> 更新软件列表，然后安装 pip3（Python 3）已经内置。</p><h3 id="选择最优源"><a href="#选择最优源" class="headerlink" title="选择最优源"></a>选择最优源</h3><p>使用 <code>pip3 install apt-select</code> 安装 <a href="https://github.com/jblakeman/apt-select">apt-select</a>，这个工具可以为包管理工具选择最快的源，方便后面的其他安装。</p><p>因为服务器在比利时卢森堡，所以使用比利时的国家代码 BE：</p><figure class="highlight bash"><table><tr><td class="code"><pre><span class="line">apt-select -C BE -m up-to-date -c -t 10</span><br></pre></td></tr></table></figure><p>apt-select 输出如下：</p><figure class="highlight bash"><table><tr><td class="code"><pre><span class="line">Getting list of mirrors...done.</span><br><span class="line">Testing latency to mirror(s)</span><br><span class="line">[4/4] 100%</span><br><span class="line">Getting list of launchpad URLs...<span class="keyword">done</span>.</span><br><span class="line">Looking up 4 status(es)</span><br><span class="line">[2/4] 50%</span><br><span class="line">1. mirror.unix-solutions.be</span><br><span class="line">    Latency: 5.25 ms</span><br><span class="line">    Org:     Unix-Solutions BVBA</span><br><span class="line">    Status:  Up to <span class="built_in">date</span></span><br><span class="line">    Speed:   1 Gbps</span><br><span class="line">2. archive.ubuntu.com</span><br><span class="line">    Latency: 12.87 ms</span><br><span class="line">    Org:     Canonical Ltd.</span><br><span class="line">    Status:  Up to <span class="built_in">date</span></span><br><span class="line">    Speed:   100 Mbps</span><br><span class="line">Choose a mirror (1 - 2)</span><br><span class="line"><span class="string">&#x27;q&#x27;</span> to quit 1</span><br></pre></td></tr></table></figure><p>使用数字键选择一个符合心意的源，使用如下命令替换生成好的 <code>sources.list</code> 并备份原来的：</p><figure class="highlight bash"><table><tr><td class="code"><pre><span class="line">sudo <span class="built_in">cp</span> /etc/apt/sources.list /etc/apt/sources.list.backup &amp;&amp; \</span><br><span class="line">sudo <span class="built_in">mv</span> sources.list /etc/apt/</span><br></pre></td></tr></table></figure><h3 id="安装常用软件和-Web-环境"><a href="#安装常用软件和-Web-环境" class="headerlink" title="安装常用软件和 Web 环境"></a>安装常用软件和 Web 环境</h3><p>然后使用如下命令再次更新软件源并安装一些常用软件，最后更新所有软件包：</p><figure class="highlight bash"><table><tr><td class="code"><pre><span class="line">apt update</span><br><span class="line">apt install build-essential wget curl vim coreutils git htop iotop nload screen dnsutils</span><br><span class="line">apt upgrade</span><br></pre></td></tr></table></figure><h4 id="Oneinstack-和警告"><a href="#Oneinstack-和警告" class="headerlink" title="Oneinstack 和警告"></a>Oneinstack 和警告</h4><blockquote><p>参见 <a href="https://v2ex.com/t/979226">https://v2ex.com/t/979226</a><br>Oneinstack 于 2023 年 4-5 月、9 月下旬以后两度出现官网安装包包含恶意代码的问题，且网站已经出售，请不要使用官网的一键包<br>下面的安装包为 Dropbox 转存版本，在没有完全代码审计的情况下一定程度上降低了风险，请按步骤操作</p></blockquote><p>使用 Oneinstack 一键包安装 LNMP 环境（Linux, Nginx, MySQL, PHP）。鉴于最近 LNMP.org 和 Oneinstack 出现含有恶意代码的问题，这里使用本人转存自 Dropbox 的一个据称没有污染的版本 <a href="https://github.com/hifocus/CleanInStack">CleanInStack</a>.</p><p>首先编辑 <code>/etc/hosts</code> 屏蔽 Oneinstack 官方不可信域名：</p><figure class="highlight accesslog"><table><tr><td class="code"><pre><span class="line"><span class="number">0.0.0.0</span> mirrors.linuxeyes.com</span><br><span class="line"><span class="number">0.0.0.0</span> mirrors.oneinstack.com</span><br></pre></td></tr></table></figure><p>下载<em>应该没问题的</em> Oneinstack 一键包并 md5 checksum：</p><figure class="highlight bash"><table><tr><td class="code"><pre><span class="line">wget https://github.com/hifocus/CleanInStack/releases/download/0.0.0/cleaninstack-full.tar.gz</span><br><span class="line"><span class="built_in">md5sum</span> cleaninstack-full.tar.gz</span><br><span class="line"></span><br><span class="line"><span class="comment"># md5 应为 b2947bac8cb66d54fcd90d30e406598f</span></span><br><span class="line"></span><br><span class="line">tar -xzf cleaninstack-full.tar.gz</span><br><span class="line">./oneinstack/install.sh</span><br></pre></td></tr></table></figure><p>其实安装 Nginx 即可，喜欢的话可以把 PHP 和 mySQL 装全了。</p><h4 id="更新防火墙规则"><a href="#更新防火墙规则" class="headerlink" title="更新防火墙规则"></a>更新防火墙规则</h4><p>然后更新防火墙规则：允许 22（或者你选择的 ssh 口）、80、443 端口，禁止其他端口：</p><figure class="highlight bash"><table><tr><td class="code"><pre><span class="line"><span class="comment"># 如果没安装</span></span><br><span class="line">apt install ufw</span><br><span class="line"></span><br><span class="line">ufw <span class="built_in">disable</span> <span class="comment"># 先禁用 ufw (Uncomplicated Firewall - iptables 的前端) 规则</span></span><br><span class="line">ufw default deny <span class="comment"># 默认阻拦所有规则</span></span><br><span class="line"></span><br><span class="line">ufw allow 22/tcp</span><br><span class="line">ufw allow 80/tcp</span><br><span class="line">ufw allow 443/tcp</span><br><span class="line"></span><br><span class="line">ufw <span class="built_in">enable</span> <span class="comment"># 应用更改和启用 ufw</span></span><br><span class="line">ufw status verbose <span class="comment"># 查看详细规则</span></span><br></pre></td></tr></table></figure><h4 id="禁止-IP-直接访问"><a href="#禁止-IP-直接访问" class="headerlink" title="禁止 IP 直接访问"></a>禁止 IP 直接访问</h4><p>到现在为止，如果我们直接访问服务器的 IP 会出现 Oneinstack 的界面，而访问 <code>https://IP</code> 在我们添加第一个 https 域名后也会显示该域名的证书。出于强迫症，让我们来禁止 80/443 端口对 IP 的直接访问。</p><p>首先自签一张 SSL 证书：</p><figure class="highlight bash"><table><tr><td class="code"><pre><span class="line"><span class="built_in">mkdir</span> /usr/local/nginx/conf/ssl/</span><br><span class="line">openssl req -x509 -nodes -days 365 -newkey rsa:2048 -keyout /usr/local/nginx/conf/ssl/nginx.key -out /usr/local/nginx/conf/ssl/nginx.crt</span><br><span class="line"><span class="built_in">ls</span> /usr/local/nginx/conf/ssl</span><br></pre></td></tr></table></figure><blockquote><p>注意此处 <code>/usr/local/nginx/</code> 为你 Nginx 的安装路径。</p></blockquote><p>然后编辑 <code>/usr/local/nginx/conf/nginx.conf</code>：</p><figure class="highlight plaintext"><table><tr><td class="code"><pre><span class="line">; 在 80 端口的 server 块下添加 return 444;</span><br><span class="line">  server &#123;</span><br><span class="line">    listen 80;</span><br><span class="line">    server_name _;</span><br><span class="line">    return 444;</span><br><span class="line">&#125;</span><br><span class="line"></span><br><span class="line">; 新增一个监听 443 端口的 server 块：</span><br><span class="line"></span><br><span class="line">  server &#123;</span><br><span class="line">    listen 443 ssl default_server;</span><br><span class="line">    server_name _;</span><br><span class="line">    ssl_certificate /usr/local/nginx/conf/ssl/nginx.crt;</span><br><span class="line">    ssl_certificate_key /usr/local/nginx/conf/ssl/nginx.key;</span><br><span class="line">    return 444;</span><br><span class="line">&#125;</span><br></pre></td></tr></table></figure><p>保存文件，运行 <code>nginx -t</code> 测试：</p><figure class="highlight bash"><table><tr><td class="code"><pre><span class="line">nginx: the configuration file /usr/local/nginx/conf/nginx.conf syntax is ok</span><br><span class="line">nginx: configuration file /usr/local/nginx/conf/nginx.conf <span class="built_in">test</span> is successful</span><br></pre></td></tr></table></figure><p>没问题的话就可以用 <code>service nginx restart</code> 重启 Nginx。现在通过 80/443 端口就无法直接访问服务器的 IP 了。</p><h2 id="安装-BitTorrent-下载环境"><a href="#安装-BitTorrent-下载环境" class="headerlink" title="安装 BitTorrent 下载环境"></a>安装 BitTorrent 下载环境</h2><p>使用 <a href="https://github.com/qbittorrent/qBittorrent">qBitTorrent-nox</a>：</p><blockquote><p>qBitTorrent 和 qBitTorrent-nox 的区别在于后者带有 Web UI 而非原版的 GUI，在服务器环境上更方便操作</p></blockquote><figure class="highlight bash"><table><tr><td class="code"><pre><span class="line"><span class="comment"># 添加 ppa 源</span></span><br><span class="line">add-apt-repository -y ppa:qbittorrent-team/qbittorrent-stable</span><br><span class="line"></span><br><span class="line"><span class="comment"># 更新软件源并安装 qBitTorrent-nox</span></span><br><span class="line">apt update &amp;&amp; apt install -y qbittorrent-nox</span><br><span class="line"></span><br><span class="line"><span class="comment">## 看看安装成功了没</span></span><br><span class="line">qbittorrent-nox --version</span><br><span class="line"><span class="comment"># qBittorrent v4.3.9</span></span><br></pre></td></tr></table></figure><h3 id="添加守护进程"><a href="#添加守护进程" class="headerlink" title="添加守护进程"></a>添加守护进程</h3><p>守护进程可以方便地管理软件的开关状态，也可以设置开机自启。</p><figure class="highlight bash"><table><tr><td class="code"><pre><span class="line"><span class="comment"># 使用你喜欢的编辑器，这里使用 vim</span></span><br><span class="line">vim /etc/systemd/system/qbittorrent-nox.service</span><br><span class="line"></span><br><span class="line"><span class="comment"># 文件里放以下内容</span></span><br><span class="line">[Unit]</span><br><span class="line">Description=qBittorrent client</span><br><span class="line">After=network.target</span><br><span class="line"></span><br><span class="line">[Service]</span><br><span class="line">ExecStart=/usr/bin/qbittorrent-nox --webui-port=10086 <span class="comment"># 你喜欢的端口</span></span><br><span class="line">Restart=always</span><br><span class="line"></span><br><span class="line">[Install]</span><br><span class="line">WantedBy=multi-user.target</span><br></pre></td></tr></table></figure><p>启用开机自启动：</p><figure class="highlight bash"><table><tr><td class="code"><pre><span class="line">sudo systemctl <span class="built_in">enable</span> qbittorrent-nox</span><br><span class="line"><span class="comment"># Created symlink /etc/systemd/system/multi-user.target.wants/qbittorrent-nox.service → /etc/systemd/system/qbittorrent-nox.service.</span></span><br></pre></td></tr></table></figure><p>现在你就可以通过：</p><ul><li><code>service qbittorrent-nox start</code> 启动 qBittorrent-nox</li><li><code>service qbittorrent-nox stop</code> 停止 qBittorrent-nox</li><li><code>service qbittorrent-nox status</code> 查看 qBittorrent-nox 的状态</li></ul><p>qb-Nox 默认用户名：<code>admin</code>，默认密码：<code>adminadmin</code></p><p>因为我们之前在防火墙禁止了相关端口，此时 qB 的 Web UI 是没办法通过 <code>IP:port</code> 访问的。</p><h2 id="使用-Nginx-创建反代"><a href="#使用-Nginx-创建反代" class="headerlink" title="使用 Nginx 创建反代"></a>使用 Nginx 创建反代</h2><p>我们用 Nginx 来创建一层反向代理方便我们日后使用。此处我们使用 Oneinstack 自带脚本来创建一个虚拟主机：</p><p>首先将任意域名/子域名指向服务器 IP.</p><figure class="highlight bash"><table><tr><td class="code"><pre><span class="line"><span class="built_in">cd</span> ~</span><br><span class="line"></span><br><span class="line"><span class="comment"># 这里我把 acme.sh 的默认证书颁发机构改为了 Let&#x27;s Encrypt，感觉 ZeroSSL 1. 不纯粹免费 2. 签发速度慢</span></span><br><span class="line">./oneinstack/src/acme.sh-master/acme.sh --set-default-ca --server letsencrypt</span><br><span class="line"></span><br><span class="line"><span class="comment"># 创建 virtual host</span></span><br><span class="line">./oneinstack/vhost.sh</span><br></pre></td></tr></table></figure><p>按照提示选择选项，记住在开始选择 3 自动签发免费 SSL 证书，且确保域名 DNS 正确指向服务器。</p><figure class="highlight bash"><table><tr><td class="code"><pre><span class="line"><span class="comment"># 成功后输出</span></span><br><span class="line">Your domain:                  example.huangxin.dev</span><br><span class="line">Virtualhost conf:             /usr/local/nginx/conf/vhost/example.huangxin.dev.conf</span><br><span class="line">Directory of:                 /data/wwwroot/example.huangxin.dev</span><br><span class="line">Let<span class="string">&#x27;s Encrypt SSL Certificate:/usr/local/nginx/conf/ssl/example.huangxin.dev.crt</span></span><br><span class="line"><span class="string">SSL Private Key:              /usr/local/nginx/conf/ssl/example.huangxin.dev.key</span></span><br></pre></td></tr></table></figure><p>编辑 <code>/usr/local/nginx/conf/vhost/example.huangxin.dev.conf</code>:</p><figure class="highlight plaintext"><table><tr><td class="code"><pre><span class="line"># 删除以下内容</span><br><span class="line"></span><br><span class="line">  location ~ [^/]\.php(/|$) &#123;</span><br><span class="line">    #fastcgi_pass remote_php_ip:9000;</span><br><span class="line">    fastcgi_pass unix:/dev/shm/php-cgi.sock;</span><br><span class="line">    fastcgi_index index.php;</span><br><span class="line">    include fastcgi.conf;</span><br><span class="line">  &#125;</span><br><span class="line"></span><br><span class="line">  location ~ .*\.(gif|jpg|jpeg|png|bmp|swf|flv|mp4|ico)$ &#123;</span><br><span class="line">    expires 30d;</span><br><span class="line">    access_log off;</span><br><span class="line">  &#125;</span><br><span class="line">  location ~ .*\.(js|css)?$ &#123;</span><br><span class="line">    expires 7d;</span><br><span class="line">    access_log off;</span><br><span class="line">  &#125;</span><br><span class="line"></span><br><span class="line"># 添加以下内容</span><br><span class="line">  location / &#123;</span><br><span class="line">    proxy_pass http://0.0.0.0:10086/;</span><br><span class="line">    proxy_set_header Host $host;</span><br><span class="line">    proxy_set_header X-Real-IP $remote_addr;</span><br><span class="line">  &#125;</span><br></pre></td></tr></table></figure><p>此时，访问 <a href="https://example.huangxin.dev/">https://example.huangxin.dev</a> 就能看到 qB 的 Web UI 了。</p><h3 id="为-Web-UI-加上密码"><a href="#为-Web-UI-加上密码" class="headerlink" title="为 Web UI 加上密码"></a>为 Web UI 加上密码</h3><p>但是我们同样不想把我们的 qB 面板暴露在公网。在这里我们创建一层 Basic Auth 来给 qB 面板加上密码（或者用 qB 自带用户系统也行）：</p><figure class="highlight bash"><table><tr><td class="code"><pre><span class="line"><span class="comment"># 创建用户名（记得替换 &#123;username&#125;）</span></span><br><span class="line">sh -c <span class="string">&quot;echo -n &#x27;&#123;username&#125;:&#x27; &gt;&gt; /usr/local/nginx/.htpasswd&quot;</span></span><br><span class="line"></span><br><span class="line"><span class="comment"># 创建密码（输入两次密码确认）</span></span><br><span class="line">sh -c <span class="string">&quot;openssl passwd -apr1 &gt;&gt; /usr/local/nginx/.htpasswd&quot;</span></span><br></pre></td></tr></table></figure><p>在刚刚的 <code>location / &#123;&#125;</code> 块下添加：</p><figure class="highlight plaintext"><table><tr><td class="code"><pre><span class="line">auth_basic &quot;Restricted&quot;; # 验证提示</span><br><span class="line">auth_basic_user_file /usr/local/nginx/.htpasswd;</span><br></pre></td></tr></table></figure><p>照例 <code>nginx -t</code> 测试，<code>service nginx restart</code> 重启。现在访问 <code>example.huangxin.dev</code> 就需要输入用户名和密码了。</p><p><img src="https://edge.huangxin.org/images/2023/10/06/2814045796.png"></p><p>可以进入 qB 面板 - Tools(工具) - Options (选项) - Web UI，在 Authentication(验证) 一栏下把 <code>Bypass authentication for clients on localhost (对本地主机上的客户端跳过身份验证)</code> 勾选上，这样就无需输入两次密码。当然，也可以在上面的 Langauge 一栏下把语言改成中文。</p><p>然后我们在设置里再进入 BitTorrent 一栏，开启匿名模式以及在底部添加一些 tracker，可以从以下两个仓库里选：</p><ul><li><a href="https://github.com/XIU2/TrackersListCollection">https://github.com/XIU2/TrackersListCollection</a></li><li><a href="https://github.com/ngosang/trackerslist">https://github.com/ngosang/trackerslist</a></li></ul><h2 id="挂载-Volume"><a href="#挂载-Volume" class="headerlink" title="挂载 Volume"></a>挂载 Volume</h2><p>接下来，我们需要把另外购买的 Volume 挂载到服务器上，参考这篇文章：<a href="https://www.idcoffer.com/archives/6453">https://www.idcoffer.com/archives/6453</a></p><figure class="highlight bash"><table><tr><td class="code"><pre><span class="line"><span class="comment"># 查看磁盘列表</span></span><br><span class="line">fdisk -l</span><br><span class="line"></span><br><span class="line"><span class="comment"># 选择要挂在的磁盘，这里是 /dev/sda</span></span><br><span class="line">fdisk /dev/sda</span><br><span class="line"></span><br><span class="line"><span class="comment"># 分别选择</span></span><br><span class="line">n <span class="comment"># 创建新分区</span></span><br><span class="line">p <span class="comment"># 创建主分区</span></span><br><span class="line">w <span class="comment"># 保存更改</span></span><br><span class="line"></span><br><span class="line"><span class="comment"># 再次查看磁盘</span></span><br><span class="line">fdisk -l</span><br><span class="line"></span><br><span class="line"><span class="comment"># 格式化成 EXT4 文件系统</span></span><br><span class="line">mkfs.ext4 /dev/sda1</span><br><span class="line"></span><br><span class="line"><span class="comment"># 为分区创建一个文件夹</span></span><br><span class="line"><span class="built_in">mkdir</span> /disk2</span><br><span class="line"></span><br><span class="line"><span class="comment"># 挂载分区</span></span><br><span class="line">mount /dev/sda1 /disk2</span><br><span class="line"></span><br><span class="line"><span class="comment">## 编辑 /etc/fstab 文件</span></span><br><span class="line">vim /etc/fstab</span><br><span class="line"></span><br><span class="line"><span class="comment"># 加入下面一行 注意修改磁盘名称和挂载点</span></span><br><span class="line">/dev/sda1 /disk2 ext4 defaults  0  0</span><br><span class="line"></span><br><span class="line"><span class="comment"># 重启服务器</span></span><br><span class="line">reboot</span><br><span class="line"></span><br><span class="line"><span class="comment"># 看看是否成功自动挂载</span></span><br><span class="line"><span class="built_in">df</span> -h</span><br></pre></td></tr></table></figure><p>现在，我们就可以进入 qB Web UI，把下载位置改成 <code>/disk2</code> 了。</p><h2 id="启用目录列举"><a href="#启用目录列举" class="headerlink" title="启用目录列举"></a>启用目录列举</h2><p>下载好了 BT，怎么拉回本地呢？有一个方法是直接通过 aria2c 的 Web RPC 推送到本地或者是路由器、NAS之类（见下一部分）。但是由于 aria2c 配置复杂和小白不友好，而且服务器在卢森堡，我觉得还是用 IDM 多线程下载比较好。</p><p>我们可以通过同一个域名，使用一个子目录，来实现目录列举。修改 <code>/usr/local/nginx/conf/vhost/example.huangxin.dev.conf</code>:</p><figure class="highlight plaintext"><table><tr><td class="code"><pre><span class="line">location /files &#123;</span><br><span class="line">  # 依然开启 Basic Auth 验证</span><br><span class="line">  auth_basic &quot;Restricted&quot;;</span><br><span class="line">  auth_basic_user_file /usr/local/nginx/.htpasswd;</span><br><span class="line"></span><br><span class="line">  # 将子目录的根目录指向下载文件夹</span><br><span class="line">  alias /disk2/downloads;</span><br><span class="line"></span><br><span class="line">  # 开启目录列举</span><br><span class="line">  autoindex on;</span><br><span class="line">&#125;</span><br></pre></td></tr></table></figure><p>根据 ChatGPT 的针对大文件、相对慢的磁盘的推荐，我还在 <code>location</code> 块里加上了如下设置：</p><figure class="highlight plaintext"><table><tr><td class="code"><pre><span class="line">gzip off;</span><br><span class="line"></span><br><span class="line">sendfile on;</span><br><span class="line">output_buffers 1 1m;</span><br><span class="line">tcp_nopush on;</span><br><span class="line"></span><br><span class="line">open_file_cache max=100 inactive=20s;</span><br><span class="line">open_file_cache_valid 30s;</span><br><span class="line">open_file_cache_min_uses 2;</span><br><span class="line">open_file_cache_errors on;</span><br></pre></td></tr></table></figure><p>这样，我们就可以通过 Nginx 自带的目录列举功能来直观地看到服务器上的文件了：</p><p><img src="https://edge.huangxin.org/images/2023/10/06/534330853.png"></p><p>光看还不够，下载好的资源一个目录下十来个文件，如何全部获取他们的 URL 然后放到下载器里下载呢？虽然可以有很极客的解决办法，但是这里我们可以用比较原始的方法：</p><ol><li>进入资源目录</li><li>右键查看源代码</li><li>复制所有 `<a> 标签<br> <img src="https://edge.huangxin.org/images/2023/10/06/1192704887.png"></li><li>Google 搜索 “href extraction” 工具，我随便找了个：<code>https://en.toolpage.org/tool/href-extractor</code>，提取所有相对链接，复制到 VS Code 内<br> <img src="https://edge.huangxin.org/images/2023/10/06/1192704887.png"></li><li>回到资源目录，复制上方 URL，回到 VS Code，使用 <kbd>Alt</kbd> + <kbd>Shift</kbd> + <kbd>鼠标左键</kbd> 选中所有 URL，然后 <kbd>Ctrl</kbd> + <kbd>C</kbd> 复制</li><li>VS Code 内的就是所有文件的绝对 URL，放入 IDM（Task - Add Batch Download from Clipboard）即可开始下载</li></ol><h2 id="安装-AList"><a href="#安装-AList" class="headerlink" title="安装 AList"></a>安装 AList</h2><blockquote><p>AList 是一个支持多个源的目录列举工具，包括本地、阿里云盘、Google Drive、各种对象存储等等</p></blockquote><p>GitHub 页面：<a href="https://github.com/alist-org/alist">https://github.com/alist-org/alist</a></p><p>通过安装 AList，我们可以通过一个图形化的界面对服务器的文件目录直接进行操作（主要用来删除下载完的文件），免去了连接服务器和手打 <code>rm -rf</code> 命令的麻烦。另外，Alist 可以支持离线下载和使用 Aria2 RPC 推送下载。</p><p>AList 有<a href="https://alist.nn.ci/zh/guide/install/script.html">一键脚本</a>，但是只支持安装最新的版本。由于 <a href="https://github.com/alist-org/alist/releases/tag/v3.28.0">v3.28.0</a> 似乎魔改了后台，个人不太喜欢，这里手动安装 GitHub Release 里的 3.26.0 版本，参考 <a href="https://alist.nn.ci/zh/guide/install/manual.html">https://alist.nn.ci/zh/guide/install/manual.html</a>。</p><figure class="highlight bash"><table><tr><td class="code"><pre><span class="line"><span class="comment"># 创建文件夹并进入</span></span><br><span class="line"><span class="built_in">mkdir</span> -p /data/apps/alist</span><br><span class="line"><span class="built_in">cd</span> /data/apps/alist</span><br><span class="line"></span><br><span class="line"><span class="comment"># 下载有 MUSL 静态链接的二进制文件并解压缩</span></span><br><span class="line">wget https://github.com/alist-org/alist/releases/download/v3.26.0/alist-linux-musl-amd64.tar.gz</span><br><span class="line">tar -xzf alist-linux-musl-amd64.tar.gz &amp;&amp; <span class="built_in">rm</span> alist-linux-musl-amd64.tar.gz</span><br><span class="line"></span><br><span class="line"><span class="comment"># 测试安装</span></span><br><span class="line">./alist <span class="built_in">help</span></span><br><span class="line"></span><br><span class="line"><span class="comment"># 获取 admin 账户信息，并从输出里找到临时密码</span></span><br><span class="line">./alist admin</span><br><span class="line"><span class="comment"># INFO[2023-10-06 21:19:47] Successfully created the admin user and the initial password is: xxxxxxxxxx</span></span><br><span class="line"></span><br><span class="line"><span class="comment"># 添加守护进程</span></span><br><span class="line">vim /usr/lib/systemd/system/alist.service</span><br><span class="line"></span><br><span class="line"><span class="comment"># 输入以下内容</span></span><br><span class="line">[Unit]</span><br><span class="line">Description=alist</span><br><span class="line">After=network.target</span><br><span class="line"> </span><br><span class="line">[Service]</span><br><span class="line">Type=simple</span><br><span class="line">WorkingDirectory=path_alist <span class="comment"># 将 path_alist 改为 alist 的绝对路径，在这里是 /data/apps/alist</span></span><br><span class="line">ExecStart=path_alist/alist server</span><br><span class="line">Restart=on-failure</span><br><span class="line"> </span><br><span class="line">[Install]</span><br><span class="line">WantedBy=multi-user.target</span><br><span class="line"></span><br><span class="line"><span class="comment"># 重载配置</span></span><br><span class="line">systemctl daemon-reload</span><br><span class="line"></span><br><span class="line"><span class="comment"># 启用开机自启</span></span><br><span class="line">systemctl <span class="built_in">enable</span> alist</span><br><span class="line"></span><br><span class="line"><span class="comment"># 启用 alist</span></span><br><span class="line">service alist start</span><br><span class="line"></span><br><span class="line"><span class="comment"># 查看状态,确保无报错</span></span><br><span class="line">service alist status</span><br></pre></td></tr></table></figure><h3 id="子目录的反代设置"><a href="#子目录的反代设置" class="headerlink" title="子目录的反代设置"></a>子目录的反代设置</h3><p>由于我们打算把 AList 放在子目录里，参考<a href="https://alist.nn.ci/zh/faq/howto.html#%E5%A6%82%E4%BD%95%E5%AF%B9%E5%AD%90%E7%9B%AE%E5%BD%95%E8%BF%9B%E8%A1%8C%E5%8F%8D%E5%90%91%E4%BB%A3%E7%90%86">这篇文档</a>，我们首先要进入 AList 同目录下的 <code>/data</code> 文件夹，修改 <code>config.json</code>：</p><figure class="highlight bash"><table><tr><td class="code"><pre><span class="line">vim /data/apps/alist/data/config.json</span><br><span class="line"></span><br><span class="line"><span class="comment"># 将 &quot;site_url&quot; 改为 `/cloud` 或者你喜欢的子目录名</span></span><br><span class="line"><span class="comment"># &quot;site_url&quot;: &quot;/cloud&quot;,</span></span><br></pre></td></tr></table></figure><p>在 Nginx 虚拟主机配置文件内新增：</p><figure class="highlight plaintext"><table><tr><td class="code"><pre><span class="line">location /cloud/ &#123;</span><br><span class="line">    auth_basic off;</span><br><span class="line">    proxy_set_header X-Forwarded-For $proxy_add_x_forwarded_for;</span><br><span class="line">    proxy_set_header X-Forwarded-Proto $scheme;</span><br><span class="line">    proxy_set_header Host $http_host;</span><br><span class="line">    proxy_set_header X-Real-IP $remote_addr;</span><br><span class="line">    proxy_set_header Range $http_range;</span><br><span class="line">   proxy_set_header If-Range $http_if_range;</span><br><span class="line">    proxy_redirect off;</span><br><span class="line">    proxy_pass http://0.0.0.0:5244/cloud/; # 注意 proxy_pass 必须带子目录路径和最后的斜杠</span><br><span class="line">&#125;</span><br></pre></td></tr></table></figure><p><code>nginx -t</code> 测试，<code>service nginx restart</code> 重启；此时，就能通过 <code>https://example.huangxin.dev/cloud</code> 访问 AList 实例。</p><p>访问 AList 实例，使用上面的 admin 账号密码登陆，修改密码，进入存储 - 添加 - 本地存储，设置挂载路径为 <code>/</code> 或者 <code>/downloads</code>，设置根目录为 <code>/disk2/downloads</code>（或者你对应的路径），就可以通过 AList 访问下载好的文件。</p><p>也可以在右边的工具栏设置本地 aria2 RPC，这样就可以直接推送下载了。</p><p><img src="https://edge.huangxin.org/images/2023/10/06/1586933755.png"></p><h2 id="使用中转服务器加速下载"><a href="#使用中转服务器加速下载" class="headerlink" title="使用中转服务器加速下载"></a>使用中转服务器加速下载</h2><p>由于国内国际网络的连通性不加，加上服务器本身并没有大陆优化，如果你碰巧有对大陆优化且带宽相对充裕的服务器，除了使用代理下载外，还可以用中转服务器上的 Nginx 进行又一层的反代。</p><ol><li>在中转服务器上安装 Nginx，参考上面的教程</li><li>新建一个子域名，例如 <code>proxy-download.huangxin.dev</code>，并将其指向中转服务器 IP</li><li>在中转服务器上建立一个虚拟主机</li><li>在 Nginx 虚拟主机配置文件里应用如下配置： <figure class="highlight plaintext"><table><tr><td class="code"><pre><span class="line">    location / &#123;</span><br><span class="line">    # 可以另外加一层 Basic Auth</span><br><span class="line">    auth_basic &quot;Restricted Content&quot;;</span><br><span class="line">    auth_basic_user_file /usr/local/nginx/.htpasswd;</span><br><span class="line"></span><br><span class="line">    # 反代地址，记得尾端的斜杠</span><br><span class="line">    proxy_pass https://example.huangxin.dev/files/;</span><br><span class="line"></span><br><span class="line">    # Set the proxy headers so the original host and IP are known</span><br><span class="line">    proxy_set_header Host example.huangxin.dev;</span><br><span class="line">    proxy_set_header X-Real-IP $remote_addr;</span><br><span class="line">    proxy_set_header X-Forwarded-For $proxy_add_x_forwarded_for;</span><br><span class="line"></span><br><span class="line">    # Basic HTTP Authentication</span><br><span class="line">    # 在请求头内包含被代理服务器的 Basic Auth 用户名和密码</span><br><span class="line">    proxy_set_header Authorization &quot;Basic dXNlcjpwYXNzd29yZA==&quot;; ## user:password 的 base64 编码</span><br><span class="line"></span><br><span class="line">    # Enable support for resumable downloads</span><br><span class="line">    proxy_http_version 1.1;</span><br><span class="line">    proxy_set_header Connection &quot;&quot;;</span><br><span class="line">    proxy_buffering on;</span><br><span class="line">    proxy_buffer_size 16k;</span><br><span class="line">    proxy_buffers 4 32k;</span><br><span class="line">&#125;</span><br></pre></td></tr></table></figure></li><li>现在，请求 <code>https://proxy-download.huangxin.dev</code> 就会被反代到 <code>https://example.huangxin.dev/files/</code>，并且会自动带上 Basic Auth 的用户名和密码</li></ol><h1 id="成果速览"><a href="#成果速览" class="headerlink" title="成果速览"></a>成果速览</h1><p>使用 BuyVM 1C1G 20GB @ 10Gbps 的服务器可以做到 BT 跑满硬盘速度下载（约 35MB/s），通过中转服务器取回能跑到本地软件限制的限制带宽上限（约 7800KB/s）:<br><img src="https://edge.huangxin.org/images/2023/10/06/1194553697.png"></p>]]></content>
    
    
    <summary type="html">&lt;h1 id=&quot;前言&quot;&gt;&lt;a href=&quot;#前言&quot; class=&quot;headerlink&quot; title=&quot;前言&quot;&gt;&lt;/a&gt;前言&lt;/h1&gt;&lt;p&gt;很多人都有看电影电视的经历抑或是习惯。囿于国内的言论环境，很多资源都无法正常引进，或者在引进的时候被删减。通过各类云盘流通的资源质量良莠不齐，而使用国外流媒体平台观看又会面对诸多限制和高昂成本的问题，对于我来说，直接食用国外通过 BitTorrent（BT）分享的生肉或者加上自行寻找配对的熟肉字幕更加具有实践性。</summary>


    <category term="技术向" scheme="https://huangxin.dev/categories/partly-technical/"/>
    
    
  </entry>
  
  <entry>
    <title>惶心博客 2022 年报</title>
    <link href="https://huangxin.dev/site-updates/2022-yearly-report.html"/>
    <id>https://huangxin.dev/site-updates/2022-yearly-report.html</id>
    <published>2022-12-30T16:00:00.000Z</published>
    <updated>2024-03-25T17:52:54.000Z</updated>
    
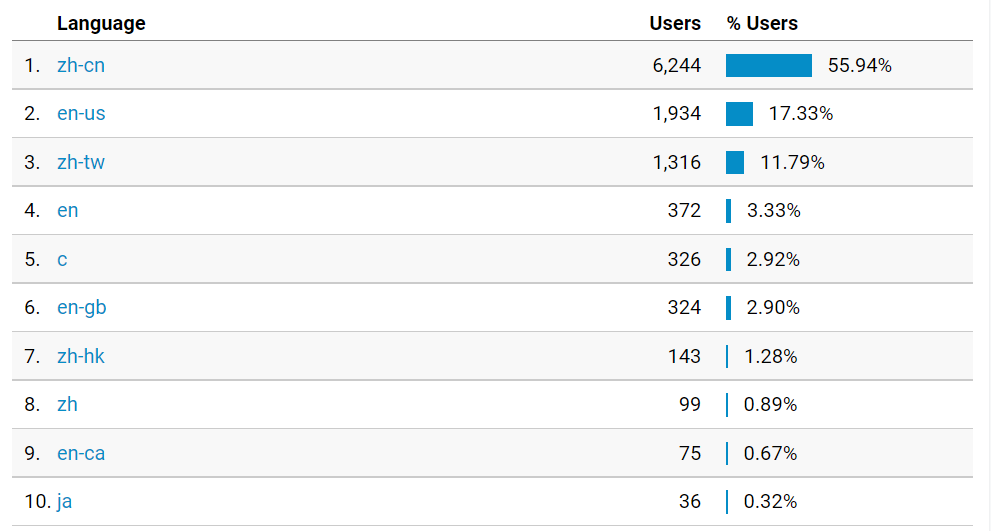
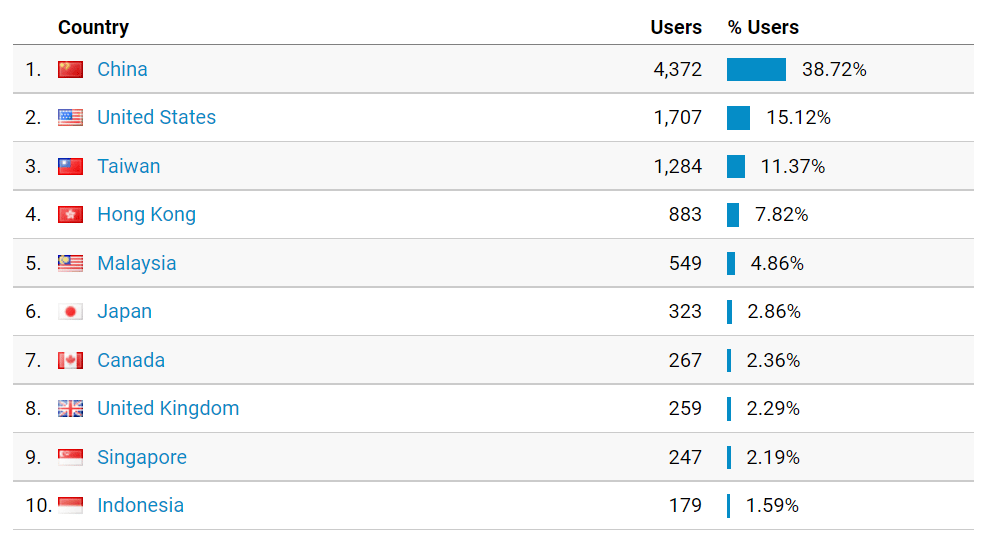
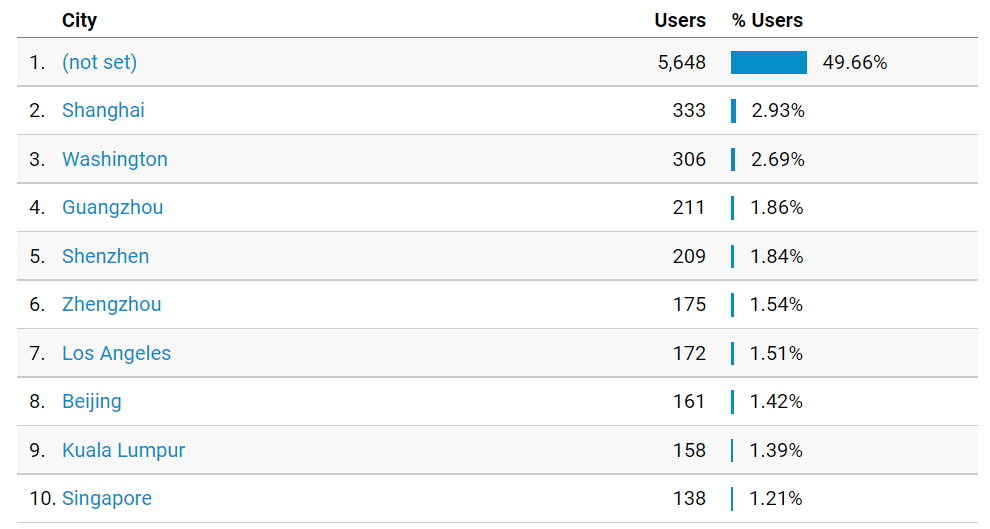
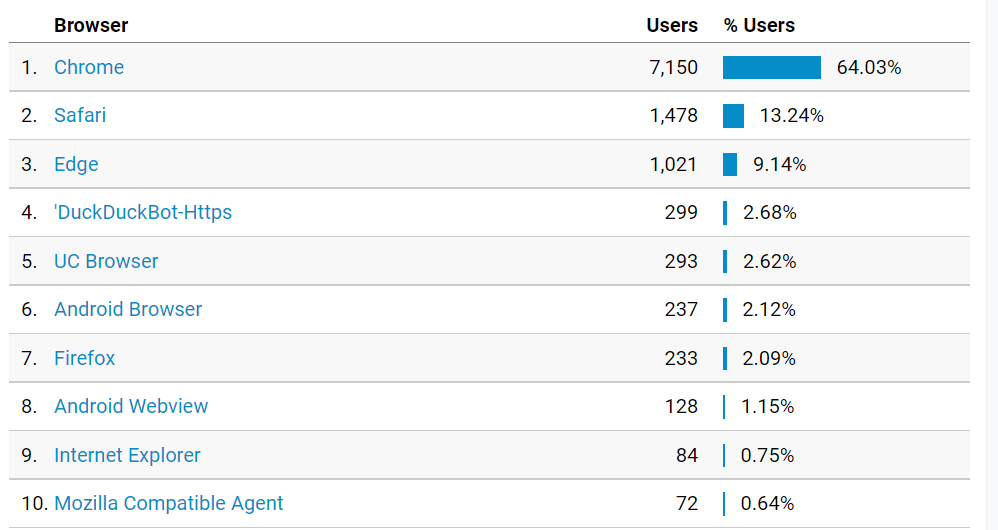
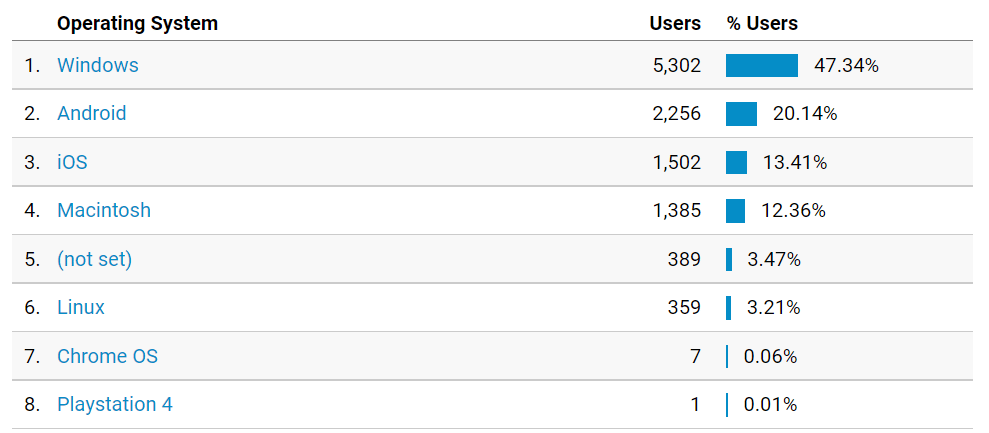
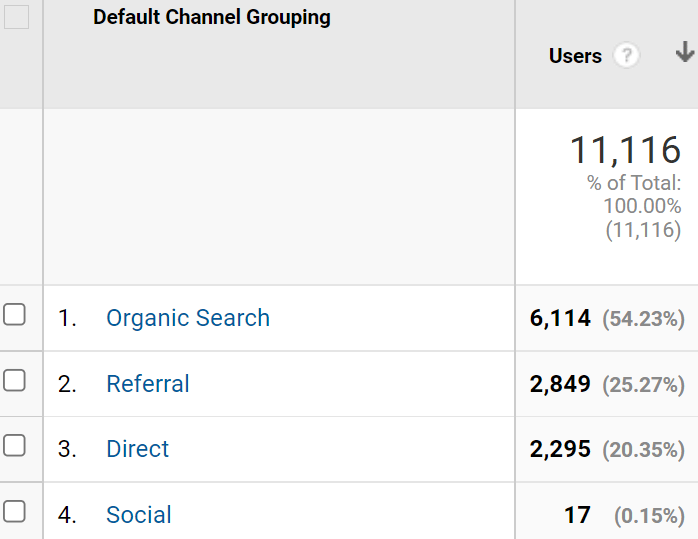
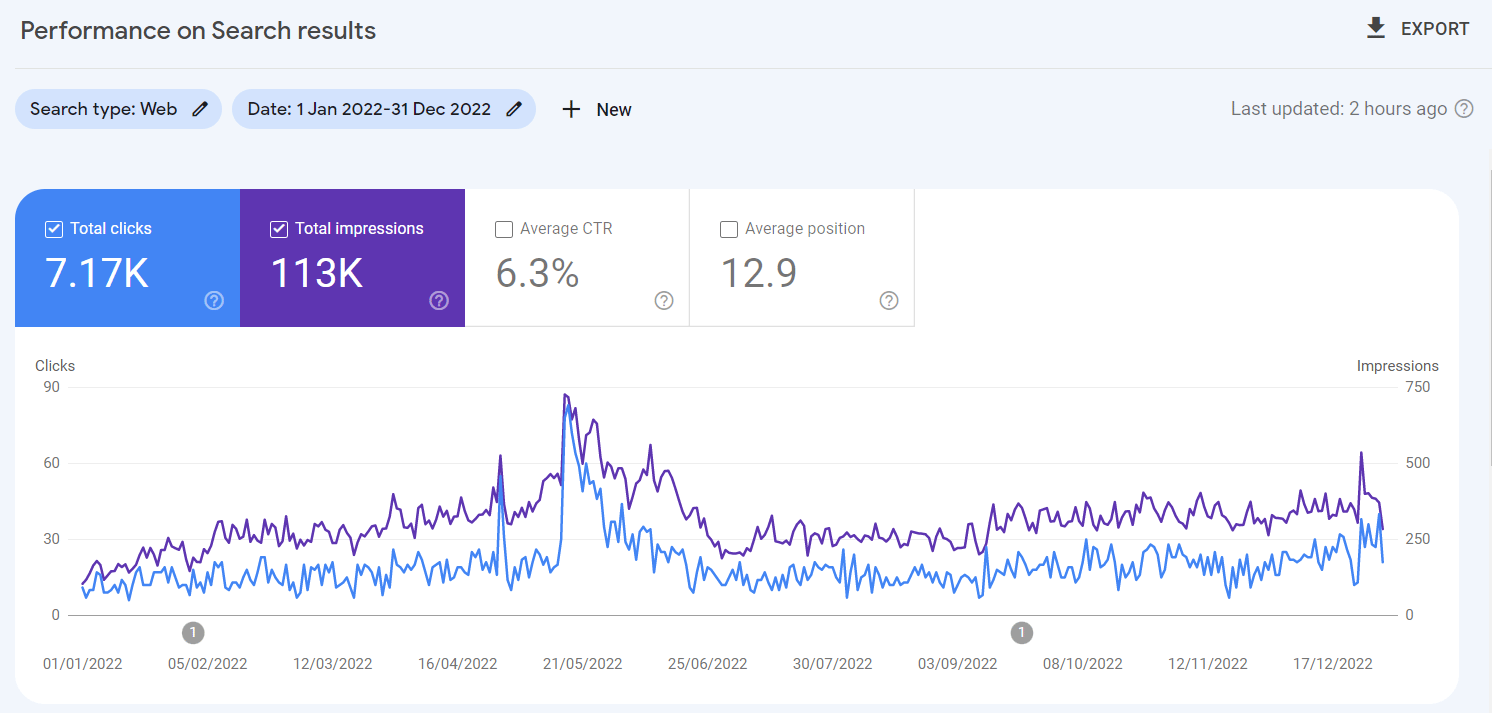
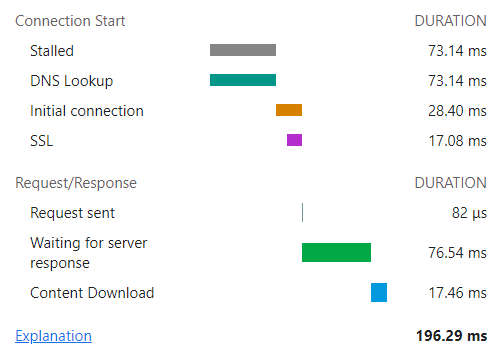
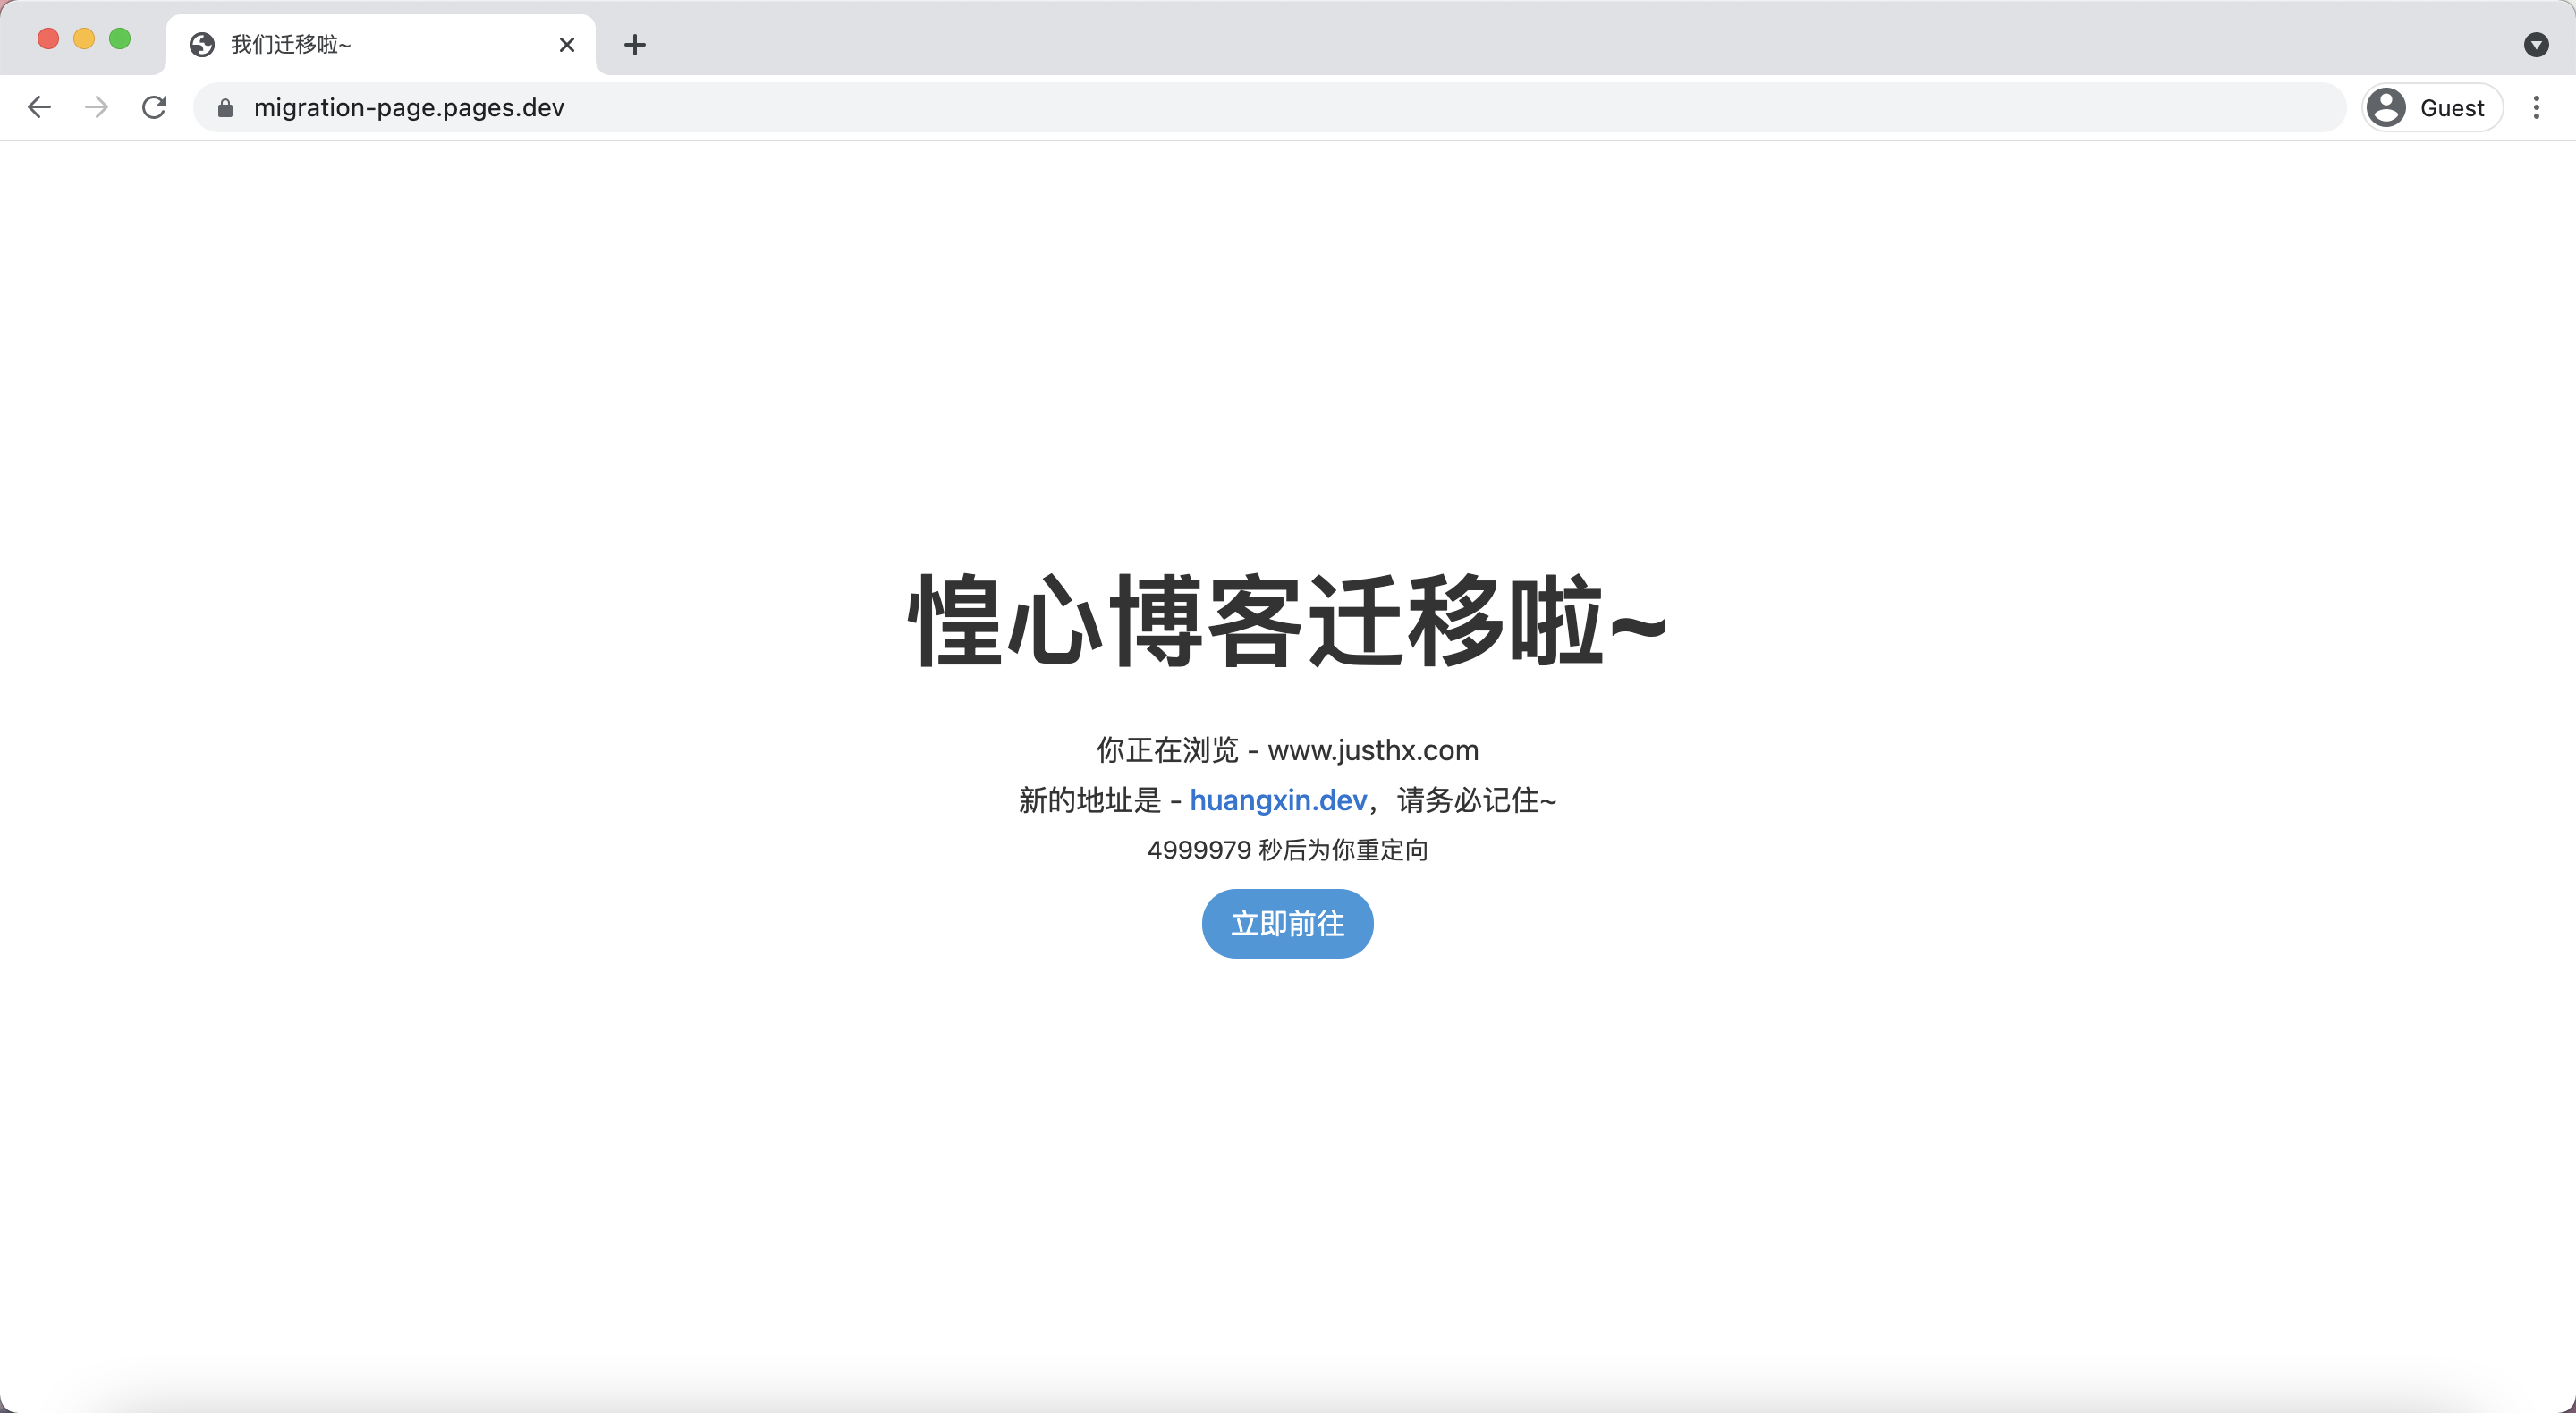
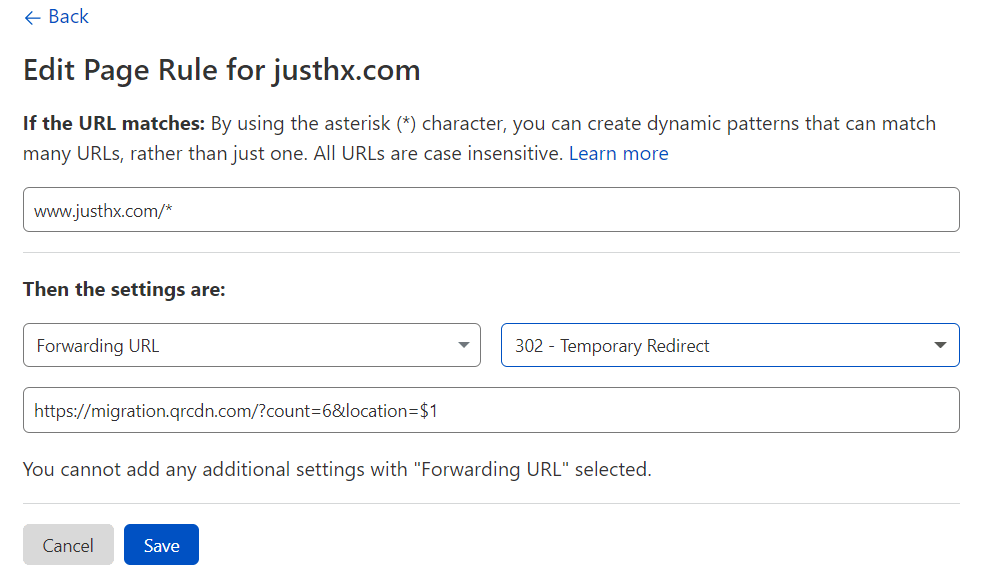
    <content type="html"><![CDATA[<p>从这篇年报开始，我计划将每年的“年度总结”变更为”年报“的形式。我希望通过”年报“这种表述，读者能够更直观地感受到这类型的文章属于一种偏向于数据的信息披露。</p><span id="more"></span><h1 id="写在前面"><a href="#写在前面" class="headerlink" title="写在前面"></a>写在前面</h1><p>这篇文章实际上写于 2023 年 1 月 2 日，但是有自己的博客的好处就是可以 <del>manipulate</del> 修改上面显示的一切东西。</p><p>2022 年在我身上发生了很多，如果有人有兴趣，可以参考阅读<a href="https://edge.huangxin.org/images/legacy/vip2.loli.io/2023/01/02/1LvsItOJZmxHwBe.png">这份</a>我发在朋友圈的个人年终总结（部分内容因为隐私原因被删除）。总的来说，虽然又是不太开心的一年，但是如果再来一次，我还是会选择经历这一年。毕竟……</p><blockquote><p>岁月从不曾圆满 人常抱憾无可释然<br>唯有遍历 如此尘寰<br>—— 封茗囧菌《风月迟迟来》</p></blockquote><p>综合音乐软件的年度报告，我的年度单曲是鞠婧祎《以十洲的名义》：</p><blockquote><p>十年之后再相逢 眼中泪光闪动<br>只怕早已不相识 擦肩而过<br>别说万事转头空 未转头时为梦<br>你留下白马披风<br>依然有青葱少年<br>向前冲</p></blockquote><p>如果喜欢，你可以开始播放这首歌，然后继续阅读本篇报告。</p><p><audio  controls loop controlsList="nodownload"  src="https://assets.huangxin.org/%E4%BB%A5%E5%8D%81%E6%B4%B2%E7%9A%84%E5%90%8D%E4%B9%89%20-%20%E9%9E%A0%E5%A9%A7%E7%A5%8E.mp3"></audio></p><h2 id="访客数据"><a href="#访客数据" class="headerlink" title="访客数据"></a>访客数据</h2><p>根据 <a href="https://clarity.microsoft.com/">Microsoft Clarity</a> 搜集的数据，2022 年本站迎来了 10,990 名访客，建立了 13,068 个访问会话；根据 <a href="https://analytics.google.com/analytics/web/">Google Analytics</a>，类似的访客和会话数量（区别小于±0.7%）产生了 17,963 个页面浏览，平均每个会话持续了 44s.</p><h3 id="访客语言"><a href="#访客语言" class="headerlink" title="访客语言"></a>访客语言</h3><p>55.94% 的访客语言为 <code>zh-cn</code>，~20% 的访客使用英语或者英语的地区变种，使用繁体中文的访客占 ~13%.</p><p><img src="https://edge.huangxin.org/images/2023/01/02/1337575164.png" alt="访客语言数据"></p><h3 id="访客地区"><a href="#访客地区" class="headerlink" title="访客地区"></a>访客地区</h3><p>与使用 <code>zh-cn</code> 语言的访客占比不一致，来自中国大陆的访客仅占 38.72%，故此可以推断一部分简体中文用户访问本站时身居海外。</p><p>来自台湾地区的访客和 <code>zh-TW</code> 的用户占比类似。</p><p><img src="https://edge.huangxin.org/images/2023/01/02/801381635.png" alt="访客国家数据"></p><h3 id="访客城市"><a href="#访客城市" class="headerlink" title="访客城市"></a>访客城市</h3><p>Google Analytics 无法列出近乎 50% 的访客来源的城市；除此之外，前五名分别是：上海，华盛顿，广州，深圳，郑州。</p><p><img src="https://edge.huangxin.org/images/2023/01/02/153263140.png" alt="访客城市数据"></p><h3 id="访客浏览器"><a href="#访客浏览器" class="headerlink" title="访客浏览器"></a>访客浏览器</h3><p>64.03% 的访客使用 Chrome, Safari 占比为 13.24%, Edge 为 9.14%，Firefox 还不如 UC Browser，仅占 2.09%.</p><p>相比于上一年，Chrome 的份额提高了近乎 5%，Safari 降低了 3%，Firefox 降低了 ~0.3%.</p><p><img src="https://edge.huangxin.org/images/2023/01/02/3491638993.png" alt="访客浏览器数据"></p><h3 id="访客操作系统"><a href="#访客操作系统" class="headerlink" title="访客操作系统"></a>访客操作系统</h3><p>47.34% 的访客使用 Windows，20.14% 使用 Android，iOS 访客占比为 13.41%, macOS 访客占比为 12.36%, Linux 为 3.21%.</p><p>相比于上一年，来自两种移动操作系统的访客占比均在一定程度上下降，而 macOS 访客占比上升了 118%.</p><p><img src="https://edge.huangxin.org/images/2023/01/02/930088828.png" alt="访客操作系统数据"></p><h4 id="移动设备比例"><a href="#移动设备比例" class="headerlink" title="移动设备比例"></a>移动设备比例</h4><p>安卓 vs iOS 访客占比为近乎整数的 6:4.</p><p><img src="https://edge.huangxin.org/images/2023/01/02/479629603.png" alt="移动设备访客数据"></p><h2 id="访客来源"><a href="#访客来源" class="headerlink" title="访客来源"></a>访客来源</h2><h3 id="访客获取渠道"><a href="#访客获取渠道" class="headerlink" title="访客获取渠道"></a>访客获取渠道</h3><p>自然搜索为本站最大的访客来源渠道，占 54.23%. 引荐访问占 25.27%, 直接访问占 20.35%, 社交媒体占 0.15%.</p><p>与上一年相比，搜索占比上升超过 25%，而直接访问占比将近腰斩。原因之一是本站旧域名 <code>justhx.com</code> 使用 <a href="https://github.com/hifocus/Migration-Page">Migration-Page</a> 重定向到本站，而这一部分的访问也被归类为引荐访问。</p><p><img src="https://edge.huangxin.org/images/2023/01/02/3563094546.png" alt="访客获取渠道数据"></p><p>引荐站点方面，本站友链访客<a href="https://mkblog.cn/">孟坤博客</a>，<a href="https://xinger.ink/">Xinger IMG Collection</a>，<a href="https://2heng.xin/">樱花庄的白猫</a>，<a href="https://2heng.xin/">犬’s Blog</a>，<a href="https://www.zaihua.net/">在花博客</a>和<a href="https://paugram.com/">保罗的小宇宙</a>荣获 2022 年本站友链访客贡献前六名~ 让我们在这里诚挚地感谢上述小伙伴，以及其他正在发展中的其他<a href="https://friends.huangxin.org/">友链</a>博客。</p><p>需要特别感谢的是 <a href="https://stblog.penclub.club/">@lixiang810</a>，她在过去的一年无私地帮助了本 <a href="https://www.mokeyjay.com/archives/2102">CVM</a> 高级工程师实现了很多代码，也祝她生活顺利，幸福快乐~</p><p>第三方站点方面，<code>v2ex.com</code> 出现在了引荐列表第 8 名（因为我在上面发了一次本博客的链接），个人主页 <code>hx.js.org</code> 出现在了第九名（可喜可贺）。</p><h3 id="搜索引擎表现"><a href="#搜索引擎表现" class="headerlink" title="搜索引擎表现"></a>搜索引擎表现</h3><p>根据 Google Search Console, 在 2022 年，本站在 Google 的结果里出现了 11.3 万次，被点击了 ~7170 次，平均点击率是 6.3%，平均出现在第 12.9 个结果。</p><p><img src="https://edge.huangxin.org/images/2023/01/02/1495863709.png" alt="搜索引擎表现数据"></p><h1 id="站点发展"><a href="#站点发展" class="headerlink" title="站点发展"></a>站点发展</h1><p>2022 年持续是本人生产力不足、繁忙于生活和学业的一年，故此没有写下太多博文，也没有创造太多增长访客的机会，故此今年访客数据相比去年大概下滑 15-20%.</p><p>但是在幕后，本站开始自主托管图片。图片托管于一台黑五入手，1C2G 30G 的 Ryzen 5950X 自带备份的服务器上。目前没有植入太多抗攻击的措施，但是起码数据很难丢。</p><p>本站也开始使用 <a href="https://workers.cloudflare.com/">CloudFlare Workers</a> 代理一切第三方静态资源（如 <a href="https://fonts.google.com/">Google Fonts</a>, <a href="https://www.jsdelivr.com/">jsDelivr</a> 和其他外部 CDN），统一了从全球任何地方访问的体验，以及（根据实际体验）大幅提高了加载速度，且解决了部分第三方资源在国内某些地区因为墙中墙无法加载的情况，实现了要么全打得开，要么全打不开，<del>应载尽载</del>的目标。</p><p>目前，影响本站加载速度的唯一外部因素只有访客 ISP 对 CloudFlare 线路的连通性。在一次单一测试中，使用原生海外网络，桌面版 Chrome 使用访客模式打开本站，<code>DOMContentLoaded</code> 仅需 460 毫秒。</p><p><img src="https://edge.huangxin.org/images/2023/01/02/866542952.png" alt="上述测试内本站根目录 / 的加载速度"></p><p>本站也开始实验一个 Typography 设计；总结来说，本站的字体显示：</p><ul><li>尽可能地优先操作系统原生的，非微软雅黑的中文非衬线字体的优先度（如 <a href="https://w.wiki/vGw">PingFang SC</a>, <a href="https://developer.harmonyos.com/cn/harmonyos_design/">HarmonyOS Sans</a> 和 <a href="https://w.wiki/6BAJ">WenQuanYi Micro Hei</a>，在以上所有字体不可用的情况下从外部加载 <a href="https://w.wiki/6BAP">Noto Sans SC</a>.</li><li>在英文字体方面，使用 <a href="https://github.com/github/mona-sans">GitHub 开源的</a> <a href="https://github.com/mona-sans">Mona-Sans</a>，其次使用操作系统原生的非衬线英文字体。</li><li>代码字体使用 <a href="https://fonts.google.com/specimen/IBM+Plex+Mono">IBM Plex Mono</a>，其次使用操作系统原生的等宽字体。</li><li>在使用极细字重的博客标题以及 slogan 处，使用 <a href="https://en.wikipedia.org/wiki/Base64">base64</a> <a href="https://hellogreg.github.io/woff2base/">生成</a>并在 CSS 内嵌入对应的字符子集。</li></ul><p>对于本站使用的字族的详细解释，请参见 <a href="https://huangxin.dev/partly-technical/webfont-from-beginner-to-sans-serif.html">中文 WebFont 小指南 - 从入门到 sans-serif</a> 一文。</p><h1 id="结语"><a href="#结语" class="headerlink" title="结语"></a>结语</h1><p>2022 无论对中国，对世界，亦或者对我个人，都是多灾多难、波涛汹涌的一年。尽管无尽地失望，在这里我无意讨论任何细节，惟愿世界和平，国泰民安。</p><p>如果你对本文提到的任何非个人内容感兴趣，欢迎在下方评论区留言或者通过其他方式和我讨论。</p><p>在这里附上我的 2022 年度照片，它使用 <a href="https://en.wikipedia.org/wiki/Sony_%CE%B16000">Sony α6000</a> 配置 <a href="https://en.wikipedia.org/wiki/Sony_E_PZ_16-50mm_F3.5-5.6_OSS">E PZ 16-50mm F3.5-5.6 OSS</a> 镜头在 <code>f/5.0, 1/400s, ISO 100</code> 下拍摄。</p><p>也祝你新年快乐。</p><p><img src="https://edge.huangxin.org/images/2023/01/02/658647304.jpg" alt="Windmil and Sunset"></p>]]></content>
    
    
    <summary type="html">&lt;p&gt;从这篇年报开始，我计划将每年的“年度总结”变更为”年报“的形式。我希望通过”年报“这种表述，读者能够更直观地感受到这类型的文章属于一种偏向于数据的信息披露。&lt;/p&gt;</summary>


    <category term="新动态" scheme="https://huangxin.dev/categories/site-updates/"/>
    
    
  </entry>
  
  <entry>
    <title>生活剪影</title>
    <link href="https://huangxin.dev/past-stories/life-shadows.html"/>
    <id>https://huangxin.dev/past-stories/life-shadows.html</id>
    <published>2022-11-18T16:00:00.000Z</published>
    <updated>2022-11-20T00:01:11.000Z</updated>
    
    <content type="html"><![CDATA[<p>我在厨房里，意外地调出了好吃的拌面酱料。</p><span id="more"></span><p>那个瞬间，我百无聊赖地玩着手机上重复了多次的对局。游戏角色一个接一个地叠加在彼此身上；微小的力量积少成多，最终在屏幕上迸发出夺目的伤害数字；朋友圈里，久未联系的校友说在享受酒后多巴胺分泌的瞬间。我一边在怀疑酒该是致郁剂，不该让人更快乐，一边发现周围不知在何时平静了下来。</p><p>适才水沸腾的声音，锅盖开合的声音，舍友走动的声音，都戛然而止。我听不见风声，听不见空气流动的声音。游戏里的角色在入场时的日语语音，在粤语歌的映衬下，以极高分辨率从耳机里传来。</p><p>这是这个学期的第六周。这是一个周六。这一天大半在睡梦中度过。空气里的平静不过是暴风雨再次袭来之前的假象，让人稍微松弛，又没办法彻底放松。</p><p>有很多这样的瞬间，我平静地面对着这个世界，面对着我走过的路和前方未知方向，波澜不惊而心如止水。</p><p>看着每天路上见到的形形色色的人，我时常会想，他们的世界是怎么样的呢？他们今天又在经历什么样的世界？</p><p>我只知道我把力挽狂澜、殚精竭虑和全力以赴时常过成了日常。而在夜晚，我又开始焦虑白天的事情。</p><p>在 LinkedIn 上看到有人说一句话，大概是说多多关心周围的人，你永远不知道他们在个人生活里在经历什么。我想，这就是我吧。但是又有什么人真的能做到这样呢？这个世界上的人，奇形怪状而又缺乏对他人的同情和尊重，不喜包容看重利益，自私自利却希望能渔翁得利。</p><p>真理掌握在少数人手上，恶人是大多数，而善良成为可利用的弱点。而且这个世界需要批判善良，而把恶视为常态。对于一个受害者，最先出现的不是关心，而是对为什么无法避免恶的质问。</p><p>仁义礼智信；我无法理解为何反而在现代社会，这些品质如石沉大海；我会如此频繁见到遇到不仁不义不礼不信的人。智吗？其实在这样的前款条件下可有可无吧；就算有，就算聪明绝顶，又能如何呢。</p><p>直到今天，我遇到句句投机的人，依然草木皆兵。过去太残忍，我所获得的美好都变成了昨日黄花，过去的人步履不停奔赴向前。</p><p>奔赴，他们所向往的，繁花所簇的锦绣前程。</p><p>我在异国，手指在手机模拟的快门键上起起落落，平静地过着绝望的生活，绝望着看着眼前平静。</p><p>我把生活剪成影子，它们稀碎地落在水泥上被风卷走被雨淋湿；我躲在黑夜里尝试压制翻涌的情绪，又在白天再一次看上去刀枪不入。</p><p>从未有人想象，辗转过经年，对我意味何为。</p><p>从未有人拾起，我剪碎的影子，在我面前细细拼凑平整，有声或无声地给予我力量。</p><p>那些影子，被留在我楼下，随着岁月隐匿在空间里，最终无迹可寻。</p><p>我依然平静地看着世界，平静地看日出月落，年月流转。</p><p>平静地希望，最终我</p><p>亦能够如是。</p><blockquote><p>总推说你是人你是人你是凡人，牺牲我乃是求生本能。<br>——麦浚龙《吃鲸鱼的人》</p></blockquote><blockquote><p>本文是一篇随笔，1020 字。</p></blockquote>]]></content>
    
    
    <summary type="html">&lt;p&gt;我在厨房里，意外地调出了好吃的拌面酱料。&lt;/p&gt;</summary>


    <category term="曾经里" scheme="https://huangxin.dev/categories/past-stories/"/>
    
    
  </entry>
  
  <entry>
    <title>风吹雨</title>
    <link href="https://huangxin.dev/past-stories/windy-rains.html"/>
    <id>https://huangxin.dev/past-stories/windy-rains.html</id>
    <published>2022-08-19T16:00:00.000Z</published>
    <updated>2022-08-19T16:13:43.000Z</updated>
    
    <content type="html"><![CDATA[<blockquote><p>有时候睡前很幸运地下起小雨，就会刻意把窗开到最大。会有一点点雨滴打在窗沿上溅到身前；风吹进来，满世界满世界潮湿的气息，那是雨天的独特信号。</p></blockquote><span id="more"></span><hr><h2 id="Intro"><a href="#Intro" class="headerlink" title="[Intro]"></a>[Intro]</h2><p>风从无处而来，又无处不在。</p><p>簇拥在一处的枯叶在石板路上婆娑着发出的声音，在我听来，像是不停流过去的年月。</p><p>我们总喜欢谈天说地，和别人说山高水长。其实山不高水也不长，而我们住在城市的影子里。</p><p>所以，我们不会再见。</p><h2 id="壹-·-烂漫"><a href="#壹-·-烂漫" class="headerlink" title="[壹 · 烂漫]"></a>[壹 · 烂漫]</h2><p>每次坐公车的时候，我都喜欢把脸贴在窗子上。</p><p>曾经读到过一个笑话，大意是动漫里的主人公把头倚在车窗上的时候，总显得格外浪漫；而当我们自己做同样的事情时，车窗总会伴着柴油发动机的节奏而震动，连带着我们的脑袋，所以场景里我们就变得有些尴尬。</p><p>幸运的是，常坐的公车是电动的。于是我常常睁大眼睛，看着窗外一小截沥青路飞快地变换着条纹；或者是，似乎永远不动的天空。</p><p>安静的时候，能感受到若有若无的动量。我会很享受那微微向前的推力，因为那很多时候意味着，我快回家了。</p><p>车窗外阳光，顺着发角，似乎折射在了外套的绒毛上。逆着光看去，窗外满眼模糊的绿色中，混着淡淡金色。</p><p>我终于知道了，这就是人们所说，春光烂漫。</p><p>而春天，在我的世界里，或许曾倏尔路过。</p><h2 id="贰-·-神偷"><a href="#贰-·-神偷" class="headerlink" title="[贰 · 神偷]"></a>[贰 · 神偷]</h2><p>下班回家，身后是草叶轻轻刮在木栏杆上的​声音，夹带着风。</p><p>我会喜欢一个如今被广泛用作他途的词语，“和风”。在我看来，它是温和的风，也是让人感到暖和的风；也可以是，在四季里，夹杂着的，和进去的风。</p><p>那天下班，我想起来两天前那个黑暗无人的夜晚，想起落针可闻万籁俱寂的场景。我似乎不断地在翻山越岭，赴汤蹈火，可最后不过在原地踏步；那些付出更多努力的东西，终于在最后不可避免地和过去殊途同归。</p><p>我想起过去的人。</p><p>其实啊，我一点不会遗憾你，一点不会想念你。我只是遗憾失去的时间，其中夹杂的感情；遗憾时间的跨度，你我之间隐藏着的多变和狡诈。斗转星移，日月变换，坚不可摧的东西像光消失在宇宙里。</p><p>我只是遗憾遇见；我只是在感叹，光阴是捕手，岁月是神偷。</p><p>而时间，是让人措不及防的东西。</p><h2 id="叁-·-裂隙"><a href="#叁-·-裂隙" class="headerlink" title="[叁 · 裂隙]"></a>[叁 · 裂隙]</h2><p>曾有一次坐晚上的火车。那天晚上呼呼下着雨，火车在雨夜里飞速前进。车窗的温度被雨水和风降至冰凉，贴在上面，意外地舒服。</p><p>那趟火车上人很多很挤，我坐在窗边的位子上，像是躲在了一方小世界里。很奇怪的是，沉下心来思考的时候，大脑似乎会自动隔绝外界的噪音；我只看到，雨水在巨大速度带来的惯性下，被拉成直线的模样。把耳朵贴在窗上的时候，又可以听到呼呼的响声。</p><p>那会是风声吗。</p><p>和那晚一样也和所有的夜晚一样，我总在这世间，时时踽踽前行。停下来的时候，会看到别人牵手，看到别人偷偷亲吻；看到别人浪漫到极致把隐晦的爱意写在歌词里飘散在空气里，而我却仿佛在裂隙中漫游。</p><h2 id="Outro"><a href="#Outro" class="headerlink" title="[Outro]"></a>[Outro]</h2><p>风和雨，似乎就是四季的全部。不同的风和雨，组成了不同的四季。雨到来之前会起风，而雨和风和在一起，就能带走世间炙热。</p><p>风吹动雨，到达触不可及的地方。</p><p>有时候睡前很幸运地下起小雨，就会刻意把窗开到最大。会有一点点雨滴打在窗沿上溅到身前；风吹进来，满世界满世界潮湿的气息，那是雨天的独特信号。</p><p>风吹动雨，雨会变成小花。</p><p>风吹着雨，躺在床上眼睛看着天花板，眼前会浮动所有的过去，所有剧烈而冲动的情感；脑子里会一片清明，或者是一片混沌。</p><p>然后啊，然后就可以轻轻或者沉沉地睡去。而梦里的铁马和冰河，他们总是会在风吹雨的声音里，纷至沓来。</p><blockquote><p><em>本文部分灵感来自陆游《十一月四日风雨大作（其二）》，金玟岐作词《岁月神偷》和郭敬明、落落作词《时间煮雨》，且本文部分借用了作品内容。</em><br><em>“铁马冰河”是作者第一个正式的笔名；本文主要灵感即来源于此</em></p></blockquote>]]></content>
    
    
    <summary type="html">&lt;blockquote&gt;
&lt;p&gt;有时候睡前很幸运地下起小雨，就会刻意把窗开到最大。会有一点点雨滴打在窗沿上溅到身前；风吹进来，满世界满世界潮湿的气息，那是雨天的独特信号。&lt;/p&gt;
&lt;/blockquote&gt;</summary>


    <category term="曾经里" scheme="https://huangxin.dev/categories/past-stories/"/>
    
    
  </entry>
  
  <entry>
    <title>中文 WebFont 小指南 - 从入门到 sans-serif</title>
    <link href="https://huangxin.dev/partly-technical/webfont-from-beginner-to-sans-serif.html"/>
    <id>https://huangxin.dev/partly-technical/webfont-from-beginner-to-sans-serif.html</id>
    <published>2022-04-05T13:20:14.000Z</published>
    <updated>2024-03-25T17:52:54.000Z</updated>
    
    <content type="html"><![CDATA[<h2 id="前言"><a href="#前言" class="headerlink" title="前言"></a>前言</h2><p>我一直很喜欢在网页里嵌入各种 WebFont - 在线字体；WebFont 可以通过网络在客户端上加载本地没有的字体，从而实现更加美观的页面排版。</p><span id="more"></span><p>一般而言，如果需要加载速度最大化，例如我在做 Google 的首页 - 速度需求大于绝对美观度，这个时候全局应用一个 WebFont 就不是最好的选择——用户只需要最快地打开页面开始搜索，并不需要慢慢欣赏页面本身。在这种情况下，给页面适配一个足够好的 <code>font-family</code> 更加合理。</p><p>其次，在中文网页上应用 WebFont 对于速度也是一个挑战：单个英文 WebFont 通常不过几十kb，而中文 WebFont 往往需要几M。拿 Source Sans Pro 和思源黑体比较，在 woff2 压缩后，Source Sans Pro 仅有 56.6kb 大小，而思源黑体为 1.53MB；如果用户的浏览器不够现代，在加载字体上的数据消耗还要高出几倍。</p><p>在本文里，我会讨论加载中文字体的几种选择，以及 <code>font-family</code> 的设置。</p><h2 id="加载中文字体"><a href="#加载中文字体" class="headerlink" title="加载中文字体"></a>加载中文字体</h2><p>对于普通的个人和没有多少预算的团队，使用开源/免费商用字体大概是唯一的选择。GitHub 上的 <a href="https://github.com/wordshub/free-font">wordshub/free-font</a> 仓库收集了非常之多能够免费商用的中文字体，在选择字体上的时候可以参考一下；而许多国内的企业也发布了他们自己的中文字体，例如<a href="https://alibabafont.taobao.com/wow/alibabafont/act/alifont">阿里巴巴普惠体</a>，<a href="https://static01.coloros.com/www/public/img/topic7/font-opposans.zip">OPPOSans</a>，<a href="https://web.vip.miui.com/page/info/mio/mio/detail?postId=33935854">MiSans</a> 和 <a href="https://developer.harmonyos.com/en/docs/design/des-guides/font-0000001157868583">HarmonyOS Sans</a> 等等，也可以是不错的选择。</p><p>当然，更加直接的来源是 WebFont 提供商，比如知名的 <a href="https://fonts.google.com/">Google Fonts</a> 和 <a href="https://fonts.adobe.com/">Adobe Fonts</a>。Google Fonts 上有数种开源免费的中文字体可以直接通过 Google 的网络加载，其中包括<a href="https://fonts.google.com/noto/specimen/Noto+Sans+SC">思源黑体</a>和<a href="https://fonts.google.com/noto/specimen/Noto+Serif+SC">思源宋体</a>。而 Adobe Fonts 提供非常广泛的中文字体的选择，但部分字体需要付费的 Adobe CC 订阅才可以使用。</p><h3 id="Google-Fonts-的使用"><a href="#Google-Fonts-的使用" class="headerlink" title="Google Fonts 的使用"></a>Google Fonts 的使用</h3><p>在国外的网络环境下，Google Fonts 的使用不能太简单。直接引用 <code>fonts.googleapis.com</code> 提供的 CSS，然后设置相应的 <code>font-family</code> 即可；得益于英文字体的小体积和 Google 优秀的基建，Google Fonts 的加载速度十分之快。</p><p>在加载中文字体上，使用 Google Fonts 上的中文字体，比如思源黑体，无疑十分便捷，而不需要任何的服务端配置。然而，虽然 Google Fonts 早在几年前就已经解析到了国内的 Google 自有机房，<u>但是部分运营商还是会自作主张阻断对 <code>fonts.googleapis.com</code> 和 <code>fonts.gstatic.com</code> 这两个域名的访问，导致访客完全无法加载 Google Fonts</u>。</p><p><img src="https://edge.huangxin.org/images/legacy/vip1.loli.io/2022/04/06/JPzdi32hybxLerX.jpg" alt="大量国内节点无法解析 fonts.gstatic.com"></p><p>那么，我们可以使用众所周知的 Google Fonts 反代服务。知名的反代服务有如下几个：</p><ul><li><code>fonts.loli.net</code> - <a href="https://u.sb/css-cdn/">烧饼博客提供的 Google Fonts 反代</a><ul><li>国内 xTom 日本单点，海外 CloudFlare</li></ul></li><li><code>fonts.geekzu.org</code> - <a href="https://cdn.geekzu.org/">极客族公共加速服务</a><ul><li>国内阿里云上海单点，海外多点</li></ul></li><li><code>fonts.lug.ustc.edu.cn</code> - <a href="https://lug.ustc.edu.cn/">中国科学技术大学Linux用户协会</a>的<a href="https://mirrors.ustc.edu.cn/">镜像服务</a>（已被 unlist，但是仍然可用）<ul><li>全球 RivenCloud 日本单点</li></ul></li><li><code>fonts.font.im</code> - <a href="http://font.im/">font.im 提供的 Google Fonts 服务</a><ul><li>全球 Linode 日本单点</li></ul></li></ul><p>后两个只有全球单点，无法兼顾全球速度，故此忽略。根据我的测试（不具有代表性和普遍性，仅作参考），<code>fonts.loli.net</code>  和 <code>fonts.geekzu.org</code> 加载思源黑体均能在国内达到与 Google Fonts 相近的速度：</p><table><thead><tr><th></th><th>CSS Sheet (~30kb)</th><th>字体文件 (~1.5MB)</th><th>总耗时</th></tr></thead><tbody><tr><td><code>fonts.googleapis.com</code></td><td>297ms</td><td>1108ms</td><td>1405ms</td></tr><tr><td><code>fonts.loli.net</code></td><td>592ms</td><td>1308ms</td><td>1900ms</td></tr><tr><td><code>fonts.geekzu.org</code></td><td>134ms</td><td>1509ms</td><td>1643ms</td></tr></tbody></table><p>以上虽然仅为单次、单一事件、单一网络环境的测试，但是联系到反代服务的性质以及节点分布，结果之间具有持续性。</p><p>你也可以自己试试：</p><ul><li><a href="https://fonts-23154653213.surge.sh/font-sources/google-fonts.html">https://fonts-23154653213.surge.sh/font-sources/google-fonts.html</a><br><a href="https://fonts-23154653213.surge.sh/font-sources/geekezu-fonts.html">https://fonts-23154653213.surge.sh/font-sources/geekezu-fonts.html</a><br><a href="https://fonts-23154653213.surge.sh/font-sources/loli-net-fonts.html">https://fonts-23154653213.surge.sh/font-sources/loli-net-fonts.html</a></li></ul><p>1.5s 左右的总加载时长，看起来不上不下。有没有更好的方式呢？</p><p><strong>有。</strong></p><h3 id="75CDN-前端静态资源库"><a href="#75CDN-前端静态资源库" class="headerlink" title="75CDN 前端静态资源库"></a>75CDN 前端静态资源库</h3><p>之前在<a href="/partly-technical/in-response-to-jsdelivr-icp-license-revokement.html">《jsDelivr 备案被吊销后，网页静态资源何去何从》</a>一文中也介绍过 360 旗下奇舞团维护的前端公共 CDN；它完全本地化 cdnjs 的资源，并且提供国内 360 自有 CDN + 海外 CloudFront 的优秀配置。不仅如此，它还提供 Google 字体库的本地化。和上面提到的反代服务不同，75CDN 能够直接提供 Google 字体的本地化 <code>@font-face</code>，让客户端直接加载字体文件本身，而无需经过反代和服务端提供内容这两层壁垒。</p><p>在 <a href="https://cdn.baomitu.com/index/fonts">https://cdn.baomitu.com/index/fonts</a> 页面里填入 Google Fonts 的 CSS 地址，例如 <code>https://fonts.googleapis.com/css?family=Noto+Sans+SC</code> 从而直接返回下述内容：</p><figure class="highlight css"><table><tr><td class="code"><pre><span class="line"><span class="comment">/* noto-sans-sc-regular */</span></span><br><span class="line"><span class="keyword">@font-face</span> &#123;</span><br><span class="line">  <span class="attribute">font-family</span>: <span class="string">&#x27;Noto Sans SC&#x27;</span>;</span><br><span class="line">  <span class="attribute">font-style</span>: normal;</span><br><span class="line">  <span class="attribute">font-weight</span>: regular;</span><br><span class="line">  <span class="attribute">src</span>: <span class="built_in">url</span>(<span class="string">&#x27;//lib.baomitu.com/fonts/noto-sans-sc/noto-sans-sc-regular.eot&#x27;</span>); <span class="comment">/* IE9 Compat Modes */</span></span><br><span class="line">  <span class="attribute">src</span>: <span class="built_in">local</span>(<span class="string">&#x27;Noto Sans SC&#x27;</span>), <span class="built_in">local</span>(<span class="string">&#x27;NotoSans SC-Normal&#x27;</span>),</span><br><span class="line">       <span class="built_in">url</span>(<span class="string">&#x27;//lib.baomitu.com/fonts/noto-sans-sc/noto-sans-sc-regular.eot?#iefix&#x27;</span>) <span class="built_in">format</span>(<span class="string">&#x27;embedded-opentype&#x27;</span>), <span class="comment">/* IE6-IE8 */</span></span><br><span class="line">       <span class="built_in">url</span>(<span class="string">&#x27;//lib.baomitu.com/fonts/noto-sans-sc/noto-sans-sc-regular.woff2&#x27;</span>) <span class="built_in">format</span>(<span class="string">&#x27;woff2&#x27;</span>), <span class="comment">/* Super Modern Browsers */</span></span><br><span class="line">       <span class="built_in">url</span>(<span class="string">&#x27;//lib.baomitu.com/fonts/noto-sans-sc/noto-sans-sc-regular.woff&#x27;</span>) <span class="built_in">format</span>(<span class="string">&#x27;woff&#x27;</span>), <span class="comment">/* Modern Browsers */</span></span><br><span class="line">       <span class="built_in">url</span>(<span class="string">&#x27;//lib.baomitu.com/fonts/noto-sans-sc/noto-sans-sc-regular.ttf&#x27;</span>) <span class="built_in">format</span>(<span class="string">&#x27;truetype&#x27;</span>), <span class="comment">/* Safari, Android, iOS */</span></span><br><span class="line">       <span class="built_in">url</span>(<span class="string">&#x27;//lib.baomitu.com/fonts/noto-sans-sc/noto-sans-sc-regular.svg#NotoSans SC&#x27;</span>) <span class="built_in">format</span>(<span class="string">&#x27;svg&#x27;</span>); <span class="comment">/* Legacy iOS */</span></span><br><span class="line">&#125;</span><br></pre></td></tr></table></figure><p>如果需要不同字重，也可以以这样的格式输入： <code>https://fonts.googleapis.com/css?family=Noto+Sans+SC:200</code> ，同样会返回对应字重的字体。</p><p>注意这个服务不支持 <a href="https://developers.google.com/fonts/docs/css2">Google Fonts v2 API</a> 以及一些较新的字体，猜测可能是因为适配和同步的原因，需要手打 v1 API。</p><p>在网页的样式表中直接插入上述 <code>@font-face</code> 段落，测试下来速度十分明显。简单粗暴地加载 <code>noto-sans-sc-regular.woff2</code>，1.6MB 的大小用时仅需 988ms，秒杀 Google Fonts 自身，更遑论各个反代服务。</p><p>当然，这个所谓“秒杀” 也就仅限于国内的网络环境。使用海外原生网络打开 <a href="https://fonts-23154653213.surge.sh/font-sources/google-fonts.html">google-fonts.html</a>，CSS 样式表耗时 71ms，1.5MB 的字体文件仅耗时 393ms，加起来也就 500ms 不到。</p><p>你也可以自己试试：<a href="https://fonts-23154653213.surge.sh/font-sources/baomitu-fonts.html">https://fonts-23154653213.surge.sh/font-sources/baomitu-fonts.html</a></p><h3 id="Google-Fonts-的取舍"><a href="#Google-Fonts-的取舍" class="headerlink" title="Google Fonts 的取舍"></a>Google Fonts 的取舍</h3><p>Google Fonts v1 和 v2 API 均默认支持字体切片，即按照页面上字符的多样性动态加载更多的字体切片，这样可以在部分场景下节省流量，提升页面加载速度。但是在中文环境下，实测证明即使使用 Google Fonts 的字体切片，往往也需要加载近乎全部的字体切片，以实现字符全面覆盖；在这种情况下，由于 <a href="https://cdn.baomitu.com/">cdn.baomitu.com</a> 提供的服务来自商业级别 CDN 以及成熟的基础建设，直接完整加载字体文件反而是更好的选择。</p><h3 id="字符子集"><a href="#字符子集" class="headerlink" title="字符子集"></a>字符子集</h3><p>Google Fonts v2 API 同时支持生成字符子集以供直接调用；如果你的需求仅仅是在一两句话上应用某一个字体，可以通过下面的方式加载具体字符的子集，从而避免完整加载字体文件而拖慢页面的加载速度。</p><p><code>https://fonts.googleapis.com/css2?family=Noto+Serif+SC:wght@500&amp;display=swap&amp;text=等到世界末日的那天偷偷地许愿</code></p><blockquote><p>woff2 文件的大小仅仅为 4.93kb</p></blockquote><p>相应地，你也可以制作自己的字符子集，而无需依赖 Google Fonts。如果你坚持使用 Google Fonts，可以在 v2 API 里设置 <code>display</code> 参数为 <code>swap</code> 或者 <code>fallback</code>，避免字体加载造成长时间的页面阻塞。</p><h3 id="Adobe-Fonts-和自行托管"><a href="#Adobe-Fonts-和自行托管" class="headerlink" title="Adobe Fonts 和自行托管"></a>Adobe Fonts 和自行托管</h3><p>Adobe Fonts 的资源域名 <code>use.typekit.net</code> 全球使用 Akamai 分发，在国内访问极其缓慢，几乎可以忽略。</p><p>如果你选择用自己的服务托管自己的字体，记得同时提供多种格式以适配非现代的浏览器。</p><p>值得一提的是，阿里巴巴的 <a href="https://www.iconfont.cn/">iconfont</a> 也提供<a href="https://www.iconfont.cn/webfont">在线字体</a>服务，提供阿里巴巴普惠体和思源黑体的外链；分发域名是 <code>at.alicdn.com</code>， 全球速度同样十分优秀。</p><h2 id="WebFontLoader-和-font-display-属性"><a href="#WebFontLoader-和-font-display-属性" class="headerlink" title="WebFontLoader 和 font-display 属性"></a>WebFontLoader 和 font-display 属性</h2><h3 id="WebFontLoader-的用途"><a href="#WebFontLoader-的用途" class="headerlink" title="WebFontLoader 的用途"></a>WebFontLoader 的用途</h3><p>前几年，<a href="https://css-tricks.com/fout-foit-foft/">FOIT 和 FOUT</a> 是前端讨论的热点之一。FOIT 是 Flash of Invisible Text（瞬时不可见文本），指的是浏览器在等待字体加载的时候，会使用不可见（空白或透明）的字符占位，造成指定字体加载完成之前页面长时间空白的现象。这样无疑会产生非常不好的用户体验。</p><p>而 FOUT 是 Flash of Unstyled Text（瞬时未样式化文本），意味着浏览器优先显示其他可用的字体（本地字体），在远端字体加载完毕后再替换的行为。在这种情况下，几乎不会产生页面空白等待字体加载的情况；在字体加载时，用户将可以用同类相似的本地字体阅读网页上的内容。</p><p>Google 和 Adobe 联合开发了 WebFontLoader 这个 JavaScript 库，在当时解决了这个问题。WebFontLoader 可以指定字体加载的来源（Google Fonts，Adobe Fonts 或者 custom），通过往 <code>body</code> 标签添加 <code>wf-loading</code>, <code>wf-active</code> 和 <code>wf-inactive</code> 的 <code>class</code>，让开发者决定用户在什么时候看到什么样的 <code>font-family</code>。</p><p>例如我希望使用 Open Sans 显示我的网页，但又不确定用户会不会因为 Google Fonts 加载缓慢而长时间地看到阻塞中的空白页面，我就可以这样使用 <a href="https://github.com/typekit/webfontloader">WebFontLoader</a>：</p><figure class="highlight html"><table><tr><td class="code"><pre><span class="line"><span class="comment">&lt;!-- 引用 webfontloader.js --&gt;</span></span><br><span class="line"><span class="tag">&lt;<span class="name">script</span> <span class="attr">src</span>=<span class="string">&quot;https://ajax.loli.net/ajax/libs/webfont/1.6.26/webfont.js&quot;</span>&gt;</span><span class="tag">&lt;/<span class="name">script</span>&gt;</span></span><br><span class="line"><span class="tag">&lt;<span class="name">script</span>&gt;</span><span class="language-javascript"></span></span><br><span class="line"><span class="language-javascript"> <span class="title class_">WebFont</span>.<span class="title function_">load</span>(&#123;</span></span><br><span class="line"><span class="language-javascript">  <span class="attr">google</span>: &#123;</span></span><br><span class="line"><span class="language-javascript">    <span class="attr">families</span>: [<span class="string">&#x27;Open Sans&#x27;</span>], <span class="comment">// 选择 Open Sans 字族</span></span></span><br><span class="line"><span class="language-javascript">    <span class="attr">api</span>: <span class="string">&#x27;https://fonts.loli.net/css&#x27;</span>, <span class="comment">// 手动设置 Google Fonts API，可选，仅支持 v1</span></span></span><br><span class="line"><span class="language-javascript">  &#125;,</span></span><br><span class="line"><span class="language-javascript">  <span class="attr">timeout</span>: <span class="number">1200</span></span></span><br><span class="line"><span class="language-javascript">  <span class="comment">// 设置 timeout 时长，单位毫秒，时间过后字体还没完全加载就自动为 body 加上 .wf-inactive class</span></span></span><br><span class="line"><span class="language-javascript">&#125;);</span></span><br><span class="line"><span class="language-javascript"></span><span class="tag">&lt;/<span class="name">script</span>&gt;</span></span><br><span class="line"><span class="tag">&lt;<span class="name">style</span>&gt;</span><span class="language-css"></span></span><br><span class="line"><span class="language-css">    <span class="selector-class">.wf-loading</span>, <span class="selector-class">.wf-inactive</span> &#123;</span></span><br><span class="line"><span class="language-css">        <span class="attribute">font-family</span>: -apple-system, BlinkMacSystemFont, <span class="string">&quot;Segoe UI&quot;</span>, Roboto, <span class="string">&quot;Helvetica Neue&quot;</span>, sans-serif;</span></span><br><span class="line"><span class="language-css">    &#125;</span></span><br><span class="line"><span class="language-css">    <span class="selector-class">.wf-active</span> &#123;</span></span><br><span class="line"><span class="language-css">        <span class="attribute">font-family</span>: <span class="string">&quot;Open Sans&quot;</span>, sans-serif;</span></span><br><span class="line"><span class="language-css">    &#125;</span></span><br><span class="line"><span class="language-css"></span><span class="tag">&lt;/<span class="name">style</span>&gt;</span></span><br><span class="line"></span><br><span class="line"><span class="tag">&lt;<span class="name">body</span>&gt;</span></span><br><span class="line">  <span class="tag">&lt;<span class="name">p</span>&gt;</span></span><br><span class="line">    Hello, Welcome to Huangxin&#x27;s Blog.</span><br><span class="line">  <span class="tag">&lt;/<span class="name">p</span>&gt;</span></span><br><span class="line"><span class="tag">&lt;/<span class="name">body</span>&gt;</span></span><br></pre></td></tr></table></figure><p>在使用 WebFontLoader 之后，页面的加载逻辑如下：</p><p>WebFont 未加载/加载中：</p><ul><li>WebFontLoader 往 <code>body</code> 注入 <code>.wf-loading</code> class</li><li>CSS 规则里，<code>.wf-loading</code> 应用本地字族，即 <code>-apple-system, BlinkMacSystemFont, &quot;Segoe UI&quot;, Roboto, &quot;Helvetica Neue&quot;, sans-serif;</code>，故此正文使用上述字族</li></ul><p>WebFont 已加载：</p><ul><li>WebFontLoader 往 <code>body</code> 注入 <code>.wf-active</code> class</li><li>CSS 规则里，<code>.wf-active</code> 应用 <code>&quot;Open Sans&quot;, sans-serif</code>，故此正文字体改变为 Open Sans</li></ul><p>WebFont 无法加载：</p><ul><li>按照规则，1200ms 后若 WebFont 未完成加载，<code>body</code> class 改为 <code>.wf-inactive</code>，用户端显示无变化。</li></ul><p>注意这里全程 <code>font-family</code> 使用的都是已有的字符，浏览器不必等待任何其他字体加载，所以不会存在 FOIT 使页面呈现字体占位符的情况。</p><h3 id="font-display"><a href="#font-display" class="headerlink" title="font-display"></a>font-display</h3><p>根据 <a href="https://caniuse.com/css-font-rendering-controls">caniuse.com</a>，Chrome 60, Firefox 58 和 Safari 11.1 以后，上述浏览器支持了一项新的 CSS 属性：<code>font-display</code>。</p><p>参考 <a href="https://developer.mozilla.org/en-US/docs/Web/CSS/@font-face/font-display">https://developer.mozilla.org/en-US/docs/Web/CSS/@font-face/font-display</a>：</p><p><code>font-display</code> 约束了页面显示外部字体的行为，基于它的加载状态。</p><p><code>font-display</code> 有5个值：</p><p><code>auto</code><br>    让浏览器决定字体显示行为    </p><p><code>block</code><br>    在短时间内阻塞页面字体显示，给予字体无限长的替换时长    </p><p><code>swap</code><br>    在极短时间内阻塞页面字体显示，给予字体无限长的替换时长    </p><p><code>fallback</code><br>    在极短时间内阻塞页面字体显示，给予字体一个短替换时长    </p><p><code>optional</code><br>    在极短时间内阻塞页面字体显示，不给予替换时长    </p><p>换人话说就是，<code>block</code> 会导致 FOIT；<code>swap</code>, <code>fallback</code>和 <code>optional</code>会有一个极短的 FOIT 阶段（一般为 100ms），在字体加载好之后替换上去；<code>swap</code> 拥有无限时长的替换阶段，也就是说如果字体100秒以后才加载完成，字体也会在100秒被替换上去。<code>fallback</code> 有一个一般为 3s 的替换时长，限时内字体不加载成功则永远不会替换，而 <code>optional</code> 没有替换时长，在一开始的 100ms 无法加载完成则不会有机会被替换。</p><p><code>font-display</code> 的使用方法如下：</p><figure class="highlight css"><table><tr><td class="code"><pre><span class="line"><span class="keyword">@font-face</span> &#123;</span><br><span class="line">  <span class="attribute">font-family</span>: ExampleFont;</span><br><span class="line">  <span class="attribute">src</span>: <span class="built_in">url</span>(<span class="string">/path/to/fonts/examplefont.woff</span>) <span class="built_in">format</span>(<span class="string">&#x27;woff&#x27;</span>),</span><br><span class="line">       <span class="built_in">url</span>(<span class="string">/path/to/fonts/examplefont.eot</span>) <span class="built_in">format</span>(<span class="string">&#x27;eot&#x27;</span>);</span><br><span class="line">    </span><br><span class="line">  <span class="attribute">font-display</span>: fallback;</span><br><span class="line">&#125;</span><br></pre></td></tr></table></figure><p>可以发现，以上 <code>font-display</code> 的使用和 WebFontLoader 的用法一模一样，<code>swap</code> 没有 <code>timeout</code> 设置，而 <code>fallback</code> 则是 ~3000ms 的 <code>timeout</code>。因为这个属性已经广泛地被各种主流浏览器支持，WebFontLoader 也几乎没有被使用的必要了。</p><p>尽管 Google Fonts 默认的 font-display 是 <code>swap</code>，考虑到国内特殊的网络环境，我还是建议使用 <code>fallback</code>：如果一个 WebFont 3 秒内无法加载完成，它也没有被加载的必要了。</p><h2 id="font-family-的设置"><a href="#font-family-的设置" class="headerlink" title="font-family 的设置"></a>font-family 的设置</h2><p>在 CSS 的类里定义它的 <code>font-family</code>，可以定义它显示文字时使用的字体。</p><p>如果有一个 <code>font-family</code>:</p><figure class="highlight css"><table><tr><td class="code"><pre><span class="line"><span class="selector-tag">body</span> &#123;</span><br><span class="line">    <span class="attribute">font-family</span>: <span class="string">&quot;Font A&quot;</span>, <span class="string">&quot;Font B&quot;</span>, <span class="string">&quot;Font C&quot;</span>, sans-serif;</span><br><span class="line">&#125;</span><br></pre></td></tr></table></figure><p>浏览器在渲染页面的时候，会按照从前到后的顺序尝试适配字体名称，以应用对应的字体。</p><p>如果 <code>Font A</code> 存在，则使用它，如果不存在，则尝试从加载的 CSS 文件中寻找是否有对应的 Font-Face，如果还是没有，则移动到下一个字体，如此反复。</p><p><code>sans-serif</code> 这样的是一个字族集，它包含了一系列相似的字体；sans-serif 的意思是非衬线字体，故此在这个集合里的也都是这个类型的字体，而这个集通常是浏览器或者操作系统定义的。常见的集合还有 <code>serif</code>, <code>-apple-system</code>, <code>BlinkMacSystemFont</code> 和<code>system-ui</code>，分别代表衬线字体，Safari 定义的系统字体，Chrome 定义的系统字体和 Windows（以及可能的一些其他操作系统）定义的系统字体。</p><p>那么，在我们写 <code>font-family</code> 的时候，<del>除了到别人的网站上抄一整串下来，</del>我们需要注意：</p><ol><li>字集的分布；英文字体如 Arial 不支持中文，而无论中文英文字体都几乎不支持 emoji，故此我们应该遵循 <code>英文字体-中文字体-emoji 字体</code> 的顺序</li><li>字体的选择；在同一个类型的字体里，把字体按它们的理想度自高到地排序，或者按照字体质量的高低排序</li><li>集合的使用；列举完所有的具体之后，我们应该用集合结束 <code>font-family</code> 确保总是有字体可被应用</li></ol><p>下面收集一些包含中文网站的 <code>font-family</code>：</p><p>知乎：</p><p><code>-apple-system, BlinkMacSystemFont, &quot;Helvetica Neue&quot;, &quot;PingFang SC&quot;, &quot;Microsoft YaHei&quot;, &quot;Source Han Sans SC&quot;, &quot;Noto Sans CJK SC&quot;, &quot;WenQuanYi Micro Hei&quot;, sans-serif;</code></p><p>豆瓣：</p><p><code>Helvetica, Arial, sans-serif;</code></p><p>微博：</p><p><code>Arial, &quot;PingFang SC&quot;, &quot;Hiragino Sans GB&quot;, &quot;Microsoft YaHei&quot;, &quot;WenQuanYi Micro Hei&quot;, sans-serif;</code></p><p>京东：</p><p><code>tahoma, arial, &quot;Microsoft YaHei&quot;, &quot;Hiragino Sans GB&quot;, u5b8bu4f53, sans-serif;</code></p><p>V2EX:</p><p><code>&quot;Helvetica Neue&quot;, &quot;Luxi Sans&quot;, &quot;Segoe UI&quot;, &quot;Hiragino Sans GB&quot;, &quot;Microsoft Yahei&quot;, sans-serif, &quot;Apple Logo&quot;;</code></p><p>Airbnb 中国：</p><p><code>Circular, PingFang-SC, &quot;Hiragino Sans GB&quot;, 微软雅黑, &quot;Microsoft YaHei&quot;, &quot;Heiti SC&quot;;</code></p><p>Bilibili:</p><p><code>-apple-system, BlinkMacSystemFont, &quot;Helvetica Neue&quot;, Helvetica, Arial, &quot;PingFang SC&quot;, &quot;Hiragino Sans GB&quot;, &quot;Microsoft YaHei&quot;, sans-serif;</code></p><p>掘金：</p><p><code>-apple-system, system-ui, &quot;Segoe UI&quot;, Roboto, Ubuntu, Cantarell, &quot;Noto Sans&quot;, sans-serif, BlinkMacSystemFont, &quot;Helvetica Neue&quot;, &quot;PingFang SC&quot;, &quot;Hiragino Sans GB&quot;, &quot;Microsoft YaHei&quot;, Arial;</code></p><p>中文维基百科：</p><p><code>sans-serif;</code></p><p>从上面的一堆 <code>font-family</code> 里，我们可以总结出几个热点字体：</p><p><code>-apple-system</code>, <code>BlinkMacSystemFont</code>： Apple 设备专属，应该是一般加载 <code>SF Pro</code>，有中文的时候加载 <code>PingFang SC</code></p><p><code>Helvetica Neue</code>：一款发布于 1983 年的英文字体</p><p><code>Microsoft YaHei</code>：微软雅黑，Windows 7 以上系统专属</p><p><code>Hiragino Sans GB</code>：冬青黑体，macOS iOS 早年内置字体</p><p><code>WenQuanYi Micro Hei</code>：文泉驿微米黑，广泛内置于 Linux 类系统</p><p><code>Segoe UI</code>： Windows 7+ 内置英文字体</p><p><code>Roboto</code>：安卓平台泛用字体</p><p><code>Ubuntu</code>：Ubuntu 系统默认字体</p><p><code>Arial</code>：绝大多数操作系统内置，类似 <code>Helvetica Neue</code></p><h3 id="怎么列举出一个足够好的-font-family？"><a href="#怎么列举出一个足够好的-font-family？" class="headerlink" title="怎么列举出一个足够好的 font-family？"></a>怎么列举出一个足够好的 font-family？</h3><p><code>sans-serif</code>. <strong>Period.</strong></p><p>说实话，我相信绝大多数的操作系统/浏览器都会排列好自己所有的字体，所以绝大多数情况下一个 <code>sans-serif</code> 解千愁。</p><p>其次照顾好各大操作系统，且以大致的字体质量排列：</p><p>Apple Devices: <code>-apple-system, BlinkMacSystemFont</code></p><p>Windows 7+: <code>Segoe UI</code>, Windows XP: <code>Tahoma</code></p><p>Android: <code>Roboto</code>，Earlier Android: <code>Droid Sans</code></p><p>Ubuntu: <code>Ubuntu</code></p><p>其他泛用英文字体：</p><p><code>Helvetica Neue, Arial</code></p><p>非衬线字体集：<code>sans-serif</code></p><p>中文字体：</p><p>Apple Devices: <code>PingFang SC, Hiragino Sans GB</code></p><p>Windows 7+: <code>Microsoft YaHei</code></p><p>Windows XP: <code>HeiTi</code></p><p>Android: <code>Noto Sans CJK</code>, Earlier Android: <code>Droid Sans</code></p><p>Ubuntu: <code>Noto Sans CJK, WenQuanYi Micro Hei</code></p><p>最后抄一下别人的，串起来，加上 Emoji：</p><figure class="highlight css"><table><tr><td class="code"><pre><span class="line">en &#123;</span><br><span class="line">    <span class="attribute">font-family</span>: -apple-system, BlinkMacSystemFont, <span class="string">&quot;Segoe UI&quot;</span>, <span class="string">&quot;Noto Sans&quot;</span>, Roboto, Oxygen, Cantarell, <span class="string">&quot;Fira Sans&quot;</span>, <span class="string">&quot;Liberation Sans&quot;</span>, <span class="string">&quot;Droid Sans&quot;</span>, Ubuntu, <span class="string">&quot;Helvetica Neue&quot;</span>, Helvetica, Arial, sans-serif, <span class="string">&quot;Apple Color Emoji&quot;</span>, <span class="string">&quot;Segoe UI Emoji&quot;</span>, <span class="string">&quot;Segoe UI Symbol&quot;</span>;</span><br><span class="line">&#125;</span><br></pre></td></tr></table></figure><figure class="highlight css"><table><tr><td class="code"><pre><span class="line">zh &#123;</span><br><span class="line">    <span class="attribute">font-family</span>: font-family: -apple-system, BlinkMacSystemFont, <span class="string">&quot;Segoe UI&quot;</span>, <span class="string">&quot;Noto Sans&quot;</span>, Roboto, Oxygen, Cantarell, <span class="string">&quot;Fira Sans&quot;</span>, <span class="string">&quot;Liberation Sans&quot;</span>, <span class="string">&quot;Droid Sans&quot;</span>, Ubuntu, <span class="string">&quot;PingFang SC&quot;</span>, <span class="string">&quot;Noto Sans CJK SC&quot;</span>, <span class="string">&quot;Noto Sans SC&quot;</span>, <span class="string">&quot;Hiragino Sans GB&quot;</span>, <span class="string">&quot;WenQuanYi Micro Hei&quot;</span>, <span class="string">&quot;Microsoft YaHei&quot;</span>, <span class="string">&quot;Helvetica Neue&quot;</span>, Helvetica, Arial, sans-serif, <span class="string">&quot;Apple Color Emoji&quot;</span>, <span class="string">&quot;Segoe UI Emoji&quot;</span>, <span class="string">&quot;Segoe UI Symbol&quot;</span>;</span><br><span class="line">&#125;</span><br></pre></td></tr></table></figure><p><strong>为什么不用 <code>system-ui</code>？</strong></p><ul><li><a href="https://infinnie.github.io/blog/2017/systemui.html">https://infinnie.github.io/blog/2017/systemui.html</a></li></ul><p>当然，最近各大手机厂商都放出了自家的中文字体，我们也可以加上：</p><figure class="highlight css"><table><tr><td class="code"><pre><span class="line">zh &#123;</span><br><span class="line">    <span class="attribute">font-family</span>: font-family: -apple-system, BlinkMacSystemFont, <span class="string">&quot;Segoe UI&quot;</span>, <span class="string">&quot;Noto Sans&quot;</span>, Roboto, Oxygen, Cantarell, <span class="string">&quot;Fira Sans&quot;</span>, <span class="string">&quot;Liberation Sans&quot;</span>, <span class="string">&quot;Droid Sans&quot;</span>, Ubuntu, <span class="string">&quot;PingFang SC&quot;</span>, <span class="string">&quot;HarmonyOS Sans SC&quot;</span>, MiSans, <span class="string">&quot;Hiragino Sans GB&quot;</span>, <span class="string">&quot;WenQuanYi Micro Hei&quot;</span>, <span class="string">&quot;Noto Sans CJK SC&quot;</span>, <span class="string">&quot;Noto Sans SC&quot;</span>, <span class="string">&quot;Microsoft YaHei&quot;</span>, <span class="string">&quot;Helvetica Neue&quot;</span>, Helvetica, Arial, sans-serif, <span class="string">&quot;Apple Color Emoji&quot;</span>, <span class="string">&quot;Segoe UI Emoji&quot;</span>, <span class="string">&quot;Segoe UI Symbol&quot;</span>;</span><br><span class="line">&#125;</span><br></pre></td></tr></table></figure><p><del>OPPOSans 因为字重奇怪被除名。</del></p><h3 id="本博客的实践"><a href="#本博客的实践" class="headerlink" title="本博客的实践"></a>本博客的实践</h3><p>首先在 font-family 里优先苹方，HarmonyOS Sans，MiSans，冬青黑体和文泉驿微米黑，通过 75CDN 引入 Noto Sans SC 并且 <code>font-display: swap</code>，把微软雅黑仅仅放在 <code>sans-serif</code> 的前面。</p><p><del>坚决做到除非用户断网不然就不能让微软雅黑活下去</del></p><p>此外博客 Logo 是 Noto Sans SC Thin @100，Slogan 是 Noto Serif SC Extralight @200，均直接做成子集然后 inline-css。</p><h2 id="引用"><a href="#引用" class="headerlink" title="引用"></a>引用</h2><p>除了文章中提及的外部资源，本文还参考了以下文章，顺序不分先后：</p><ul><li><a href="https://juejin.cn/post/6844903790580072462">https://juejin.cn/post/6844903790580072462</a></li><li><a href="https://infinnie.github.io/blog/2017/systemui.html">https://infinnie.github.io/blog/2017/systemui.html</a></li><li><a href="https://markdotto.com/2018/02/07/github-system-fonts/">https://markdotto.com/2018/02/07/github-system-fonts/</a></li><li><a href="https://ant.design/docs/spec/font-cn">https://ant.design/docs/spec/font-cn</a></li><li><a href="https://github.com/typekit/webfontloader">https://github.com/typekit/webfontloader</a><ul><li><a href="https://developers.google.com/fonts/docs/webfont_loader">https://developers.google.com/fonts/docs/webfont_loader</a></li></ul></li><li><a href="https://css-tricks.com/snippets/css/system-font-stack/">https://css-tricks.com/snippets/css/system-font-stack/</a></li></ul><hr><p>感谢阅读。第一次写这么长的文章，我相信一定有错漏、描述不正确的地方，欢迎在评论区予以指正。</p><p>如需全文转载本文，请联系我获取免费授权；除非获得授权，本文禁止全文转载。</p>]]></content>
    
    
    <summary type="html">&lt;h2 id=&quot;前言&quot;&gt;&lt;a href=&quot;#前言&quot; class=&quot;headerlink&quot; title=&quot;前言&quot;&gt;&lt;/a&gt;前言&lt;/h2&gt;&lt;p&gt;我一直很喜欢在网页里嵌入各种 WebFont - 在线字体；WebFont 可以通过网络在客户端上加载本地没有的字体，从而实现更加美观的页面排版。&lt;/p&gt;</summary>


    <category term="技术向" scheme="https://huangxin.dev/categories/partly-technical/"/>
    
    
  </entry>
  
  <entry>
    <title>Migration Page 小更新</title>
    <link href="https://huangxin.dev/partly-technical/migration-page-update.html"/>
    <id>https://huangxin.dev/partly-technical/migration-page-update.html</id>
    <published>2022-02-13T05:00:00.000Z</published>
    <updated>2024-04-28T14:20:59.000Z</updated>
    
    <content type="html"><![CDATA[<p>我的小项目 <a href="https://github.com/hifocus/Migration-Page">Migration-Page</a> 迎来了一小波更新，以下是更新内容：</p><ul><li>更新里充分认识到了并非所有人的站点都支持 https 访问，所以增加了 <code>insecure</code> 参数；在调用的时候，只需要在 url 参数里加上 <code>insecure=true</code> 就可以在页面里使用 <code>http</code> 协议</li><li>引入了 <a href="https://www.npmjs.com/package/wc-github-corners">wc-github-corners</a> 小插件；现在通过右上角的 GitHub 徽标可以到达仓库页面</li><li>更新改进了 JavaScript 代码，现在代码看起来更干净，减少了 <code>if...else</code> 的使用</li><li>更新在 README 里全面使用了 <del><code>migration.qrcdn.com</code></del> <code>migration.huangxin.org</code> 这个域名</li></ul><p>对于这个项目的更多介绍，请阅读 <a href="https://huangxin.dev/partly-technical/migration-page-introduction.html">Migration Page - 简单易用，可自定义的托管迁移页服务</a></p>]]></content>


    <summary type="html">&lt;p&gt;我的小项目 &lt;a href=&quot;https://github.com/hifocus/Migration-Page&quot;&gt;Migration-Page&lt;/a&gt; 迎来了一小波更新，以下是更新内容：&lt;/p&gt;
&lt;ul&gt;
&lt;li&gt;更新里充分认识到了并非所有人的站点都支持 https 访问</summary>


    <category term="技术向" scheme="https://huangxin.dev/categories/partly-technical/"/>
    
    
  </entry>
  
  <entry>
    <title>Warframe Wisp Mod 配置</title>
    <link href="https://huangxin.dev/games-related/warframe-wisp-versatile-build.html"/>
    <id>https://huangxin.dev/games-related/warframe-wisp-versatile-build.html</id>
    <published>2022-01-17T16:00:00.000Z</published>
    <updated>2024-03-25T17:52:54.000Z</updated>
    
    <content type="html"><![CDATA[<p><img src="https://edge.huangxin.org/images/legacy/vip1.loli.io/2022/01/19/B4uzRXVpOAcqt8W.jpg" alt="Warframe0012.jpg"></p><p>最近终于刷出了 <a href="https://warframe.huijiwiki.com/wiki/Wisp">Wisp</a>，然后马不停蹄地 5 极化，完成 3U 极限强度配卡；今天在氏族里听其他人说 Wisp 也可以搭配 <a href="https://warframe.huijiwiki.com/wiki/Mirage">Mirage</a> [<a href="https://warframe.huijiwiki.com/wiki/%E9%BB%AF%E7%84%B6%E5%A4%B1%E8%89%B2">黯然失色</a>] 进行输出，可以用来玩赏金等等，就研究了下。</p><span id="more"></span><h2 id="研究成果："><a href="#研究成果：" class="headerlink" title="研究成果："></a>研究成果：</h2><p><img src="https://edge.huangxin.org/images/legacy/vip2.loli.io/2022/01/19/G9UFx8RIDCHjfuQ.jpg" alt="Warframe0013.jpg"></p><blockquote><p><strong>术语解释：</strong><br>储能池 - 俗称 “花”，Wisp 的 1 技能能够放置的数种范围 buff，而 Wisp 本身也被称为 “花”<br>Umbra Forma - 俗称 “U福马”，提供 Umbra（暗影、牺牲类型 Mod）极性的 Forma<br>2U, 3U - 指在战甲 Mod 配置里上 2/3 个暗影 Mod，多个暗影 Mod 能提高包括 [暗影 聚精会神] 暗影 Mod 的加成数值，主要藉此提高技能强度<br>蛆：指战甲 Nidus<br>血卡：提供生存能力的 Mod，例如 [生命力] [钢铁纤维] [蓄能重划] [角斗士 决心] [肉碾虫 壳甲] 等等<br>Trinity: 俗称 “奶妈”</p></blockquote><p>首先，这样配卡的目的是什么？</p><p><strong>是极限输出吗？</strong>不是，真要强力输出可以让其他甲来<br><strong>是极限强度吗？</strong>不是，我们要保证多功能性，上可打突击三赏金五，下可称为路人局/单人局优秀的辅助</p><p>而且我们需要照顾游玩<strong>舒适度</strong>；所以本套配卡几乎不使用堕落 Mod.</p><p>配卡的最终结果可以让 Wisp 仅依靠自己的情况下优雅地获得：</p><ul><li><strong>220%+ 技能强度</strong>（~250%，如果激活成长之力）</li><li><strong>180% 技能持续时间</strong>（离开储能池（花）的时候能够有长达 54 秒的 buff 存在)</li><li>略大的技能范围（增加舒适度）</li><li><strong>夯实的生存能力</strong>：<ul><li>1530 有效生命，67~83 每秒生命恢复<br>完全没有牺牲技能效率和范围，甚至可以一下放三个 buff</li></ul></li></ul><p>总而言之就是舒适度 MAX；玩得开心，buff 得开心，输出得开心，非常开心~</p><p><img src="https://edge.huangxin.org/images/legacy/vip1.loli.io/2022/01/19/mInBrZF1bt5s7eH.png"></p><h2 id="配卡思路"><a href="#配卡思路" class="headerlink" title="配卡思路"></a>配卡思路</h2><ul><li>尽可能地不使用<a href="https://warframe.huijiwiki.com/wiki/%E5%88%86%E7%B1%BB:%E5%A0%95%E8%90%BDMOD">堕落 Mod</a> - 仅使用一张 [瞬时坚毅]，不使用 [盲怒], [弹指瞬技] 或者 [心智偏狭]。</li><li>舒适度考量；54 秒的离开储能池 buff 时长，可以在外面放肆地浪<ul><li>曾经想过下掉 [预言 启示] 换成其他加强度的 Mod，但是 47 秒和 57 秒的持续时长我选择了后者；一是真的可以考虑到打赏金的时候可能需要离开储能池更长的时间，这里的大几秒很关键，二是野队打一些比较休闲的任务的时候，buff 更长可以减少在路上放 buff 的次数，队友也可以更浪；<del>三就是 50 多秒的持续时间看起来很帅</del></li></ul></li><li>使用 [<a href="https://warframe.huijiwiki.com/wiki/%E8%9E%8D%E5%90%88%E5%82%A8%E8%83%BD%E6%B1%A0">融合储能池</a>]，一次放三个 Mod（并且可以放劣化槽，本来放那里的 [力量窜升] 可以放下面，甚至可以换成 [预言 神密]）</li><li>只上一张 [暗影 聚精会神] 拉强度，其他卡位留给生存/舒适性配卡</li><li>上 [适应]，没有上其他血卡诸如 [生命力] 或者 [钢铁纤维]；就算上一张 [暗影 钢铁纤维]，也不过多了 20% 的伤害抗性，[适应] 能多 90%（理想情况下）；没上 [生命力] 的原因单纯是技能本身就加血的，多 440 血意义不大，还不如加护甲</li><li>移植 Mirage [黯然失色]，提供最高 370% 的武器伤害输出，持续 45 秒</li></ul><p>在这个思路和上述配卡下，Wisp 就可以应付非常多样的不同情况，包括突击的 debuff “能量上限减少” - 一次性放完三个储能池仅需 50 能量，而能量上限减少 3/4 的情况下 Wisp 还能有 75 能量，你但凡上一张盲怒，这场面就救不回来了，除非上技能效率卡，但是这样一来你本来就不多的容错率/持续时间加成又要被拉低了。</p><p>而因为 Wisp 可以移动中放技能，在路上一次性放下三个储能池效果无疑比只放一个速度好得多；而在移动防御的场景下，因为需要多次放置储能池，一次放三个也会比一个一个放好得多，而且一个一个放还得反复叠 buff.</p><p>所以，最终配卡就是这样了~</p><p><img src="https://edge.huangxin.org/images/legacy/vip1.loli.io/2022/01/19/KLazQ8hg7Cwuxfv.jpg"></p><h2 id="其他配卡"><a href="#其他配卡" class="headerlink" title="其他配卡"></a>其他配卡</h2><p>这里附上其他两个个人的配卡，适合不同的场景；在这两套配卡里都移植了 [<a href="https://warframe.huijiwiki.com/wiki/%E5%BC%BA%E5%8C%96">强化</a>] 以增加技能强度。</p><h3 id="Wisp-防御专属配卡"><a href="#Wisp-防御专属配卡" class="headerlink" title="Wisp 防御专属配卡"></a>Wisp 防御专属配卡</h3><p>这套配卡更加强调了强度，在持续时间和技能效率方面有所牺牲（仍旧提供将近 40 秒的 buff 持续时间，单次使用消耗 ~80 能量），但是直接上了一张 +45% 技能范围的 [延伸]，提供更广的 buff 附加范围。</p><p>具体区别是使用了 [盲怒] 和 2U 组合配卡（其中一张为 0 级暗影），少了两张加持续时间的小卡：</p><p><img src="https://edge.huangxin.org/images/legacy/vip1.loli.io/2022/01/19/ZL75gpqGtsvN28Y.png"></p><p>这套配卡适合防御，叠好 buff，攒好能量直接放储能池；仍旧选择 [融合储能池] 的原因是这仅仅是为了单次游玩、休闲向的防御使用，如果是长途、高难度防御，直接用极限强度配卡就好。</p><h3 id="Wisp-极限强度配卡"><a href="#Wisp-极限强度配卡" class="headerlink" title="Wisp 极限强度配卡"></a>Wisp 极限强度配卡</h3><p>这套配卡合理地牺牲了一切其他属性，只专注于极限强度，产出最强的血花和射速花；注意这套配卡因为我暂时没有 [欺谋狼主之恨] 达不到理论最大强度，而 0 级暗影 Mod 最好应该是 [暗影 生命力] 更加合理，因为更高级别的 [暗影 钢铁纤维] 能提供更高的减伤比例，而生命力只能提高大几百血，当然 Umbra Forma 多也可以全部上满级的。</p><p><img src="https://edge.huangxin.org/images/legacy/vip2.loli.io/2022/01/19/OkEZl5KXAtywjfe.png"></p><p>目前游戏内单人不依靠其他战甲技能 能实现的最大强度应该是：基础 385% 强度 + [强化] 50% + [能量转换] 50% + [<a href="https://warframe.huijiwiki.com/wiki/%E5%8A%9B%E9%87%8F%E6%B1%B2%E5%8F%96">力量汲取</a>]（灭骸 Mod）50% + 成长之力 25% + [和平 电闪] 30% = 590%（Nidus 为 605%）</p><h2 id="问答环节"><a href="#问答环节" class="headerlink" title="问答环节"></a>问答环节</h2><p><strong>Q:</strong> 为什么你的休闲配卡不上盲怒？不堆技能强度？<br><strong>A:</strong> 因为要考虑舒适度。我当然也可以盲怒 + 弹指瞬技啊，但是出了花只有十几秒的 buff 你要么，还不是分分钟暴毙</p><p><strong>Q:</strong> <strong>欲言又止</strong><br><strong>A:</strong> 想追求强度直接上极限配卡</p><p><strong>Q:</strong> 为什么你的防御配卡还是不追求更高强度？<br><strong>A:</strong> 因为要考虑自己和别人的舒适度；大范围的花就和 Trinity 上 [过度延展] 一样重要；如果你的 buff 作用范围只有狭窄的一点，所有人都得挤一起那多难受啊，更别提这是一个满屏特效放烟花的（大）版本</p><p><strong>Q:</strong> <strong>欲言又止</strong><br><strong>A:</strong> 如果追求最大强度，再次推荐你上极限配卡，并且让队友带极限蛆</p><p><strong>Q:</strong> 为什么要用 [融合储能池]？我就喜欢一个一个放<br><strong>A:</strong> 融合储能池会把电花也放下，不适合刷各种材料的场景，因为可能会卡怪；但是在休闲局里面无疑是非常好用的，况且可以叠一次 buff 就放三个花；如果你临时想一个一个放，不放电花，你还是可以在局内切</p><p><strong>Q:</strong> <strong>欲mmp又止</strong><br><strong>A: 啊对对对</strong></p><p>这是第一次正式地写详实的游戏攻略，如果有任何合理的建议都尽请提出；让我们期待 2023/2024 Wisp Prime 的到来（我可期待死雷霆 Prime 了~<br>感谢各位~</p>]]></content>
    
    
    <summary type="html">&lt;p&gt;&lt;img src=&quot;https://edge.huangxin.org/images/legacy/vip1.loli.io/2022/01/19/B4uzRXVpOAcqt8W.jpg&quot; alt=&quot;Warframe0012.jpg&quot;&gt;&lt;/p&gt;
&lt;p&gt;最近终于刷出了 &lt;a href=&quot;https://warframe.huijiwiki.com/wiki/Wisp&quot;&gt;Wisp&lt;/a&gt;，然后马不停蹄地 5 极化，完成 3U 极限强度配卡；今天在氏族里听其他人说 Wisp 也可以搭配 &lt;a href=&quot;https://warframe.huijiwiki.com/wiki/Mirage&quot;&gt;Mirage&lt;/a&gt; [&lt;a href=&quot;https://warframe.huijiwiki.com/wiki/%E9%BB%AF%E7%84%B6%E5%A4%B1%E8%89%B2&quot;&gt;黯然失色&lt;/a&gt;] 进行输出，可以用来玩赏金等等，就研究了下。&lt;/p&gt;</summary>


    <category term="游戏向" scheme="https://huangxin.dev/categories/games-related/"/>
    
    
  </entry>
  
  <entry>
    <title>惶心博客 2021 年末总结</title>
    <link href="https://huangxin.dev/site-updates/2021-end-of-year-summary.html"/>
    <id>https://huangxin.dev/site-updates/2021-end-of-year-summary.html</id>
    <published>2021-12-30T16:00:00.000Z</published>
    <updated>2024-05-02T00:10:44.000Z</updated>
    
    <content type="html"><![CDATA[<p>欢迎走到 1202 年的尽头。</p><link rel="stylesheet" href="https://cdn.jsdelivr.net/npm/aplayer/dist/APlayer.min.css"><script src="https://cdn.jsdelivr.net/npm/aplayer@latest/dist/APlayer.min.js"></script><!-- require MetingJS --><script src="https://cdn.jsdelivr.net/npm/meting@2/dist/Meting.min.js"></script><p><meting-js    server="netease"    type="song"    id="1875497943"><br></meting-js></p><p>在开始之前，综合播放次数，旋律、作词和唱腔，请点击播放我今年的年度单曲 - 单依纯《续写》：</p><blockquote><p><em>余生續寫的詩</em><br><em>每一筆都是你的名字</em><br><em>再重來一次</em><br><em>也會記得愛你這件事</em></p></blockquote><p>如果不是看到那么多友链发年终总结，我大概也不会发的。这篇文章也许不会太走心，简单总结一下今年的数据和变化吧。</p><h2 id="数据"><a href="#数据" class="headerlink" title="数据"></a>数据</h2><h3 id="访客数量"><a href="#访客数量" class="headerlink" title="访客数量"></a>访客数量</h3><p>从 <code>2020-12-31</code> 到 <code>2021-12-30</code>，一年的时间跨度里，惶心博客迎来了 13,213 个访客，他们访问了 22,424 万个页面，平均每次访问事件会产生 1.42 个页面浏览。</p><p><img src="https://edge.huangxin.org/images/legacy/vip2.loli.io/2021/12/31/1ZwcdNpuJGVzRHF.png"></p><h3 id="访客分布"><a href="#访客分布" class="headerlink" title="访客分布"></a>访客分布</h3><p>上述访客里，47.6% 来自中国大陆，11.1% 来自美国，10.6% 来自台湾，6.19% 来自香港，4.89% 来自马来西亚。虽然可以想象的是本站访客里肯定会有香港、台湾和马来人，但是因为本站托管于海外，所以会有一部分访客使用代理访问本站。</p><p><img src="https://edge.huangxin.org/images/legacy/vip1.loli.io/2021/12/31/ujOfY8h4rHJkEIS.png"></p><p>在中国大陆的访客里，可以辨认出的是 7.10% 的访客来自上海，6.88% 来自广州，4.01% 来自北京，3.91% 来自杭州。与上一次年末总结里 “北上广深” 的排名不同，今年杭州访客位于第四名，而深圳在第八名。</p><p>操作系统方面，45.6% - 6000 名整的访客使用 <a href="https://www.microsoft.com/windows">Windows</a>, 24.7% 使用 <a href="https://www.android.com/">Android</a>，18.2% 使用 <a href="https://www.apple.com/ios">iOS</a>，5.66% 使用 <a href="https://www.apple.com/macos">macOS</a>，2.29% 使用 <a href="https://en.wikipedia.org/wiki/Linux">Linux</a>，0.36% 使用 <a href="https://www.google.com/chromebook/chrome-os/">Chrome OS</a>，竟然还有访客在 <a href="https://en.wikipedia.org/wiki/Windows_Phone">Windows Phone</a> 和 <a href="https://www.xbox.com/">Xbox</a> 上访问了本站各一次，非常感谢这样的特殊对待。</p><p>访客使用的浏览器中，59.4% 的访客使用 <a href="https://chrome.com/">Chrome</a>，16.9% 使用 <a href="https://www.apple.com/safari/">Safari</a>。6.29% 使用 <a href="https://en.wikipedia.org/wiki/UC_Browser">UC Browser</a>，4.66% 使用 <a href="https://www.microsoft.com/edge">Edge</a>，只有 2.37% 的访客使用了 <a href="https://firefox.com/">Firefox</a>。</p><h3 id="访客来源"><a href="#访客来源" class="headerlink" title="访客来源"></a>访客来源</h3><p>2021 年，45.7% 的访客来自搜索引擎（其中 80% 来源于 <a href="https://google.com/">Google</a>，18% 来自<a href="https://baidu.com/">百度</a>），38.1% 来自直接访问，15.9% 来自引荐链接，0.30% 来自社交媒体。</p><p><img src="https://edge.huangxin.org/images/legacy/vip1.loli.io/2021/12/31/xJ1tMi2kIsdn9YV.png"></p><p>引荐链接里，本站友链<a href="https://2heng.xin/">樱花庄的白喵</a>，<a href="https://mkblog.cn/">孟坤博客</a>，<a href="https://acg.blue/">Xinger IMG Collection</a>，<a href="https://moedog.cn/">犬’s Blog</a> 和<a href="https://taifua.com/">太傅博客</a>占据第三方引荐来源的前五名，分别贡献了 12.1%, 10.9%, 8.80%, 4.11 和 1.31% 的引荐流量。友链从来都是本站重要的支持元素；来自直接引荐的访问时间比来自搜索引擎的访问时间长 55.3%，访问页面数多 50%，更加能体现出本站友链的重要性。博客的发展和持续离不开<a href="https://friends.huangxin.org/">全体友链小伙伴</a>的支持，在这里再次表示感谢。</p><h2 id="变化"><a href="#变化" class="headerlink" title="变化"></a>变化</h2><p>今年的数据相比于以往有非常大的下滑，主要还是因为没有什么动力写博文。但是最近有增加在博客和代码方面的产出，一些频繁关注本站的访客也许注意到了在博客样式上的微小变化；各位也能很快在博客上看到更多元的文章和一些新的项目。</p><p>其实还有很多的……但是不是特别想写，就算了吧。</p><p>可以画的饼是，我会努力在明年重写 <a href="https://github.com/hifocus/get">Get</a>，优化 <a href="https://github.com/qr-merger/merger">Merger</a> 的代码，以及做出其他的小项目。</p><h2 id="最后"><a href="#最后" class="headerlink" title="最后"></a>最后</h2><p>在这里祝各位新年快乐；新的一年也请多多支持惶心博客。</p><blockquote><p><em>故事的尽头 某一个宇宙</em><br><em>也许还会有 最温热的双眸</em><br><em>一直在等候 收藏了太久的温柔</em></p></blockquote><p><img src="https://edge.huangxin.org/images/legacy/vip1.loli.io/2021/12/31/cXp2Gvg1RYJBjZd.jpg"></p><blockquote><p>2021 Best Shoot of the Year</p></blockquote>]]></content>


    <summary type="html">&lt;p&gt;欢迎走到 1202 年的尽头。&lt;/p&gt;
&lt;link rel=&quot;stylesheet&quot; href=&quot;https://cdn.jsdelivr.net/npm/aplayer/dist/APlayer.min.css&quot;&gt;
&lt;script src=&quot;https://cdn.jsd</summary>


    <category term="新动态" scheme="https://huangxin.dev/categories/site-updates/"/>
    
    
  </entry>
  
  <entry>
    <title>如何有手就行地刷 Protea</title>
    <link href="https://huangxin.dev/games-related/fool-proof-method-to-farm-protea.html"/>
    <id>https://huangxin.dev/games-related/fool-proof-method-to-farm-protea.html</id>
    <published>2021-12-27T05:00:01.000Z</published>
    <updated>2024-03-25T17:52:54.000Z</updated>
    
    <content type="html"><![CDATA[<blockquote><p>刷 Protea？这不有<del>手</del>肝就行？</p></blockquote><span id="more"></span><p>注：尽管这个方法效率很高，100% 成功率的同时单轮 + 硬币只需要 4 分钟不到，但是完整刷完三个部件还是需要 4.5 小时左右。</p><p>（本文未完成）</p><h1 id="系列简介"><a href="#系列简介" class="headerlink" title="系列简介"></a>系列简介</h1><p>这是一个新开的系列，叫“游戏向”。其实本来要叫游戏攻略的，但是本站所有的分类名称都是三个字，就这么叫了。</p><p>两年前还是多久，应该是更久之前吧，就有想过把自己对于一些游戏的看法，其实往深了说是对于游戏的市场、运作方式、机制……各种东西基于个人观点的独特看法。</p><p>但是，作为第一篇文章，还是从一篇简单的 Warframe 攻略开始吧！</p><h1 id="前言"><a href="#前言" class="headerlink" title="前言"></a>前言</h1><p>是的，Protea 的三技能实在是太好了。对于一些能量有可能窘迫的情况，比如圣殿突袭，大概就是良药吧。此外，大概也可以装在 Mirage 的身上，补充几乎是必须的 45% 能量效率。</p><p>其实 Protea 刚出来那会儿，作为一款可以“操控时间”的战甲，我是一度非常想拥有并且时不时拿出来玩玩的；但是刷的过程太劝退了，就没有刷下去。</p><p>等到现在，发现三技能移植实在是太有用了，但是组队刷的人已经几近没有了。前几天上了个车，还是灵车，只有 2/3 左右的成功率。</p><p>那么这篇文章，将会以图文加上视频并茂的方式，教会你怎么有手就行、傻瓜式地刷 Protea。</p><p>事前警告：就算是有手就行，刷 Protea 的过程仍然繁冗无比，非常伤肝，建议非刚需量力而行（虽然 Protea Prime 2025 年也不知道能不能出来就是了）。</p><h1 id="获取方式"><a href="#获取方式" class="headerlink" title="获取方式"></a>获取方式</h1><p>全程单人。</p><p>根据 Warframe 中文维基：</p><blockquote><p>Protea的蓝图通过完成系列任务<a href="https://warframe.huijiwiki.com/wiki/%E5%83%B5%E5%B1%80%E5%8D%8F%E8%AE%AE" title="僵局协议">僵局协议</a>获得。部件蓝图可以在各级<a href="https://warframe.huijiwiki.com/wiki/Granum_Void" title="Granum Void">格拉努虚空</a>获得；头部神经光元为格拉努虚空轮次C奖励，推荐火卫一捕获；机体蓝图为<strong>扩展</strong>格拉努虚空轮次C奖励，推荐海王星救援；系统蓝图<strong>噩梦</strong>格拉努虚空轮次C奖励，推荐冥王星捕获。</p></blockquote><p>在不知道哪个更新后，还是一开始就可以这样，反正无论哪个星球只要有新版 Corpus 地图板块，就可以三种硬币随便用，所以上述推荐地点仅适用于没有硬币/硬币用完，希望边刷硬币边打格拉努虚空的方式。</p><p>如果有充足的硬币，建议一直打火卫一捕获。</p><p>硬币获取方式请参见 <a href="https://warframe.huijiwiki.com/wiki/%E6%A0%BC%E6%8B%89%E5%8A%AA%E8%99%9A%E7%A9%BA">格拉努虚空</a> 条目，这里不赘述。</p><h1 id="要求"><a href="#要求" class="headerlink" title="要求"></a>要求</h1><h2 id="硬性要求"><a href="#硬性要求" class="headerlink" title="硬性要求"></a>硬性要求</h2><ul><li>Mesa 战甲。最好极化条件充足，但是没极化也没有太大关系</li><li>一些基础 Mod，高级 Mod 更佳</li></ul><h2 id="软性要求"><a href="#软性要求" class="headerlink" title="软性要求"></a>软性要求</h2><p>达到软性要求可以增加游玩舒适度和单次通关速度，但是没有也没关系，多花点时间罢了。</p><ul><li>可以进行 [Helminth 技能] 融入 - 俗称大嘴</li><li>有顶配/毕业 Mesa 配装</li><li>有舰员；没有的话可以用战甲魅影代替，只是舰员伤害更高并且不要钱罢了</li><li>有大型能量恢复装置 - 俗称井盖 - 100-200个以上</li><li>充沛赋能，其他保命赋能/Mod</li></ul><h1 id="方法"><a href="#方法" class="headerlink" title="方法"></a>方法</h1><h2 id="简述"><a href="#简述" class="headerlink" title="简述"></a>简述</h2><p>这里的方法是我所使用的“完全体” - 如果没有相关条件，不去应用即可。</p><h3 id="Mesa-配装"><a href="#Mesa-配装" class="headerlink" title="Mesa 配装"></a>Mesa 配装</h3><p>光环冲刺提升 - 提高跑路速度，可以用任意其他代替</p><p>川流不息 Prime - 提升能量上限（比较重要），可以用普通川流不息代替</p><p>主要堆持续时间 - 心智偏狭、预言启示、持久力 Prime - 可选百折不挠、普通持久力</p><p>上张强度做做样子 - 暗影 聚精会神 - 可以用任意其他加强度的 Mod 代替</p><p>天赋/合成反射/其他加拔枪速度的 Mod - 增加 4 技能开关手感（我也不知道天赋有没有用，随便上的）</p><p><strong>最重要的 - 顶天立地 Prime</strong> - 方便直接过 Corpus 的各种机关栅栏，从此一路横冲直撞</p><p>Mesa 1 技能替换 Helminth 感染者敏捷技能 - 大幅增加跑路速度，省时间必备</p><p><img src="https://edge.huangxin.org/images/legacy/vip2.loli.io/2021/12/27/nY3cfLGJDvzsOeV.png" alt="image.png"></p><p>显赫武器监察者双枪配置：</p><p>很简单的配置；我想吃火焰装填 Prime 的加成所以组了辐射；不喜欢的话火换毒组腐蚀即可。如果卡不够随便来就行。</p><p><img src="https://edge.huangxin.org/images/legacy/vip1.loli.io/2021/12/27/cHdfXFipY8TJjS4.png" alt="image.png">、</p><h3 id="怎么去找大手"><a href="#怎么去找大手" class="headerlink" title="怎么去找大手"></a>怎么去找大手</h3><p><strong>开单人。</strong></p><p>如果需要一边刷硬币一边开，地图选海王星救援。如果有大量硬币（推荐每种 20 个以上）就火卫一捕获。</p><p>进图拍<strong>3个井盖</strong>（咱就是有钱），开 123 技能，等 10 秒，技能生效的同时第二波能量出来，直接满能量出发。</p><p>直接向目标点冲，如果保命卡/赋能上的够的话这么低级的图你是无敌的，直接开1向人质关押地点/捕获地点冲 - <strong>无视任何怪</strong>。</p><p>路上如果见到大手，站在前面的控制面板前，开4转一圈清干净周围的怪，投币开始。</p><p>如果见不到大手，就一路跑去做任务，<strong>不用刻意找</strong>。大手在从你出生到撤退的路上出现的概率<strong>极高</strong>，我几十轮下来只有一次路上没大手，需要撤退前到处找找。</p><h3 id="虚空怎么打"><a href="#虚空怎么打" class="headerlink" title="虚空怎么打"></a>虚空怎么打</h3><p>进去后，疯狂按 3 开减伤技能。如果不需要同时刷硬币（做完所有任务以后等司库出现），就同时扔舰员，否则就把舰员留着后面挂机等司库。</p><p>花点时间，前后左右环顾一下，找一个比地面略高的石头，跳上去。不用慌不用急，时间很宽裕。</p><p>一定不要急着去地图中央！！！一直待在出生点附近绝大部分情况就足够了。</p><p>开 4， 开始转圈圈。</p><p>你会发现，在这种情况下单人情况下杀到 75 个非常容易，我算下来平均1秒两个 - 50秒时间限制绰绰有余。</p><p>如果面前的敌人杀光了，不用急着动 - 这个方法全程不用动 - 转 180°，你会发现后面有更多的敌人等着你。</p><p>如果 4 技能准心变到最小了，就及时重新开技能，用更大的瞄准区域更高效地杀人。</p><p>一直转圈圈，30-40秒 Lutos 就会提醒你数量够了，你就可以获得 C 轮奖励。</p><h3 id="出去后"><a href="#出去后" class="headerlink" title="出去后"></a>出去后</h3><p>出去后一般需要继续完成任务。带上 顶天立地Prime 不仅能直接闯激光门，还能用布拉玛炸地板，一箭死一房间的人。</p><p>特别是救援，救出人质后最好把路上的怪杀光，避免人质受到伤害。</p><p>一路用 1 赶路。</p><p>如果需要同时刷硬币（刷一个开一个），就在远于撤退点 45 米的地方挂机，放舰员，司库出来如果有直接视野舰员可以在你飞过去捡硬币之前把司库秒掉。</p><p>司库在非无尽任务出现在 2-4 分钟，也就是说加上杀司库捡硬币的时间，一局海王星救援不应该消耗超过 4 分 15 秒的时间。如果只是火卫二捕获（不刷硬币）两分钟左右可以完成。、</p><p>如果司库一直不出现，记得在 3 分钟的时候切一下指挥官，刷新舰员的挂机判定。</p><p>如果对撤退点没有直接视野（被转角、门挡住），根据我的观察司库很大可能会出现在撤退点内，舰员不会有直接视野所以需要自己打。如果对撤退点有直接视野司库还是会出现在差不多的地方，但是舰员有直接视野可以直接秒 - 但是仍然不建议这么做，因为如果对撤退点有视野，就算距离大于 45 米，司库也有可能不出现 - 在这种情况下往后退一点司库就会秒出现。</p><h1 id="概率"><a href="#概率" class="headerlink" title="概率"></a>概率</h1><p>总的来说，就是非常坑，非常肝，非常弱智。</p><p>Protea 三个部件下来，我一共获得了 11 个逐电部件，22 个诡计之刃部件，28 个钢刃步枪部件，以及一万个亡者护肩（大概 6 个？）。</p><p>按照以上数据算，70 轮下来我才刷出来一套 Protea。按照每一轮 3.75 分钟算，四个半小时才出来。在最高效率下（一开始刷的时候肯定不知道这个方法）四个半小时重复同一种任务，才出来。这已经和刷一个新 Prime 战甲所需要的时间相似了（1金2银1铜，中断10轮出一个）。但是问题是，僵局协议本身就需要两个小时左右来打来以获得 Protea 蓝图。所以说，刷 Protea 的耗时还不如未来刷 Protea Prime，或者随便什么新战甲。</p><p>这种情况发生的概率是 6%，略高于约定俗成的 5% 置信区间。</p><p>按照 5% 置信区间来算，一个部件需要刷 26 轮。如果是 1% 的置信区间，则需要约 39 轮。</p><p>如果你幸运地刷了 79 轮都不出一个部件，那恭喜你证明了 DE 暗箱操纵概率算法，因为这个概率低于 0.01%。</p><p>总之，非刚需或者段位控还是别刷了，伤肝。</p>]]></content>
    
    
    <summary type="html">&lt;blockquote&gt;
&lt;p&gt;刷 Protea？这不有&lt;del&gt;手&lt;/del&gt;肝就行？&lt;/p&gt;
&lt;/blockquote&gt;</summary>


    <category term="游戏向" scheme="https://huangxin.dev/categories/games-related/"/>
    
    
  </entry>
  
  <entry>
    <title>jsDelivr 备案被吊销后，网页静态资源何去何从</title>
    <link href="https://huangxin.dev/partly-technical/in-response-to-jsdelivr-icp-license-revokement.html"/>
    <id>https://huangxin.dev/partly-technical/in-response-to-jsdelivr-icp-license-revokement.html</id>
    <published>2021-12-21T05:00:00.000Z</published>
    <updated>2024-03-25T17:52:54.000Z</updated>
    
    <content type="html"><![CDATA[<blockquote><p>过去的一两年里，许多人发现了 jsDelivr 在速度上的巨大优势，开始用 jsDelivr 作为图床，甚至用 jsDelivr 来托管和加速魔法上网软件的安装脚本。到后来 jsDelivr 更新了它的可接受使用政策（AUP），可惜当然滥用服务的各路神仙是不会理睬的，在他们的眼里，撸是常态，薅羊毛是理所当然，既然是免费的就要做好被撸爆的准备。</p></blockquote><span id="more"></span><h2 id="正文"><a href="#正文" class="headerlink" title="正文"></a>正文</h2><p>昨天，<a href="https://www.jsdelivr.com/">jsDelivr</a> 团队主要负责人 Dmitriy Akulov 在 jsDelivr 官方 <a href="https://github.com/jsdelivr/jsdelivr">GitHub 仓库</a>的一条 issue 下发表了以下<a href="https://github.com/jsdelivr/jsdelivr/issues/18348#issuecomment-997777996">说明</a>：</p><p><img src="https://edge.huangxin.org/images/legacy/vip2.loli.io/2021/12/21/gs78ZV3jtSJAMki.png"></p><p>是的，昨天 jsDelivr 在国内的故障，并不是偶发的 SSL 证书出现问题导致资源下线，而是域名备案被吊销，导致国内 CDN 提供商<a href="https://www.wangsu.com/">网宿</a>移除了 jsDelivr 的账号。目前 jsDelivr 国内线路为 <a href="https://fastly.com/">Fastly</a>：</p><p><img src="https://edge.huangxin.org/images/legacy/vip2.loli.io/2021/12/21/B29GNqC3gTUJjAO.png"></p><p>过去的一两年里，许多人发现了 jsDelivr 在速度上的巨大优势，开始用 jsDelivr 作为图床，甚至用 jsDelivr 来托管和翻墙软件的安装脚本。到后来 jsDelivr 更新了它的<a href="https://www.jsdelivr.com/terms/acceptable-use-policy-jsdelivr-net">可接受使用政策（AUP）</a>，可惜当然滥用服务的各路神仙是不会理睬的，在他们的眼里，<strong>撸是常态，薅羊毛是理所当然</strong>，既然是免费的就要做好被撸爆的准备。</p><p>所以，2021 1220 - 可喜可贺的一天，jsDelivr 的 ICP 没了。最少在短时间内，jsDelivr 是无法也不会提供基于国内节点的托管服务了。可以想象，也是可能的下一步，就是 jsDelivr 完全被 GFW 阻断，成为连 <a href="https://developers.google.com/speed/libraries">Google Hosted Libraries</a> 和 <a href="https://cdnjs.com/">cdnjs</a> 都不如的开源 CDN - 最少这两个国内还极其勉强地能用。</p><p>在这里，我<strong>强烈谴责无底线滥用 jsDelivr 的人们</strong>。</p><h3 id="Disclaimer"><a href="#Disclaimer" class="headerlink" title="Disclaimer"></a>Disclaimer</h3><p>文章发出后引起了一部分的关注。请注意本文，以及本文所提及的谴责，是因为有人用 jsDelivr 来托管翻墙脚本的事情 - 在国内网络上这很显然是不可行的，<code>raw.githubsuercontent.com</code> 和 <code>gist.github.com</code> 都因此被封锁，而在一个唯一提供国内网络加速的开源 CDN 上托管这些很明显会导致站点被封禁的脚本，无疑是极其不负责任，不顾后果的行为。</p><p>诚然，我们的系统的的确确有问题，但是这并不能成为滥用一切可以滥用的以试图绕过限制（并且还无法改变根本事实）的理由。</p><p>也可能会有人说，啊我就是自由战士，我就是要和体制对抗到底，jsDelivr 牺牲了就牺牲了，都是他们的问题！</p><p>请注意，绝大部分用 jsDelivr 来托管脚本的人们，只是贪图一时的便利，他们可能觉得 jsDelivr 封不了（但是现在 ICP 没了），而没有考虑到可能的后果。更遑论那些直接用来做图床，文件下载的，就是本着滥用到底的想法。</p><p>本文只是一个菜鸡 Web Developer 对于这些人的行为导致 jsDelivr 没有了中国线路的愤慨和不满而已，确实 jsDelivr 不该这么用（你看到 cdnjs 能被这么用吗），只是一个没有审核机制，人人可托管内容的服务，最后竟然成了它的漏洞。</p><h2 id="怎么办呢"><a href="#怎么办呢" class="headerlink" title="怎么办呢"></a>怎么办呢</h2><p>凉拌呗。</p><p>目前能找到的最好的 jsDelivr 代替就是 <a href="https://cdn.baomitu.com/">cdn.baomitu.com</a>，由 360 的网络基建背书（放心，没有隐私风险，也不会给你静默安装 360），海外接入了 <a href="https://aws.amazon.com/cloudfront/">CloudFront</a>，全球速度极其优秀。完全镜像 cdnjs。只是无法用版本别名（如 <code>unpkg.com/jquery@3</code>），也不支持加速不在 cdnjs 上的项目（i.e. 自有项目）。</p><p>当然也是没办法合并文件的。jsDelivr 仅此一家，<strong>没了就是没了</strong>。</p><p>字节跳动静态资源公共库（<a href="https://cdn.bytedance.com/">cdn.bytedance.com</a>）也是一个理想的替代，只不过他的更新频率很不频繁，jQuery 到现在都只停留在 <code>3.5.1</code> 的版本号上（最新版本是 <img src="https://img.shields.io/github/v/release/jquery/jquery.svg">）。如果要使用的话记得替代他提供的域名到 <code>s1.pstatp.com</code>（网宿 CDN，全球加速）或者 <code>s2.pstatp.com</code> （阿里云 CDN，全球加速）。</p><p>其他的 BootCDN，Staticfiles 之类的维护比较混乱，不推荐使用。</p><h2 id="自有资源怎么办呢"><a href="#自有资源怎么办呢" class="headerlink" title="自有资源怎么办呢"></a>自有资源怎么办呢</h2><p>自己写了 js/css，但是显然不够格上 cdnjs，所以也没办法从上面的渠道调用，jsDelivr 又没了国内节点，怎么办呢？</p><p>是有办法的，虽然不完美，但是我是不会在这里说的。</p><p>所以要么自己托管，要么自己想办法。</p><h2 id="写在最后"><a href="#写在最后" class="headerlink" title="写在最后"></a>写在最后</h2><p>从第一次用 jsDelivr 以来，起码已经有三年时间了吧。也有常常关注这个项目，也和 Dmitriy 邮件交流过几次，了解过一些这个项目的进展。</p><p>这是一个非常好非常好的项目，也对国内的网页开发者们助力非常大，ICP 没了十分可惜，但也于事无补。</p><p>下一步我会尝试和 Dmitriy 沟通，提供一些我的想法，希望能够让 jsDelivr 在国内重现天日。</p><p><strong>最后再次谴责无底线滥用 jsDelivr 的人们。</strong></p><p><img src="https://edge.huangxin.org/images/legacy/vip2.loli.io/2021/12/21/n9AFjwdC8OrLpmD.png"></p><blockquote><p><em>再也不是一片绿了</em></p></blockquote>]]></content>
    
    
    <summary type="html">&lt;blockquote&gt;
&lt;p&gt;过去的一两年里，许多人发现了 jsDelivr 在速度上的巨大优势，开始用 jsDelivr 作为图床，甚至用 jsDelivr 来托管和加速魔法上网软件的安装脚本。到后来 jsDelivr 更新了它的可接受使用政策（AUP），可惜当然滥用服务的各路神仙是不会理睬的，在他们的眼里，撸是常态，薅羊毛是理所当然，既然是免费的就要做好被撸爆的准备。&lt;/p&gt;
&lt;/blockquote&gt;</summary>


    <category term="技术向" scheme="https://huangxin.dev/categories/partly-technical/"/>
    
    
  </entry>
  
  <entry>
    <title>Migration Page - 简单易用，可自定义的托管迁移页服务</title>
    <link href="https://huangxin.dev/partly-technical/migration-page-introduction.html"/>
    <id>https://huangxin.dev/partly-technical/migration-page-introduction.html</id>
    <published>2021-09-06T05:00:00.000Z</published>
    <updated>2024-04-28T14:20:59.000Z</updated>
    
    <content type="html"><![CDATA[<p>一个极其没有技术含量的迁移页。</p><span id="more"></span><p>GitHub 页面（求 star）：<a href="https://github.com/hifocus/Migration-Page">https://github.com/hifocus/Migration-Page</a></p><p>演示页面：<a href="https://migration.pages.dev/">https://migration.pages.dev</a></p><p><img src="https://edge.huangxin.org/images/legacy/vip2.loli.io/2021/09/05/bOcgl67JUzkyTuE.png" alt="Demo Screenshot 演示屏幕截图"></p><p>嫌啰嗦可以直接跳到 <a href="https://huangxin.dev/partly-technical/migration-page-introduction#%E7%94%A8%E6%B3%95"><em>托管-用法</em></a> 部分。</p><p>本项目极其没有技术含量，仅仅本着与人方便的想法和开源精神公开。欢迎 PR。</p><h1 id="前言"><a href="#前言" class="headerlink" title="前言"></a>前言</h1><p>博客于不久前更换了域名，从 <code>justhx.com</code> 更换到了 <code>huangxin.dev</code>；一开始更换的时候为 <code>justhx.com</code> 做了通配符重定向，<code>justhx.com/xxx</code> 会被重定向到 <code>huangxin.dev/xxx</code>，以此保持博客的运行。</p><p>由于重定向已经设置了一段时间，如果搜索引擎重新索引我网站的话也该差不多了，我觉得是时候告诉还没注意到域名改变的访客 域名已经更换了，所以应该上线一个迁移告示页面。</p><p>简单的思考后，我觉得这个迁移页应该实现以下功能：</p><ul><li>告知访客域名已经迁移这个信息</li><li>直观地展示旧域名和新域名的区别</li><li>设置一个倒计时，让访客有充裕时间浏览上述信息的同时，在一定时间后自动通配符重定向访客</li><li>提供一个按钮，让提前阅读完毕迁移信息和已经阅读过的访客直接访问新域名的相应页面</li></ul><p>除此以外，一开始是想用 <em>rewrite</em> 实现的，但是因为目前博客的架构是全部 serverless，而且 <a href="https://pages.cloudflare.com/">CloudFlare Pages</a> 暂时不支持 <em>rewrite</em>，就写成了一个 HTML 单页，通过 <em>parameter</em> 来传递信息。最后在 CloudFlare 端实现通配符重定向（传递信息）即可。</p><p>与此同时，我也想要弃置 <code>hxis.me</code> 这个个人主页的域名（因为续费太贵了）；这样的话类似的迁移页我要做两份，要手动修改原本写在页面内的新旧域名信息。转念一想，干脆把新旧域名也做成可从 <em>parameter</em> 获取的格式在页面内显示，这样部署一次，以后就都通用了，避免了很多麻烦<del>（比较符合我的懒人风格）</del>。</p><p>所以，又实现了以下功能：</p><ul><li>可以从 <em>parameter</em> 获取新旧域名的信息，站点名称，跳转目的地，和页面倒数秒数。</li><li>可以通过 <code>npm run-script build</code> 实现自动压缩页面，输出到 <code>/docs</code> 目录（兼容 <a href="https://pages.github.com/">GitHub Pages</a>）</li></ul><h1 id="实现"><a href="#实现" class="headerlink" title="实现"></a>实现</h1><p>页面基础模板用了 <a href="https://github.com/Dreamer-Paul/Emmm">Dreamer-Paul/Emmm</a> <del>（其实觊觎已久了）</del></p><p>页面信息全部内嵌 <code>id</code>，后期用 js <code>innerHTML</code> 嵌入信息：</p><figure class="highlight html"><table><tr><td class="code"><pre><span class="line"><span class="tag">&lt;<span class="name">main</span>&gt;</span></span><br><span class="line">    <span class="tag">&lt;<span class="name">h1</span> <span class="attr">id</span>=<span class="string">&#x27;migrated&#x27;</span>&gt;</span><span class="tag">&lt;/<span class="name">h1</span>&gt;</span></span><br><span class="line">    <span class="tag">&lt;<span class="name">span</span> <span class="attr">class</span>=<span class="string">&quot;lower&quot;</span>&gt;</span></span><br><span class="line">    <span class="tag">&lt;<span class="name">p</span> <span class="attr">id</span>=<span class="string">&#x27;ur-browsing&#x27;</span>&gt;</span><span class="tag">&lt;/<span class="name">p</span>&gt;</span></span><br><span class="line">    <span class="tag">&lt;<span class="name">p</span> <span class="attr">id</span>=<span class="string">&#x27;new-address&#x27;</span>&gt;</span><span class="tag">&lt;/<span class="name">p</span>&gt;</span></span><br><span class="line">    <span class="tag">&lt;<span class="name">p</span> <span class="attr">id</span>=<span class="string">&#x27;countdown&#x27;</span>&gt;</span> <span class="tag">&lt;/<span class="name">p</span>&gt;</span></span><br><span class="line">    <span class="tag">&lt;<span class="name">p</span>&gt;</span><span class="tag">&lt;<span class="name">a</span> <span class="attr">class</span>=<span class="string">&quot;btn&quot;</span> <span class="attr">id</span>=<span class="string">&#x27;go-now&#x27;</span>&gt;</span>立即前往<span class="tag">&lt;/<span class="name">a</span>&gt;</span><span class="tag">&lt;/<span class="name">p</span>&gt;</span></span><br><span class="line">    <span class="tag">&lt;/<span class="name">span</span>&gt;</span></span><br><span class="line"><span class="tag">&lt;/<span class="name">main</span>&gt;</span></span><br></pre></td></tr></table></figure><p>下面是 js 的具体内容，可以看到就是对应上面的 <code>id</code> 嵌入文字和部分 <code>setAttribute</code>：</p><figure class="highlight javascript"><table><tr><td class="code"><pre><span class="line"><span class="variable language_">document</span>.<span class="title function_">getElementById</span>(<span class="string">&#x27;migrated&#x27;</span>).<span class="property">innerHTML</span> = name1 + <span class="string">&#x27;迁移啦~&#x27;</span>;</span><br><span class="line"><span class="variable language_">document</span>.<span class="title function_">getElementById</span>(<span class="string">&#x27;ur-browsing&#x27;</span>).<span class="property">innerHTML</span> = <span class="string">&#x27;你正在浏览 - &#x27;</span> + oldroot + address;</span><br><span class="line"><span class="variable language_">document</span>.<span class="title function_">getElementById</span>(<span class="string">&#x27;new-address&#x27;</span>).<span class="property">innerHTML</span> = <span class="string">&#x27;新的地址是 - &#x27;</span> + <span class="string">&#x27;&lt;span style=&quot;color:#1976D2;font-weight:500&quot;&gt;&#x27;</span> + newroot + <span class="string">&#x27;&lt;/span&gt;&#x27;</span> +address + <span class="string">&#x27;，请务必记住~&#x27;</span>;</span><br><span class="line"><span class="variable language_">document</span>.<span class="title function_">getElementById</span>(<span class="string">&#x27;go-now&#x27;</span>).<span class="title function_">setAttribute</span>(<span class="string">&#x27;href&#x27;</span>, https + newroot + address);</span><br><span class="line"><span class="variable language_">document</span>.<span class="title function_">getElementById</span>(<span class="string">&#x27;countdown&#x27;</span>).<span class="title function_">setAttribute</span>(<span class="string">&#x27;style&#x27;</span>, <span class="string">&#x27;font-size:85%&#x27;</span>);</span><br><span class="line"><span class="variable language_">document</span>.<span class="title function_">getElementById</span>(<span class="string">&quot;countdown&quot;</span>).<span class="property">innerHTML</span> = timeleft + <span class="string">&quot; 秒后为你重定向&quot;</span>;</span><br></pre></td></tr></table></figure><p>接下来是从 <em>parameter</em> 获取上面提到的参数：</p><figure class="highlight javascript"><table><tr><td class="code"><pre><span class="line"><span class="keyword">const</span> url_string = <span class="variable language_">window</span>.<span class="property">location</span>.<span class="property">href</span>;</span><br><span class="line"><span class="keyword">const</span> url = <span class="keyword">new</span> <span class="title function_">URL</span>(url_string);</span><br><span class="line"><span class="keyword">var</span> name1 = url.<span class="property">searchParams</span>.<span class="title function_">get</span>(<span class="string">&quot;name&quot;</span>);</span><br><span class="line"><span class="keyword">var</span> oldroot = url.<span class="property">searchParams</span>.<span class="title function_">get</span>(<span class="string">&quot;oldroot&quot;</span>);</span><br><span class="line"><span class="keyword">var</span> newroot = url.<span class="property">searchParams</span>.<span class="title function_">get</span>(<span class="string">&quot;newroot&quot;</span>);</span><br><span class="line"><span class="keyword">var</span> param = url.<span class="property">searchParams</span>.<span class="title function_">get</span>(<span class="string">&quot;location&quot;</span>);</span><br><span class="line"><span class="keyword">var</span> timeleft = url.<span class="property">searchParams</span>.<span class="title function_">get</span>(<span class="string">&quot;count&quot;</span>);</span><br></pre></td></tr></table></figure><p>然后验证上述参数实际上是否存在，如果不存在则应用一个缺省值：</p><figure class="highlight javascript"><table><tr><td class="code"><pre><span class="line"><span class="keyword">if</span> (name1 == <span class="literal">null</span>) &#123;</span><br><span class="line">    <span class="keyword">var</span> name1 = <span class="string">&#x27;惶心博客&#x27;</span>;</span><br><span class="line">&#125;</span><br><span class="line"><span class="keyword">if</span> (oldroot == <span class="literal">null</span>) &#123;</span><br><span class="line">    <span class="keyword">var</span> oldroot = <span class="string">&#x27;www.justhx.com&#x27;</span>;</span><br><span class="line">&#125;</span><br><span class="line"><span class="keyword">if</span> (newroot == <span class="literal">null</span>) &#123;</span><br><span class="line">    <span class="keyword">var</span> newroot = <span class="string">&#x27;huangxin.dev&#x27;</span>;</span><br><span class="line">&#125;</span><br><span class="line"><span class="keyword">if</span> (timeleft == <span class="literal">null</span>) &#123;</span><br><span class="line">    <span class="keyword">var</span> timeleft = <span class="string">&#x27;5000000&#x27;</span>;</span><br><span class="line">&#125;</span><br><span class="line"><span class="keyword">if</span> (param == <span class="literal">null</span>) &#123;</span><br><span class="line">    <span class="keyword">var</span> address = <span class="string">&#x27;&#x27;</span>;</span><br><span class="line">&#125;</span><br><span class="line"><span class="keyword">else</span> &#123;</span><br><span class="line">    <span class="keyword">var</span> address = <span class="string">&#x27;/&#x27;</span> + param;</span><br><span class="line">&#125;</span><br></pre></td></tr></table></figure><p>这里为了我的方便就填了自己的域名。</p><p>最后从 StackOverflow 抄一个看上去比较优雅的倒计时代码：</p><figure class="highlight javascript"><table><tr><td class="code"><pre><span class="line"><span class="keyword">var</span> downloadTimer = <span class="built_in">setInterval</span>(<span class="keyword">function</span>(<span class="params"></span>)&#123;</span><br><span class="line"><span class="keyword">if</span>(timeleft &lt;= <span class="number">0</span>)&#123;</span><br><span class="line"><span class="built_in">clearInterval</span>(downloadTimer);</span><br><span class="line"><span class="variable language_">document</span>.<span class="title function_">getElementById</span>(<span class="string">&quot;countdown&quot;</span>).<span class="property">innerHTML</span> = <span class="string">&quot;正在重定向……&quot;</span>;</span><br><span class="line"><span class="variable language_">window</span>.<span class="property">location</span>.<span class="property">href</span> = (https + newroot + address)</span><br><span class="line">&#125; <span class="keyword">else</span> &#123;</span><br><span class="line"><span class="variable language_">document</span>.<span class="title function_">getElementById</span>(<span class="string">&quot;countdown&quot;</span>).<span class="property">innerHTML</span> = timeleft - <span class="number">1</span> + <span class="string">&quot; 秒后为你重定向&quot;</span>;</span><br><span class="line">&#125;</span><br><span class="line">timeleft -= <span class="number">1</span>;</span><br><span class="line">&#125;, <span class="number">1000</span>);</span><br></pre></td></tr></table></figure><p>然后从博客的 <code>package.json</code> 里抄了如下代码，方便上面提到的 NPM 自动压缩功能：</p><figure class="highlight json"><table><tr><td class="code"><pre><span class="line"><span class="attr">&quot;scripts&quot;</span><span class="punctuation">:</span> <span class="punctuation">&#123;</span></span><br><span class="line">  <span class="attr">&quot;get&quot;</span><span class="punctuation">:</span> <span class="string">&quot;rm -rf docs &amp;&amp; mkdir docs &amp;&amp; mv migration-page.html docs/index.html&quot;</span><span class="punctuation">,</span></span><br><span class="line">  <span class="attr">&quot;minify&quot;</span><span class="punctuation">:</span> <span class="string">&quot;html-minifier --input-dir ./docs --output-dir ./docs --collapse-whitespace --remove-comments --remove-optional-tags --remove-redundant-attributes --remove-script-type-attributes --remove-tag-whitespace --use-short-doctype --file-ext html --minify-css true --minify-js true&quot;</span><span class="punctuation">,</span></span><br><span class="line">  <span class="attr">&quot;build&quot;</span><span class="punctuation">:</span> <span class="string">&quot;npm run-script get &amp;&amp; npm run-script minify&quot;</span></span><br><span class="line"><span class="punctuation">&#125;</span><span class="punctuation">,</span></span><br><span class="line"></span><br><span class="line">  <span class="attr">&quot;dependencies&quot;</span><span class="punctuation">:</span> <span class="punctuation">&#123;</span></span><br><span class="line">  <span class="attr">&quot;html-minifier&quot;</span><span class="punctuation">:</span> <span class="string">&quot;^4.0.0&quot;</span></span><br><span class="line"><span class="punctuation">&#125;</span></span><br></pre></td></tr></table></figure><p>就做好了。</p><h1 id="托管"><a href="#托管" class="headerlink" title="托管"></a>托管</h1><p>托管在了 CloudFlare Pages 上，在 GitHub 仓库里用了 CloudFlare Pages 的域名 <code>migration.pages.dev</code>；这样可以最大限度地排除个人因素，除非 CloudFlare 倒闭或者我自己删除项目，域名（页面）都会保持在可访问状态。</p><p>实际上还有一个自己的域名 <code>migration.huangxin.org</code>，同样保持较高的可用度。</p><h2 id="用法"><a href="#用法" class="headerlink" title="用法"></a>用法</h2><p>具体用法可以参见 <a href="https://github.com/hifocus/Migration-Page#usage-%E7%94%A8%E6%B3%95">https://github.com/hifocus/Migration-Page#usage-用法</a></p><p>简单来说就是有了这个项目，如果你以后需要更换域名，可以把旧域名通配符重定向到：</p><figure class="highlight pgsql"><table><tr><td class="code"><pre><span class="line">https://migration.pages.dev/?oldroot=<span class="built_in">old</span>-<span class="keyword">domain</span>.com&amp;newroot=<span class="built_in">new</span>-<span class="keyword">domain</span>.com&amp;<span class="type">name</span>=YOUR-SITE-<span class="type">NAME</span>&amp;count=<span class="number">10</span>&amp;<span class="keyword">location</span>=<span class="meta">$1</span></span><br></pre></td></tr></table></figure><p>就可以有一个迁移页（自己修改 <code>oldroot</code>, <code>newroot</code>, <code>name</code> 和 <code>count</code> 变量）。</p><p>下面截图为 <code>justhx.com</code> 在 CloudFlare 后台的配置情况：</p><p><img src="https://edge.huangxin.org/images/legacy/vip1.loli.io/2021/09/06/gMvnX173tALIma5.png" alt="justhx.com 在 CloudFlare 后台的配置情况"></p><p>当然你也可以自己到项目里下载 <code>migration-page.html</code>，自己修改和托管。</p><p>GitHub 页面包含中英文文档。</p><p>Enjoy it.    </p><p><em>本文完全使用 <a href="https://docs.github.com/en/codespaces/developing-in-codespaces/web-based-editor">GitHub Web-based editor</a> 写作完成</em></p>]]></content>
    
    
    <summary type="html">&lt;p&gt;一个极其没有技术含量的迁移页。&lt;/p&gt;</summary>


    <category term="技术向" scheme="https://huangxin.dev/categories/partly-technical/"/>
    
    
  </entry>
  
  <entry>
    <title>六月份的水博文</title>
    <link href="https://huangxin.dev/past-stories/june-watering.html"/>
    <id>https://huangxin.dev/past-stories/june-watering.html</id>
    <published>2021-06-16T16:00:00.000Z</published>
    <updated>2024-03-25T17:52:54.000Z</updated>
    
    <content type="html"><![CDATA[<blockquote><p>那就下次见。</p></blockquote><span id="more"></span><iframe frameborder="no" border="0" marginwidth="0" marginheight="0" width=330 height=86 src="//music.163.com/outchain/player?type=2&id=1852040516&auto=1&height=66"></iframe><p>先放 BGM。</p><p>到今天，刚好是半年没有发布任何博文，所以在这里水一篇。</p><p>这么久没发布任何内容主要是由于个人情况导致没有任何创作欲，这里不多说这个。</p><p>讲讲近况。</p><p>最近做了宅男，7x24 小时待家里。</p><p>最近粉了 SNH48 的不少艺（河）人（妹），感觉自有可爱之处，多多观察拓宽眼界也是好的（很奇怪是不是）。希望真如我所想的，人间自有真情在。</p><p>感觉以后也不知道这个博客会不会更下去。虽然域名暂时还是续费得起的。</p><p>最后放几张上个月自己出去玩拍的照片吧。</p><p>那就下次见。<br><br><img src="https://edge.huangxin.org/images/legacy/vip2.loli.io/2021/06/17/rVW86npTlemBL72.jpg" alt="IMG_5399.jpg"><br><br><br><img src="https://edge.huangxin.org/images/legacy/vip2.loli.io/2021/06/17/l1VDtf264BEWTIC.jpg" alt="IMG_5396.jpg"><br><br><br><img src="https://edge.huangxin.org/images/legacy/vip1.loli.io/2021/06/17/XQEvpdDZGPY3TjV.jpg" alt="IMG_5391.jpg"></p>]]></content>
    
    
    <summary type="html">&lt;blockquote&gt;
&lt;p&gt;那就下次见。&lt;/p&gt;
&lt;/blockquote&gt;</summary>


    <category term="曾经里" scheme="https://huangxin.dev/categories/past-stories/"/>
    
    
  </entry>
  
  <entry>
    <title>怀念冬天</title>
    <link href="https://huangxin.dev/past-stories/the-winter-memory.html"/>
    <id>https://huangxin.dev/past-stories/the-winter-memory.html</id>
    <published>2021-01-16T16:00:00.000Z</published>
    <updated>2021-01-17T16:34:31.000Z</updated>
    
    <content type="html"><![CDATA[<blockquote><p>成为远行多年后，在同一个冬天里，对故土不同的怀念。</p></blockquote><span id="more"></span><p>我所记得的冬天，来源于住了很多年的家里。</p><p>北风总在窗外呼号，我总是臃肿地穿着厚厚的衣服，站在客厅中央电视机前，看着窗外也许是白蒙蒙的景色。然后有的时候推开落地窗，北风就争先恐后涌进来，试图把我身上为数不多的暖度带走。然后我总是猛地跨出去，到阳台上，再重重关上落地窗。</p><p>一开始楼下其实并没有后来的那座天桥，但是后来它慢慢地建起来了；那时候我还有一个小小的计划，要把天桥的建筑过程每一天都拍下来，就像见证它的成长一样。那个计划后来不了了之——但无论有没有天桥，马路对面的棕榈树，和普普通通的大树们，总是被风吹往一个方向。现在想起来，风好像也不是北风，因为大树的枝叶们总是被吹往左边。我家面北，所以那该是东风。</p><p>每当等到夜晚，我就钻进厚厚的棉胎里，然后把整个人从头包裹住。我至今还记得我在我棉胎里的感觉——那是有一点点被褥特有的棉花似的气息，加上冰冰凉凉的触觉。我有时候像个滚筒洗衣机似的把自己在被子里卷来卷去—— 嗯，摩擦生热，但也因此把自己卷的紧紧的，几乎要透不过气来。</p><p>那时候在小小的我的小小世界里，臃肿和身材还联系不上，卷也就真的是卷起来。南方没有冰天雪地，但是那个时候，那些时光，就真的好像冰雪一样晶莹剔透。那个时候脸很容易冻僵，进而冻干；嘴唇总是会“爆拆”。那个时候的冬天漫长而难熬，好像永远也不会到头；就像落地窗外的北风，永远也不会吹完。</p><p>噢，还有爷爷总是打电话来告知，明天又会是多少多少个位数字的温度，听起来吓人而又令人兴奋。第二天起来，就会被要求多穿两件衣服，虽然我从来没觉得那些个位数天气和其他日子有什么区别。</p><p>过了很久的后来，眼界宽了，知道原来别的地方最少在气温上可要比南方冷的多，而且会冰天雪地银装素裹梨花朵朵开，会泼水成冰轮胎打滑车子不能开。大人总说南方是湿冷，所以不用零下也可以很冷；我还是没多少感觉，虽然已经去过别的地方过过很多个冬天，而且对家里的冬天反而没剩下多少感受。</p><p>我至今还是无法想象，小时候我小小的身子里，每天都会想什么样的东西。但是无疑，那个时候冬天总是最神奇的一个季节，因为它在所有生活的乏味和千篇一律里，增添了很多不同；它在嘴边上，呼出来的空气总会变成白色。它在脚步下，放学的脚下的路总看上去格外干燥。它在天色里，傍晚暮色的到来总显得迫不及待。</p><p>但它也在我心里，成为远行多年后，在同一个冬天里，对故土不同的怀念。</p><blockquote><p>本文完成于 2021 年 1 月 17 日；初稿 967 字。有改动。</p></blockquote>]]></content>
    
    
    <summary type="html">&lt;blockquote&gt;
&lt;p&gt;成为远行多年后，在同一个冬天里，对故土不同的怀念。&lt;/p&gt;
&lt;/blockquote&gt;</summary>


    <category term="曾经里" scheme="https://huangxin.dev/categories/past-stories/"/>
    
    
  </entry>
  
  <entry>
    <title>失所</title>
    <link href="https://huangxin.dev/past-stories/homeless.html"/>
    <id>https://huangxin.dev/past-stories/homeless.html</id>
    <published>2020-12-06T05:00:00.000Z</published>
    <updated>2021-12-31T09:53:27.000Z</updated>
    
    <content type="html"><![CDATA[<blockquote><p>我在原地，茫然无措，流离失所。</p></blockquote><span id="more"></span><p>我仰头望着天花板。入目是一片暗淡的白色；周围是漆黑一片。</p><p>窗外能看见月亮。窗外有光照亮白色。</p><p>我以为是有人来寻，直起身来，才发现手机是倒扣着的。然后窗外传来静静的哗啦声，有车子穿梭过留着雨水的马路。</p><p>我把耳机的 Clear Bass 加大，所有的敲击音都由此变得更加立体。我试图迷失其中。</p><p>我想起我把我喜欢的手机相机对准咕噜咕噜冒着好听泡泡的锅，单击对焦，然后往下滑——降低曝光。那一刹那，好像周围的光线也为之暗下，白色的灯光在锅沿被微微反射，锅里是有着高对比度的面条。</p><p>我想起，我无数次像先前一样坐在椅子上靠在床上，望着天花板。那是无数的时间。</p><p>距离去年以来，好像很多东西都改变了。我适应了新的生活角色，比过去任何时间都更加是自己……虽然也不一定是好事就是了。席卷而来的疫情，一开始的愤慨0，后来的措手不及，被重重打击的生活。时间里没有感情的色彩，以缓慢却也飞快的速度往前进……</p><p><em>我在原地，茫然无措，流离失所。</em></p><p>我所拥有的所有镜头，没有一个拥有足够的焦距，能过清晰捕捉到我喜欢的月亮。</p><p>我所拥有的对未来所有想象，没有一点拥有足够的 feasibility，能让我看到光。</p><p>我向往太阳，眼里装的只有月光。</p><p>又不知何时，月光会凝成泪光，然后在某种黑色白色面前打转。</p><p>又不知何时，曾经踌躇满志的少年弯下了身子。他们总是问你还好吗，我总是说当然很好。</p><p>我总要说，当然，很好。</p><p><em>少年没了笑容，少年不再是美好的样子，少年——一点一点地，如月光一般，沉沉暗去。</em></p><p>少年一点一点地，沉沉睡去，希望不要再醒来。</p><p>如果有一天，少年不再少年，少年不再眼里有光心中想做太阳，然后少年自然地走到了结尾，他所遗憾的，大概只会是生命太短，无法穷尽所有的答案。</p><p><em>又或者，生命太长却没了希冀；让他不知所措，让他，张皇失措。</em></p><blockquote><p>本文是一篇随笔，完成于 2020 年 12 月 5 日。本文内容仅为文学效果，与现实没有联系。</p></blockquote>]]></content>
    
    
    <summary type="html">&lt;blockquote&gt;
&lt;p&gt;我在原地，茫然无措，流离失所。&lt;/p&gt;
&lt;/blockquote&gt;</summary>


    <category term="曾经里" scheme="https://huangxin.dev/categories/past-stories/"/>
    
    
  </entry>
  
  <entry>
    <title>Windows 下一键以管理员命令运行命令提示符</title>
    <link href="https://huangxin.dev/partly-technical/run-cmd-as-admin-with-one-command-under-windows.html"/>
    <id>https://huangxin.dev/partly-technical/run-cmd-as-admin-with-one-command-under-windows.html</id>
    <published>2020-08-04T03:19:19.000Z</published>
    <updated>2024-03-25T17:52:54.000Z</updated>
    
    <content type="html"><![CDATA[<blockquote><p>是的，我已经懒到鼠标都不想（大幅度地）移动了，该怎么办呢？</p></blockquote><span id="more"></span><h1 id="写在前面"><a href="#写在前面" class="headerlink" title="写在前面"></a>写在前面</h1><p>很多时候在使用<a href="https://docs.microsoft.com/zh-cn/windows-server/administration/windows-commands/cmd">命令提示符</a> <code>cmd.exe</code> 的时候，一些操作只能在管理员模式下进行，例如使用 <a href="https://chocolatey.org/">Chocolatey</a> 包管理器安装 <a href="https://python.org/">Python</a>：<code>choco install python</code> - 这个时候，“打开 Windows 开始菜单 - 输入 cmd - 右键 - 以管理员命令运行” 这一系列的操作就变得有些烦人。是的，我已经懒到鼠标都不想（大幅度地）移动了，该怎么办呢？</p><p>和某位群友交流过后，得知与他不同，由于我在 Windows 上并非使用 Administrator 账号直接登录，而是使用个人有管理员权限的账号，因此打开 <code>cmd</code> 就不能做到直接是管理员。我转战 Google，在<a href="https://www.raymond.cc/blog/task-scheduler-bypass-uac-prompt/">一篇文章</a>里了解到，要想做到无 UAC 弹出的 cmd 开启，无论如何需要使用快捷方式（shortcut）。然而作为一个默认隐藏桌面图标，桌面啥都没有的人来说，shortcut 也不适合我。在上述文章的末部，方法五，我发现可以做到通过 Windows 的 <a href="https://docs.microsoft.com/zh-cn/windows/win32/taskschd/task-scheduler-start-page">Task Scheduler</a> 做到通过一行命令直接用管理员权限开启某一个程序。看到这里我大概就有思路了：先按照这个方法让命令提示符能被一条命令开启，然后创建一个别名，用一个简单的词汇代替复杂的命令，这样以后在 cmd 里如果想升级到管理员权限，直接输入那个简单的词汇，回车即可。</p><blockquote><p>由于我的系统语言是英文，下述内容会直接引用系统显示的相关英文词汇</p></blockquote><h1 id="创建任务"><a href="#创建任务" class="headerlink" title="创建任务"></a>创建任务</h1><ol><li>首先打开 Windows 菜单，输入 Task Scheduler，左侧侧边栏选择 Task Scheduler (Local) - Task Scheduler Library</li><li>右侧侧边栏选择 Create Task，在弹出窗口里输入 Task（任务）的名称（例如 <code>cmd-admin</code>），下方 Configure for 下拉菜单选择你的系统（Windows 10）<br><img src="https://edge.huangxin.org/images/legacy/vip2.loli.io/2020/11/18/4XdFlNAvwVMHJm1.png"></li><li>建议在系统的非 C 盘进行这个操作：创建一个文件夹，名称随意（例如 <code>bats</code>），文件夹里面创建两个文本文档，分别重命名为 <code>cmd.bat</code> 和 <code>doskey.bat</code>（可自行改动，记得就好）</li><li>在 cmd.bat 内输入如下内容：<figure class="highlight bash"><table><tr><td class="code"><pre><span class="line">@<span class="built_in">echo</span> off</span><br><span class="line">start cmd.exe</span><br><span class="line">EXIT 0</span><br></pre></td></tr></table></figure>由于我习惯使用 <a href="https://www.microsoft.com/zh-cn/p/windows-terminal/9n0dx20hk701">Windows Terminal</a>，故此在这一步我用 <code>start wt.exe</code> 代替了 <code>start cmd.exe</code>；（在这种情况下，有可能需要手动为 <code>wt.exe</code> 单独设置 default profile，确保打开的是 cmd）。</li><li>保存；返回 Task Scheduler，在 Actions 一栏的下方点击 New，在弹出窗口里点击 Program/script 旁边的 Browse，选择刚刚创建的 <code>cmd.bat</code><br><img src="https://edge.huangxin.org/images/legacy/vip1.loli.io/2020/11/18/laV3FyOtxXwEf7W.png"></li><li>切换到 Conditions 标签，反选 Power 下的 Start the task only if the computer is on AC power<br><img src="https://edge.huangxin.org/images/legacy/vip2.loli.io/2020/11/18/jfOuZvzIwVlP2Ks.png"></li><li>回到 General 标签，Security Options 下选中 Run with highest privileges</li><li>这个时候，我们就已经可以通过 <code>schtasks /run /tn &quot;cmd-admin&quot;</code> 命令，在有管理员权限的账号下无 UAC 以管理员权限打开一个 <code>cmd.exe</code> 或者 <code>wt.exe</code> 了。</li></ol><h1 id="创建永久-doskey"><a href="#创建永久-doskey" class="headerlink" title="创建永久 doskey"></a>创建永久 doskey</h1><p><a href="https://docs.microsoft.com/zh-cn/windows-server/administration/windows-commands/doskey">doskey</a> 是 cmd.exe 的一个 feature，用以临时为命令创建别名；例如在 cmd 里运行 <code>doskey np=notepad.exe</code>，就等于为 notepad.exe（打开记事本）这个命令创建了一个名为 <code>np</code> 的别名；在同一个 cmd 会话里，这个别名会一直有效。</p><p>根据<a href="https://www.jamescoyle.net/how-to/1100-doskey-in-windows-is-just-like-alias-in-linux">这篇文章</a>，我们可以在每次 cmd 运行之前都先运行一个 .bat 脚本，这样每次 cmd 运行前，doskey 都已经被设置，就等于变相设置了一个永久有效的 alias。</p><ol><li>回到我们刚刚创建的另一个 doskey.bat 文件，在里面输入以下内容：<figure class="highlight bash"><table><tr><td class="code"><pre><span class="line">@<span class="built_in">echo</span> off</span><br><span class="line">doskey admin=schtasks /run /tn <span class="string">&quot;cmd-admin&quot;</span> $*</span><br></pre></td></tr></table></figure>这样，我们就为 <code>schtasks /run /tn &quot;cmd-admin&quot;</code> 创建了一个叫 <code>admin</code> 的别名。</li><li>打开<a href="https://support.microsoft.com/zh-cn/help/4027573/windows-10-open-registry-editor">注册表编辑器</a>（命令 <code>regedit.exe</code>），上方地址栏直接定位到 <code>HKEY_CURRENT_USER\Software\Microsoft\Command Processor</code>（如果这个之不存在就创建一个；定位到 <code>Software/Microsoft</code> 目录，在 <code>Microsoft</code> 上点击右键 - <code>New</code> - <code>Key</code> - 输入 <code>Command Processor</code>），右侧空白处右键，选择 New - String Value（字符串），创建一个名为 <code>AutoRun</code> 的字符串；然后双击字符串，在值的内容输入 <code>doskey.bat</code> 的绝对路径，例如我的 <code>D:/bats/doskey.bat</code>，然后保存退出。<br><img src="https://edge.huangxin.org/images/legacy/vip1.loli.io/2020/11/11/4SZBpIdjTYUCV5N.png"></li><li>尝试打开 cmd / Windows Terminal 里的 cmd，输入 admin，就可以即时弹出带有管理员权限的相应窗口，无需繁复操作。<br>效果如下：<br><img src="https://edge.huangxin.org/images/legacy/vip2.loli.io/2020/11/18/ewcXEI4HdTfpyRa.png"></li></ol><p>此外，你也可以设置一些另外的有意思的 doskey，也是放在刚刚设置的 doskey.bat 里一并运行；例如我的：<br>  <figure class="highlight bash"><table><tr><td class="code"><pre><span class="line">doskey hosts=code c:\windows\system32\drivers\etc\hosts $*</span><br><span class="line">doskey clear=cls $*</span><br><span class="line">doskey u=ubuntu $*</span><br></pre></td></tr></table></figure></p><h1 id="参考"><a href="#参考" class="headerlink" title="参考"></a>参考</h1><ul><li><a href="https://www.raymond.cc/blog/task-scheduler-bypass-uac-prompt/">5 Ways to Disable User Account Control (UAC) for Specific Software</a></li><li><a href="https://www.jamescoyle.net/how-to/1100-doskey-in-windows-is-just-like-alias-in-linux">doskey in Windows is just like alias in Linux</a></li><li>沙雕群友 <a href="https://github.com/jyxjjj">@神林</a></li></ul>]]></content>
    
    
    <summary type="html">&lt;blockquote&gt;
&lt;p&gt;是的，我已经懒到鼠标都不想（大幅度地）移动了，该怎么办呢？&lt;/p&gt;
&lt;/blockquote&gt;</summary>


    <category term="技术向" scheme="https://huangxin.dev/categories/partly-technical/"/>
    
    
  </entry>
  
  <entry>
    <title>宇宙的广袤里</title>
    <link href="https://huangxin.dev/past-stories/within-the-wide-universe.html"/>
    <id>https://huangxin.dev/past-stories/within-the-wide-universe.html</id>
    <published>2020-07-09T16:37:42.000Z</published>
    <updated>2020-11-12T09:53:57.000Z</updated>
    
    <content type="html"><![CDATA[<p>有人说，人的尸体在太空中只会有限地腐烂，因为低温下微生物活动很快会停止。</p><p>我同时也听说过旅行者一号的故事。它大概走不出太阳系，要等亿万年人类灭绝后外星人来发现。</p><p>它同时也每秒钟远离我们几十千米。</p><p>宇宙实在是太大了，穷尽我们一生也无法走出万分之一的步伐。有人说，不是没有外星人，只不过时间太漫长，一个整个文明的兴衰，往往无法与其他文明重叠。一个文明消亡后，宇宙又不知道要沉寂多少年。也只不过是距离太长：可观测宇宙之外，光还没有到达地球的地方，也许也存在着我们一直在寻找的外星人们。</p><p>也许，只是物理法则太过残酷。无法超越光的速度，也就意味着无法随心所欲地去发现。</p><p>旅行者一号，突然就让我想到了死亡。在我死了以后，如果可能，我的骸骨要被投入太空，在数不清长度的时光过去后成为所谓星尘。亿万里的一小部分。</p><p>如果未来有人将思念我，那么就可以抬头看看夜空。</p><p>你只要在夜空下抬头，你就依然可以看见我。</p><p>我不会是那些闪着光在无数光年以外的星星。我只是不会被照亮的尘埃。</p><p>可我就在那里，我真的在那里。</p><p>在宇宙的广袤里，永永远远，陪伴着你。</p><blockquote><p>本文为一篇随笔，完成于 2020/07/07 02:16，有改动。</p></blockquote>]]></content>


    <summary type="html">&lt;p&gt;有人说，人的尸体在太空中只会有限地腐烂，因为低温下微生物活动很快会停止。&lt;/p&gt;
&lt;p&gt;我同时也听说过旅行者一号的故事。它大概走不出太阳系，要等亿万年人类灭绝后外星人来发现。&lt;/p&gt;
&lt;p&gt;它同时也每秒钟远离我们几十千米。&lt;/p&gt;
&lt;p&gt;宇宙实在是太大了，穷尽我们一生也无法</summary>


    <category term="曾经里" scheme="https://huangxin.dev/categories/past-stories/"/>
    
    
  </entry>
  
  <entry>
    <title>回家去</title>
    <link href="https://huangxin.dev/past-stories/go-back-home.html"/>
    <id>https://huangxin.dev/past-stories/go-back-home.html</id>
    <published>2020-06-21T05:00:01.000Z</published>
    <updated>2024-03-25T17:52:54.000Z</updated>
    
    <content type="html"><![CDATA[<p><img src="https://edge.huangxin.org/images/legacy/vip2.loli.io/2022/07/03/9YKM6O7pTFcC8xj.jpg"></p><p>写于两年前 - 发布于 2022</p>]]></content>


    <summary type="html">&lt;p&gt;&lt;img src=&quot;https://edge.huangxin.org/images/legacy/vip2.loli.io/2022/07/03/9YKM6O7pTFcC8xj.jpg&quot;&gt;&lt;/p&gt;
&lt;p&gt;写于两年前 - 发布于 2022&lt;/p&gt;
</summary>


    <category term="曾经里" scheme="https://huangxin.dev/categories/past-stories/"/>
    
    
  </entry>
  
</feed>